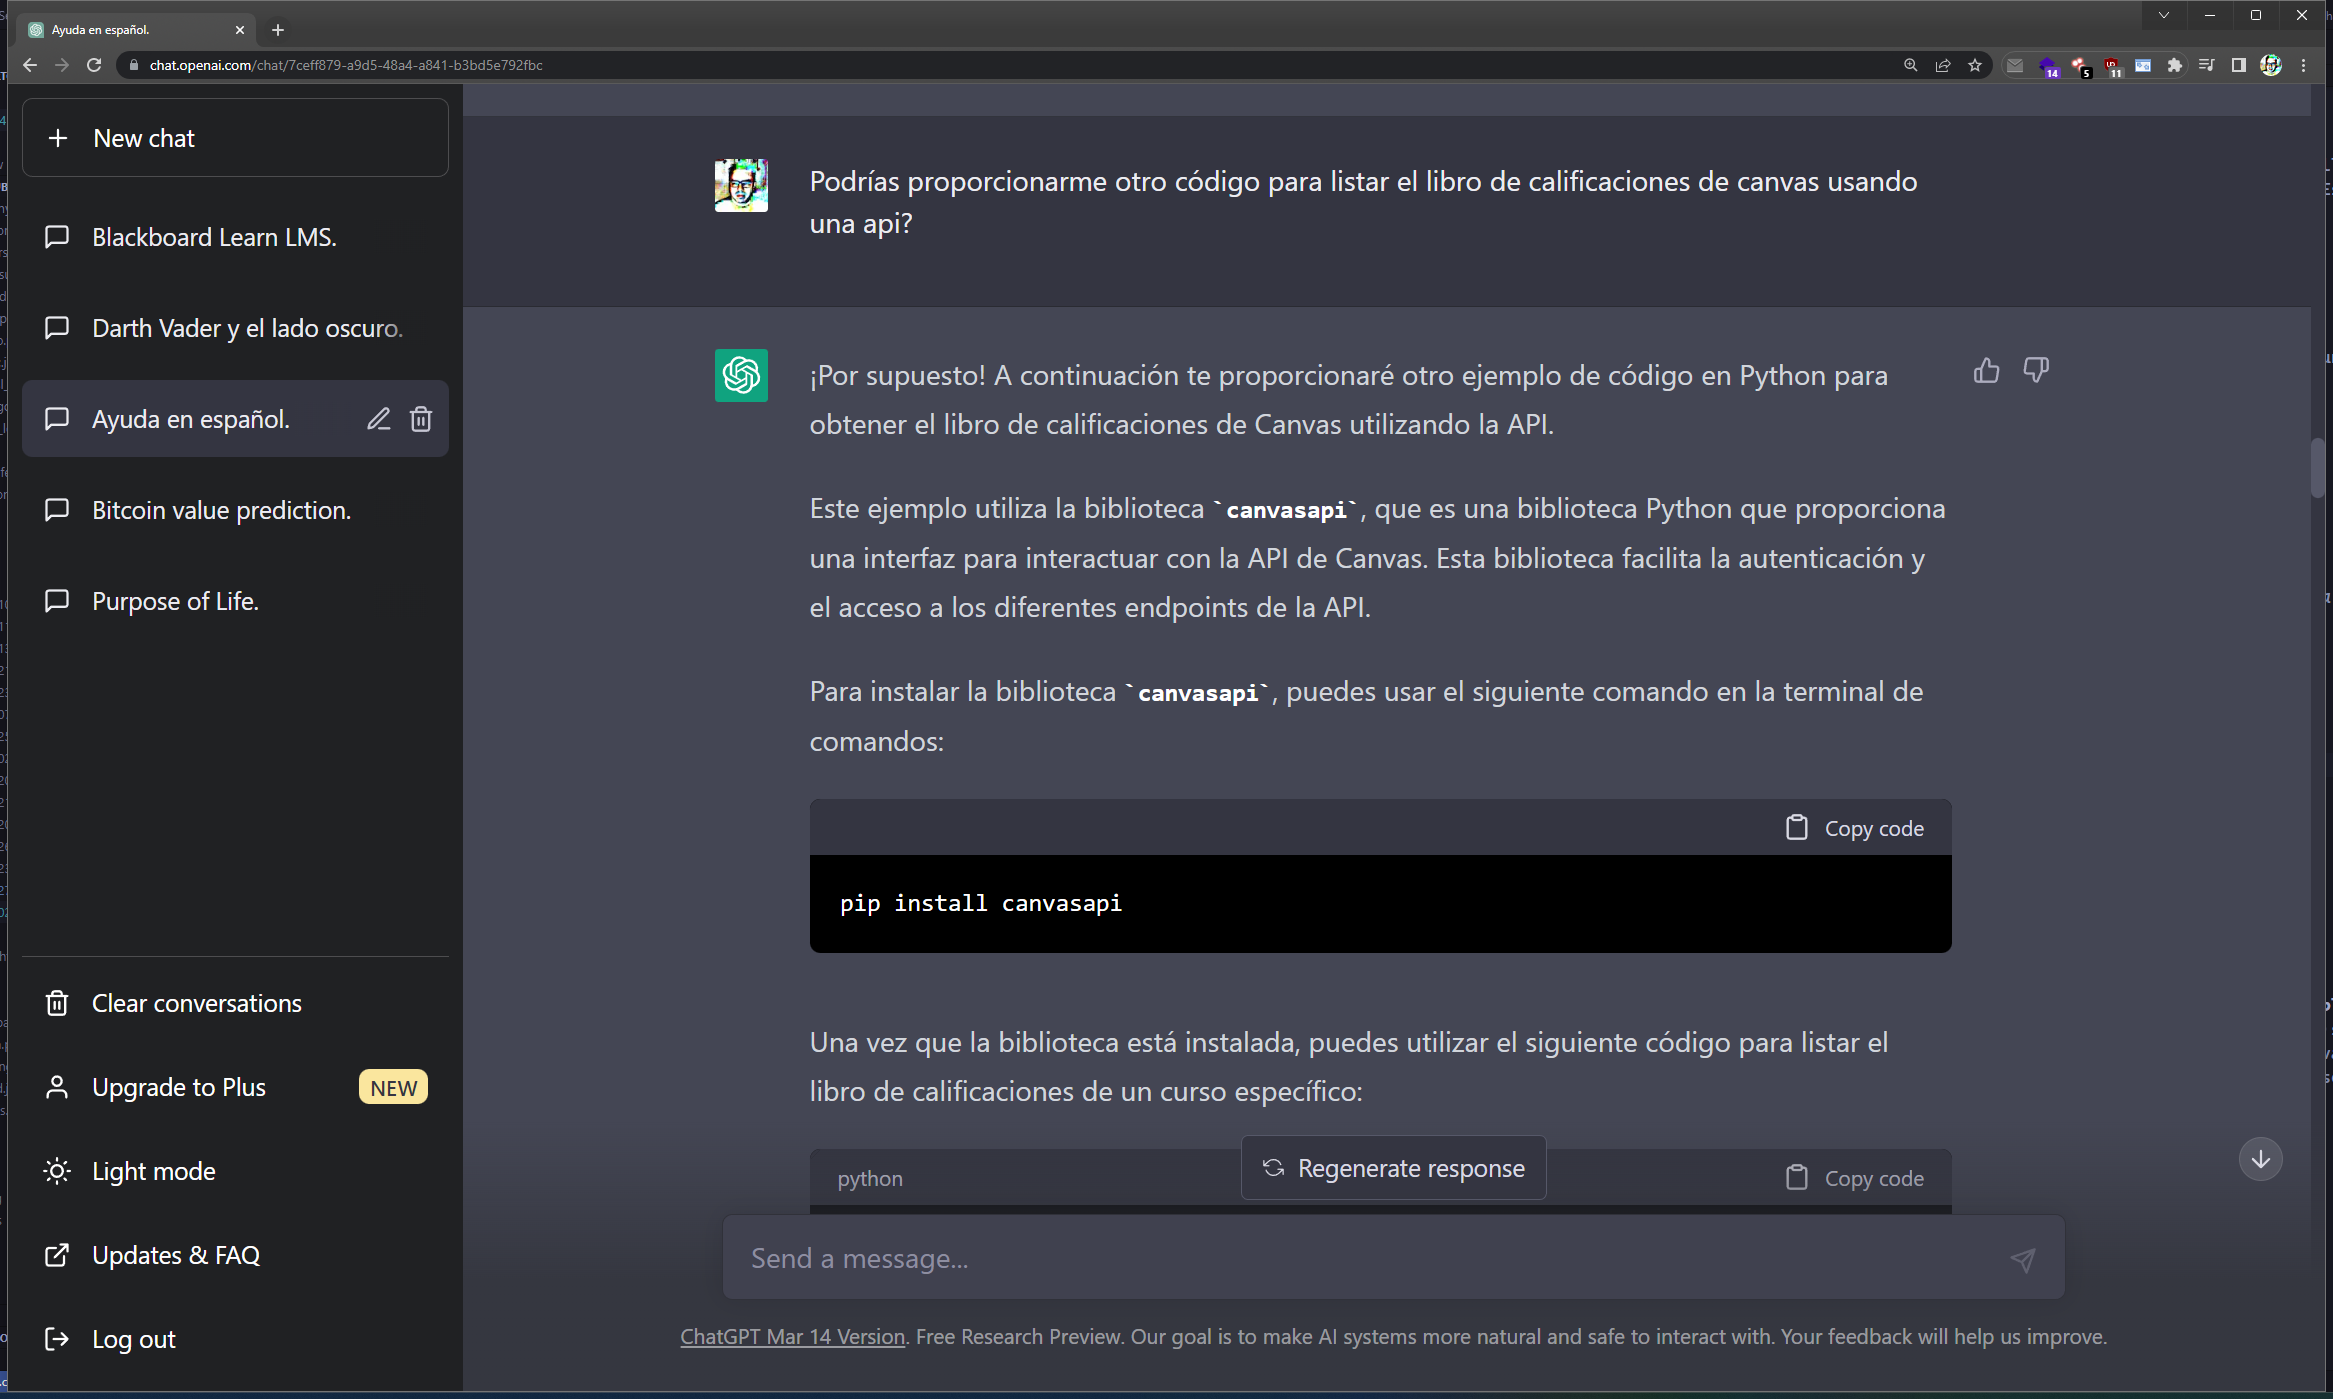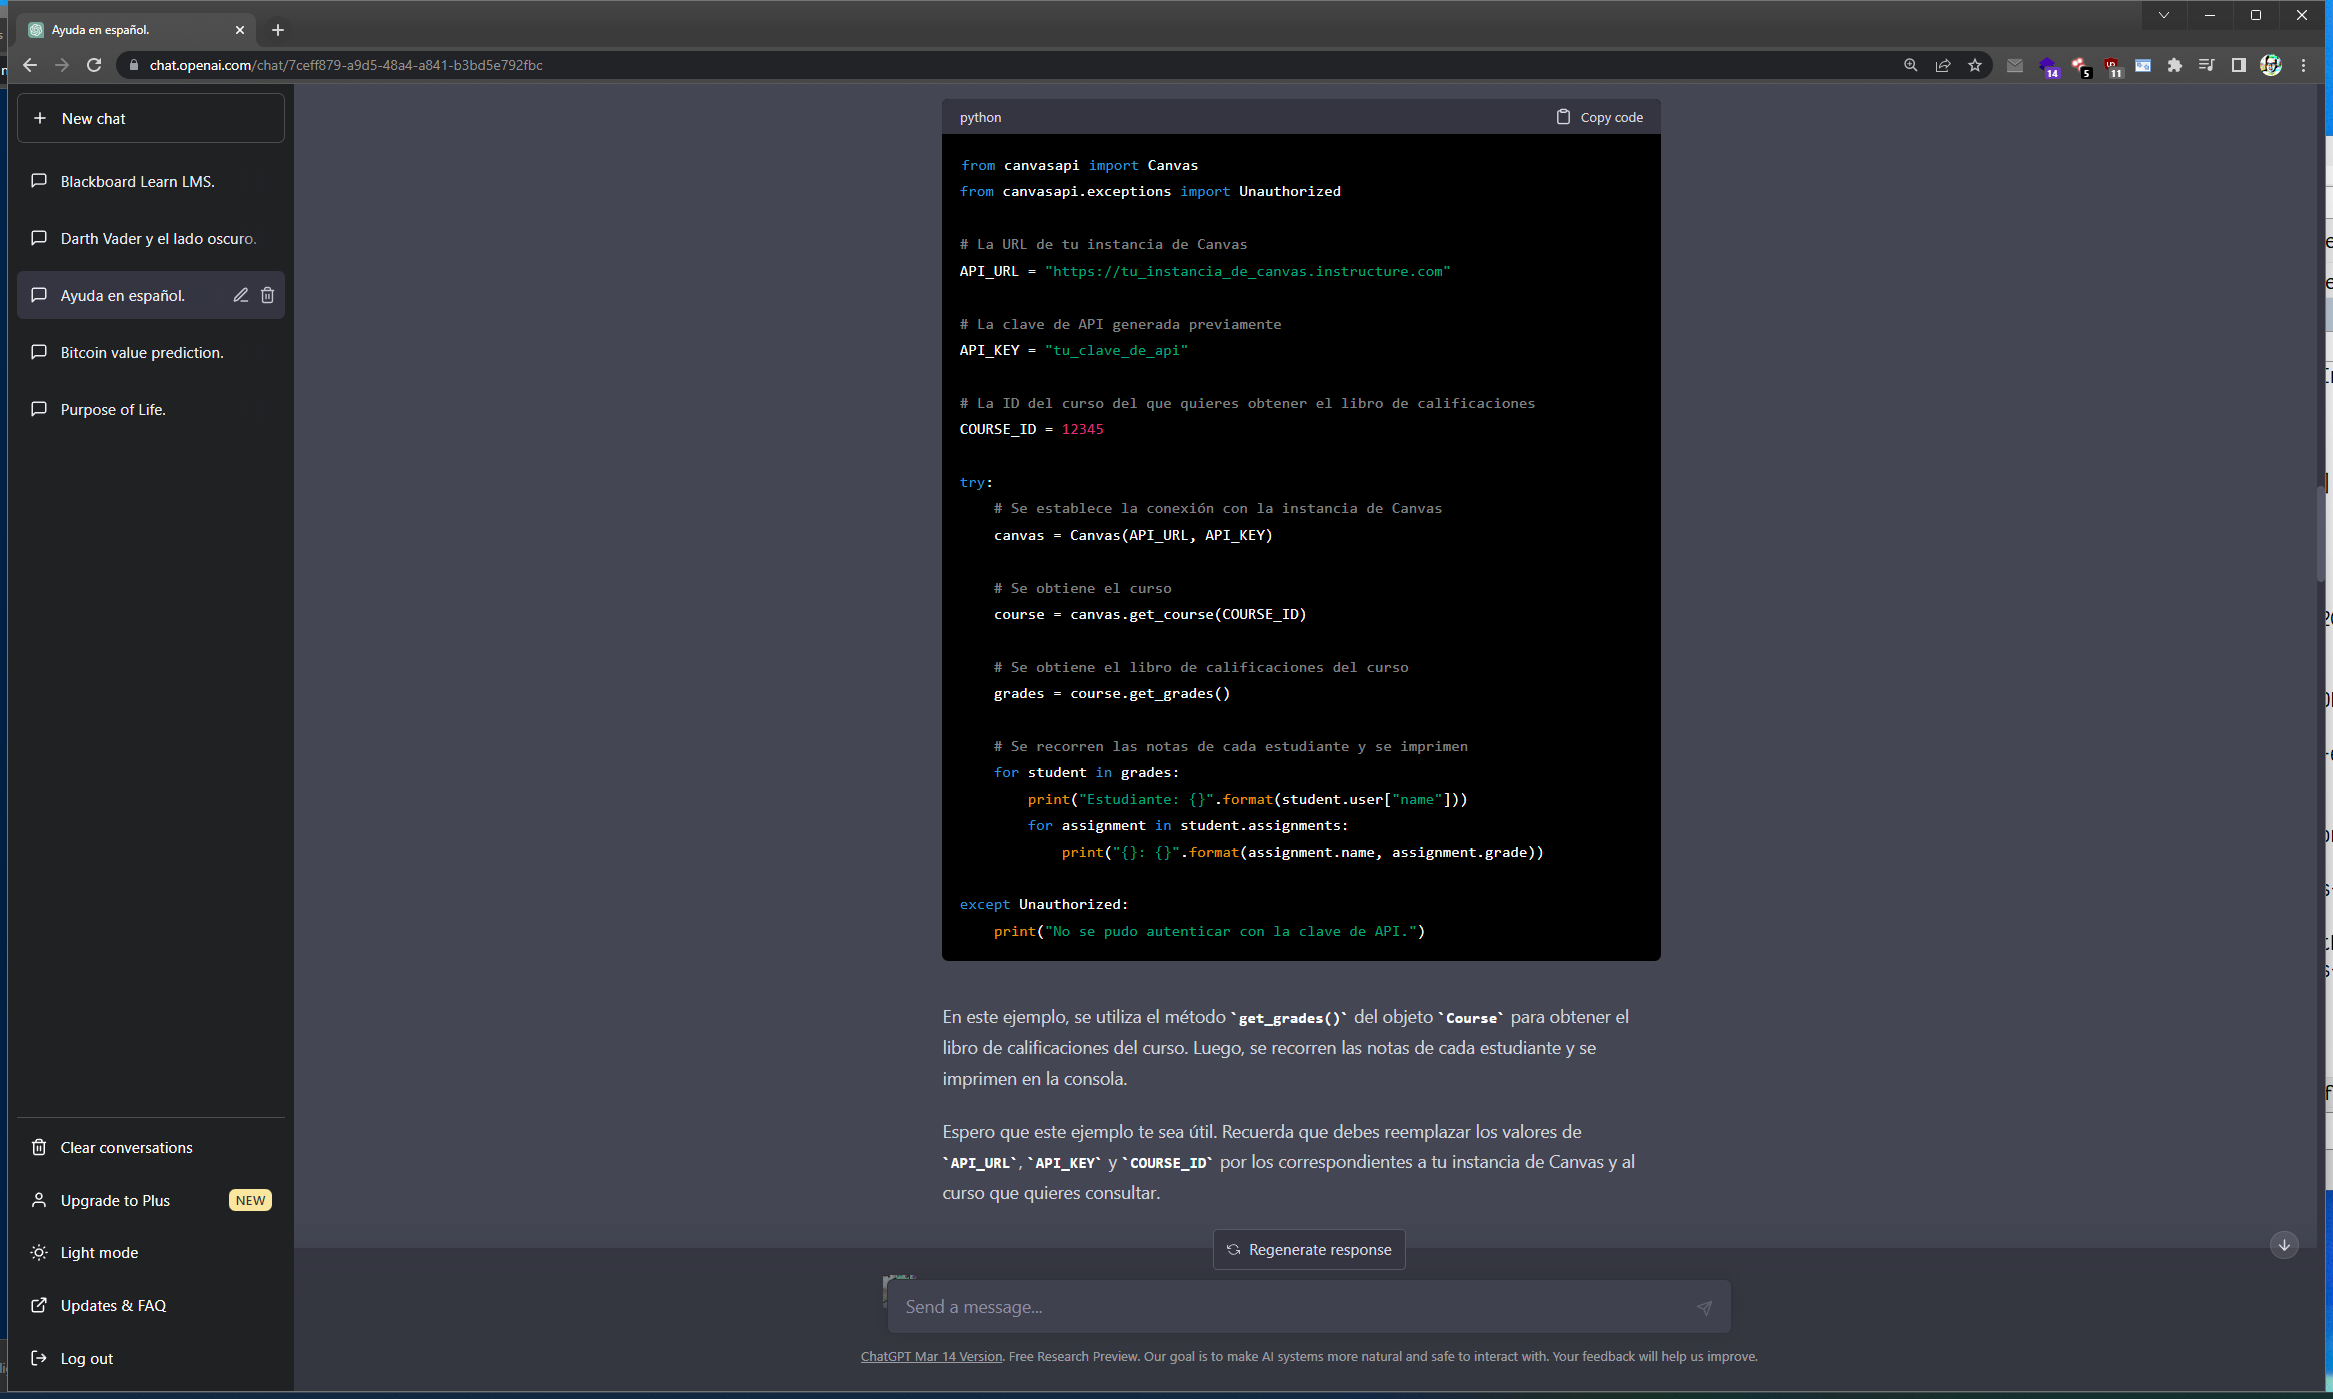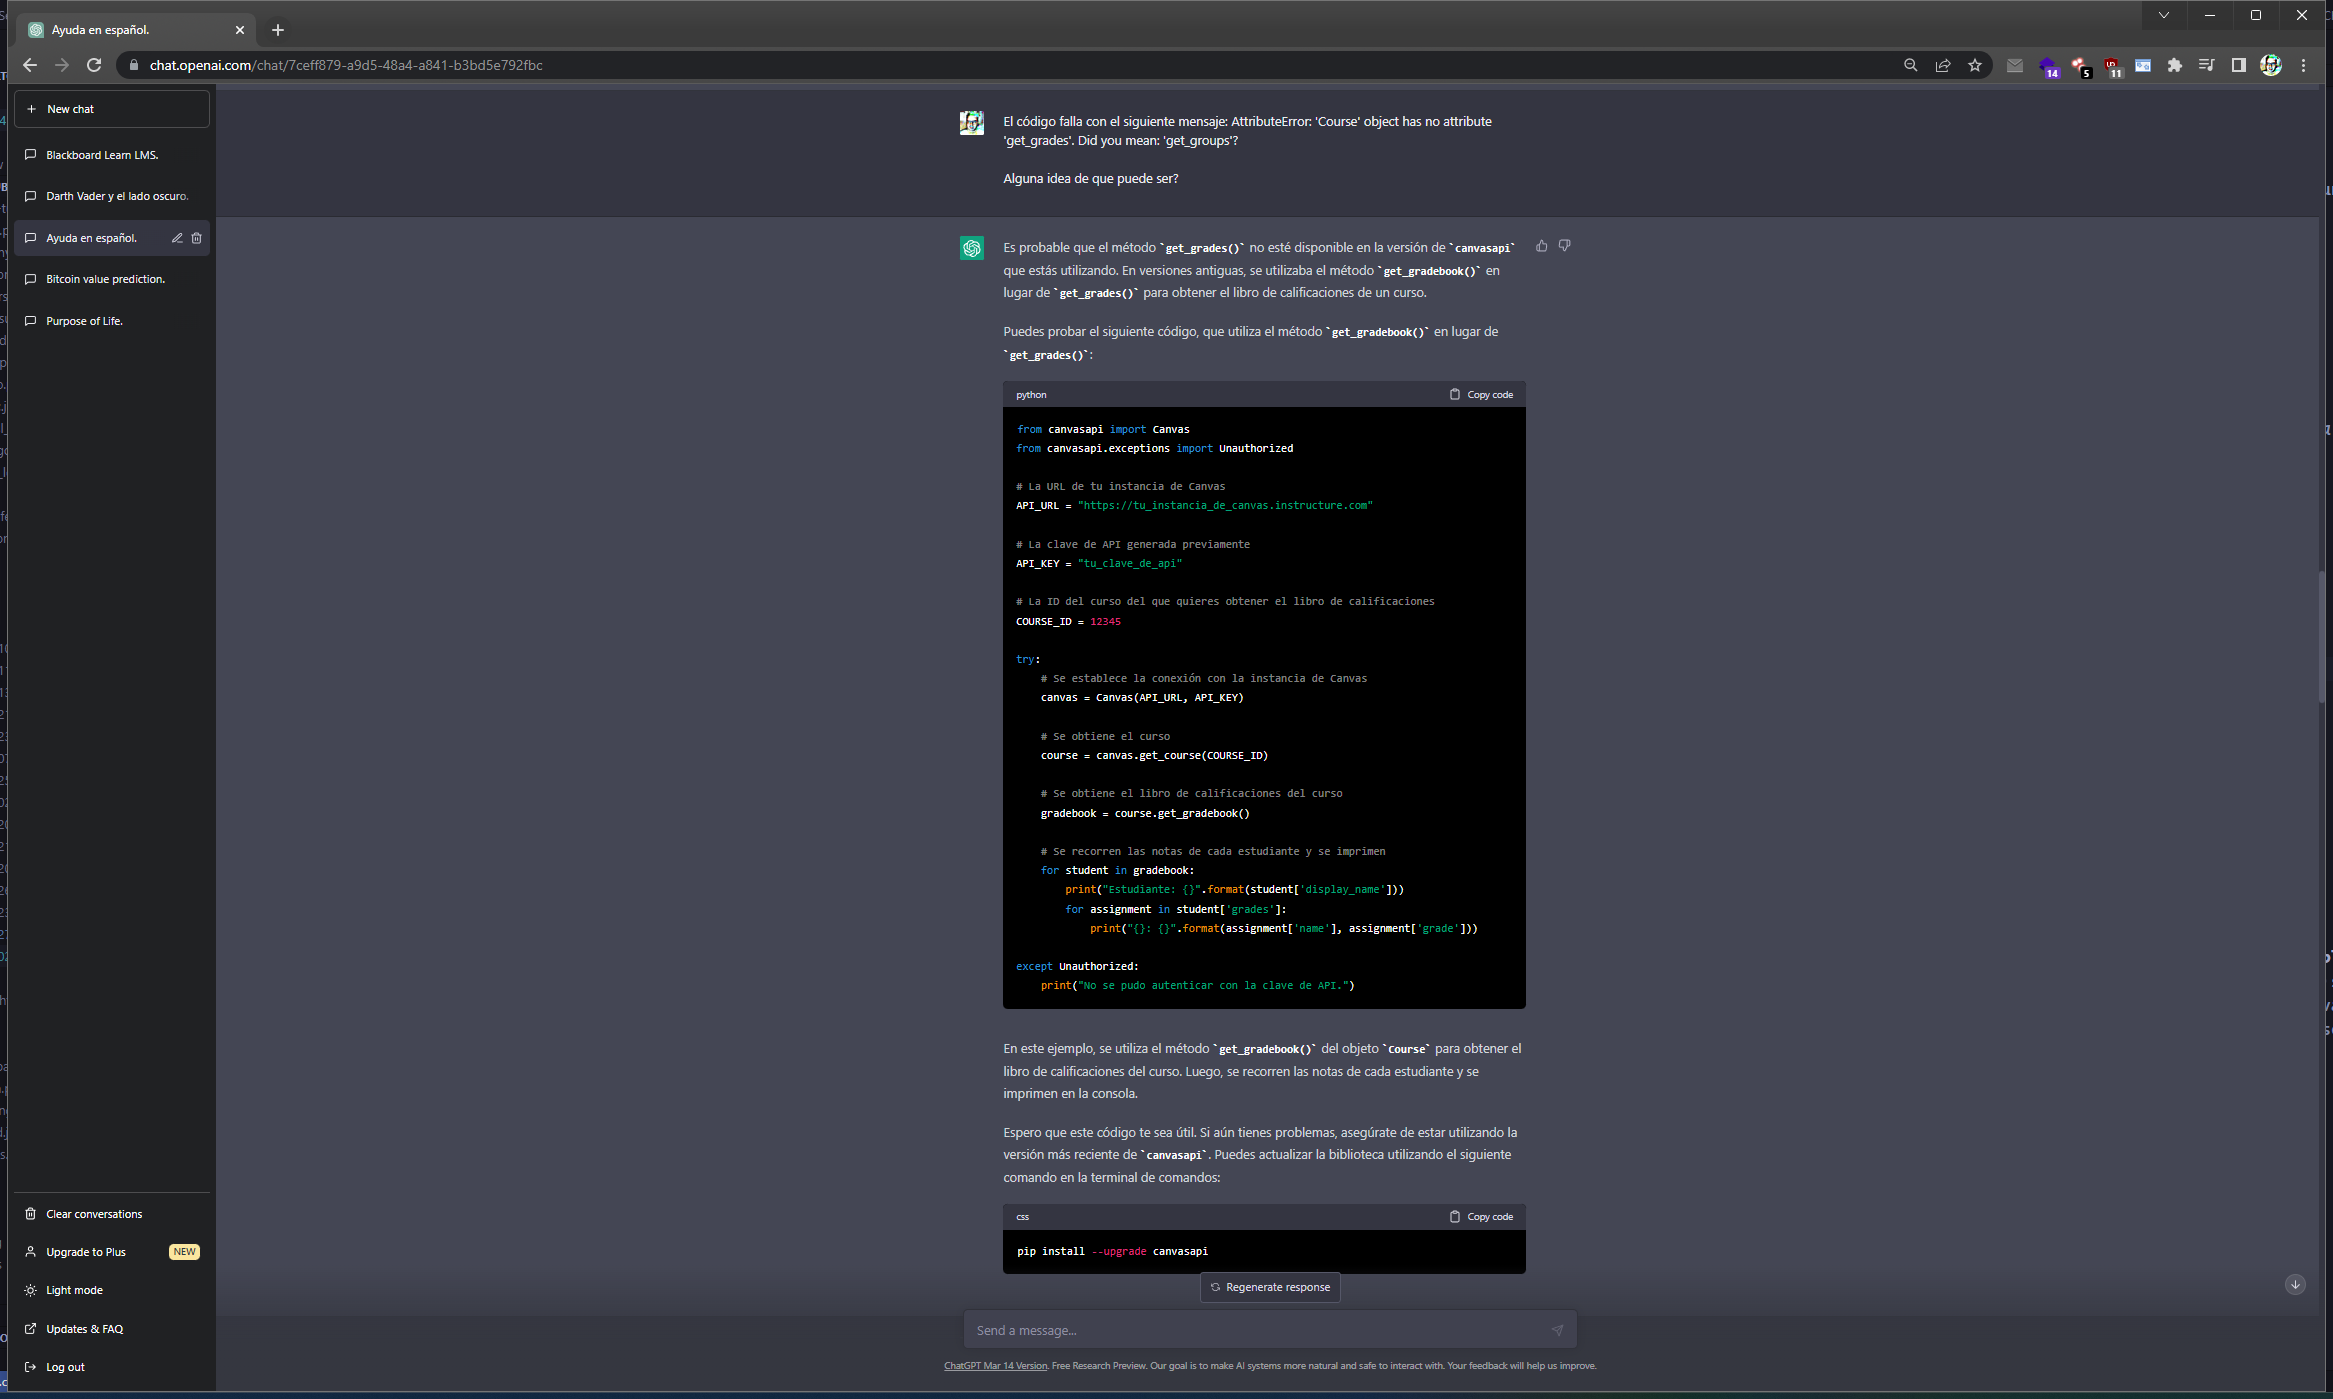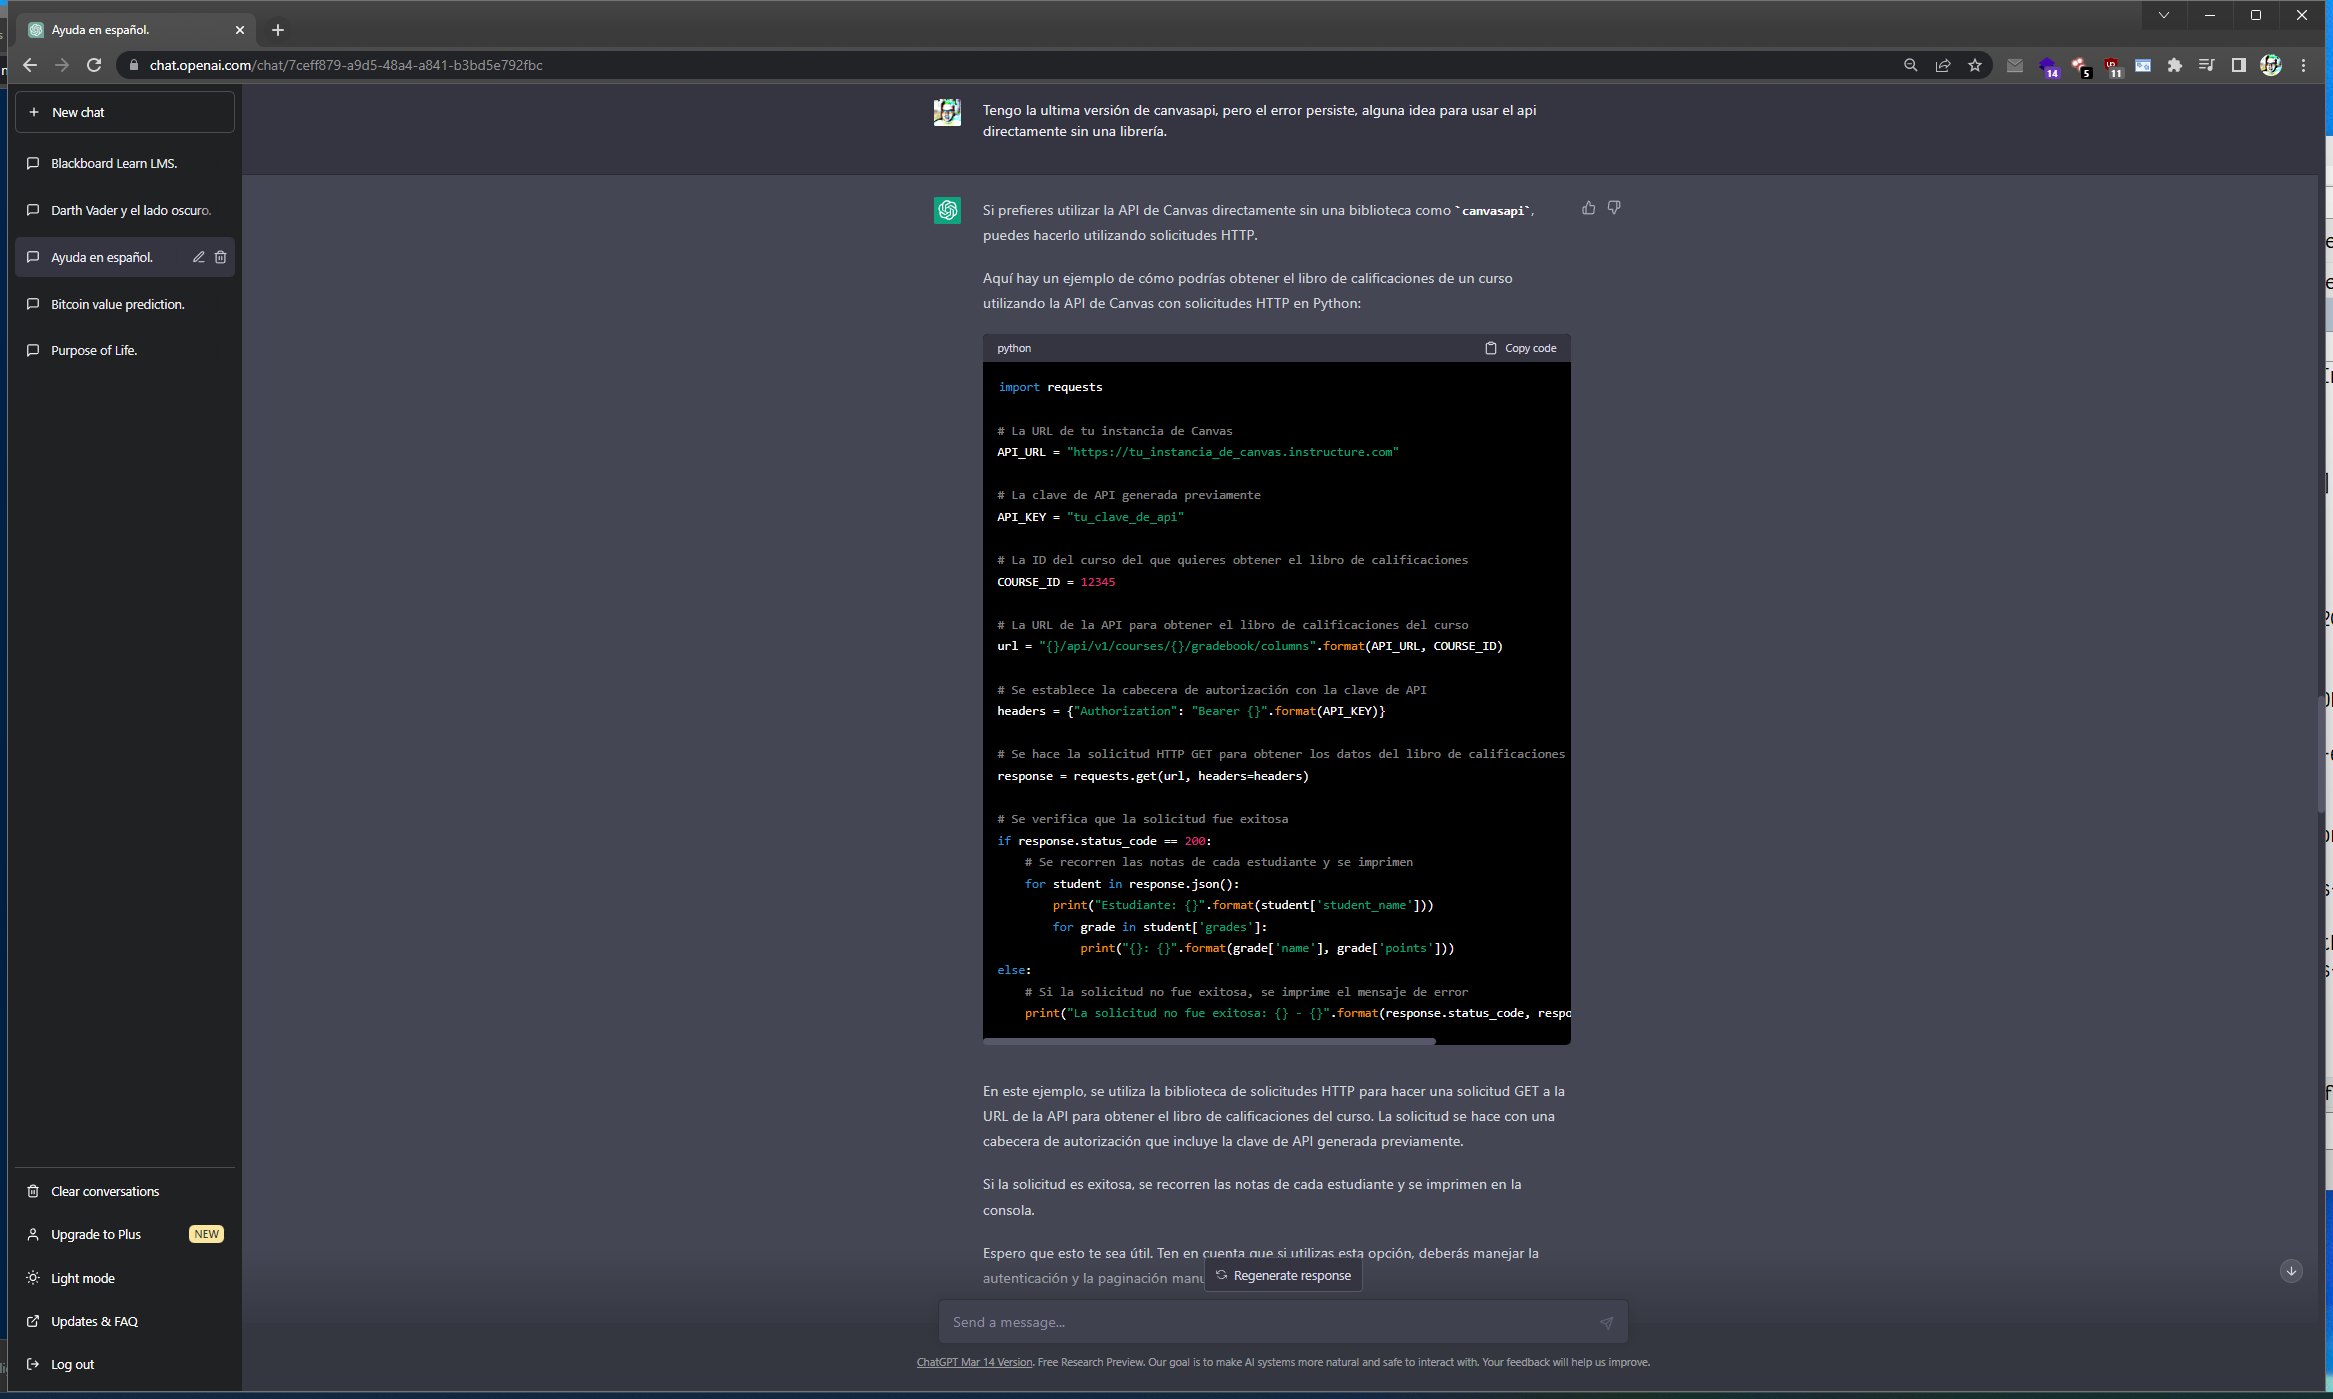
<?xml version="1.0" encoding="utf-8"?><feed xmlns="http://www.w3.org/2005/Atom" ><generator uri="https://jekyllrb.com/" version="4.3.3">Jekyll</generator><link href="https://nelbren.com/feed.xml" rel="self" type="application/atom+xml" /><link href="https://nelbren.com/" rel="alternate" type="text/html" /><updated>2024-11-29T15:21:21-06:00</updated><id>https://nelbren.com/feed.xml</id><title type="html">Nelbren</title><subtitle>Full Stack Developer</subtitle><author><name>Martin Nelbren Cuellar</name></author><entry><title type="html">Asistencia, Codificación e Integración de Desarrollo con Inteligencia Artificial ejecutándose Localmente</title><link href="https://nelbren.com/es/ollama/ai/chatgpt/api/Asistencia,_Codificaci%C3%B3n_e_Integraci%C3%B3n_de_Desarrollo_con_Inteligencia_Artificial_ejecut%C3%A1ndose_Localmente/" rel="alternate" type="text/html" title="Asistencia, Codificación e Integración de Desarrollo con Inteligencia Artificial ejecutándose Localmente" /><published>2024-11-29T00:00:00-06:00</published><updated>2024-11-29T12:00:00-06:00</updated><id>https://nelbren.com/es/ollama/ai/chatgpt/api/Asistencia,_Codificaci%C3%B3n_e_Integraci%C3%B3n_de_Desarrollo_con_Inteligencia_Artificial_ejecut%C3%A1ndose_Localmente</id><content type="html" xml:base="https://nelbren.com/es/ollama/ai/chatgpt/api/Asistencia,_Codificaci%C3%B3n_e_Integraci%C3%B3n_de_Desarrollo_con_Inteligencia_Artificial_ejecut%C3%A1ndose_Localmente/"><![CDATA[<h1 id="asistencia-codificación-e-integración-de-desarrollo-con-inteligencia-artificial-ejecutándose-localmente">Asistencia, Codificación e Integración de Desarrollo con Inteligencia Artificial ejecutándose Localmente</h1>

<h2 id="-demostración--en-youtube"><i class="fas fa-video"></i> Demostración  en Youtube</h2>

<!-- Courtesy of embedresponsively.com //-->
<div class="responsive-video-container">

  <iframe src="https://www.youtube.com/embed/mUvXVPP7EiA" frameborder="0" allowfullscreen=""></iframe>

</div>

<h2 id="capítulos">Capítulos</h2>

<ul>
  <li>
    <h3 id="0️⃣-️-monitoreo-de-recursos">0️⃣ 📊🖥️ Monitoreo de Recursos</h3>

    <blockquote>
      <h3 id="supervisión-y-análisis-de-uso-del-sistema">Supervisión y análisis de uso del sistema.</h3>
    </blockquote>

    <ul>
      <li>
        <h4 id="-visual-studio-code-">💻 <a href="https://code.visualstudio.com/">Visual Studio Code</a> +</h4>
      </li>
      <li>
        <h5 id="️-instalación-de-extensiones">🔨⬇️ Instalación de Extensiones:</h5>
        <ul>
          <li>
            <h6 id="-nvidia-monitor-y">📊 <a href="https://marketplace.visualstudio.com/items?itemName=ZiruiWang.nvidia-monitor">Nvidia Monitor</a> y</h6>
          </li>
          <li>
            <h6 id="-vscode-system-monitor">📈 <a href="https://marketplace.visualstudio.com/items?itemName=AndrewButson.vscode-system-monitor">vscode-system-monitor</a></h6>
          </li>
        </ul>
      </li>
    </ul>
  </li>
  <li>
    <h3 id="1️⃣--consultas-directas-a-ia">1️⃣ 🤖💬 Consultas Directas a IA</h3>

    <blockquote>
      <h3 id="interacción-puntual-con-ia-para-obtener-respuestas">Interacción puntual con IA para obtener respuestas.</h3>
    </blockquote>

    <ul>
      <li>
        <h4 id="-vsc-">💻 <a href="https://code.visualstudio.com/">VSC</a> +</h4>
      </li>
      <li>
        <h4 id="️-instalación-de-extensión">🔨⬇️ Instalación de Extensión:</h4>
        <ul>
          <li>
            <h5 id="-local-ai-pilot">🤖💬 <a href="https://marketplace.visualstudio.com/items?itemName=nr-codetools.localaipilot">Local AI Pilot</a></h5>
            <ul>
              <li>
                <h6 id="-instalación-de-ollama-">🦙 Instalación de <a href="https://ollama.com/download">Ollama</a> +</h6>
              </li>
              <li>
                <h6 id="️-instalación-de-modelos">⬇️ Instalación de Modelos:</h6>
                <div class="language-bash highlighter-rouge"><div class="highlight"><pre class="highlight"><code>ollama pull gemma:2b
ollama pull codegemma:2b
</code></pre></div>                </div>
              </li>
            </ul>
          </li>
        </ul>
      </li>
    </ul>
  </li>
  <li>
    <h3 id="2️⃣-️-asistencia-ia-en-código">2️⃣ 🤖🖊️ Asistencia IA en Código</h3>

    <blockquote>
      <h3 id="autocompletado-inteligente-en-el-editor">Autocompletado inteligente en el editor.</h3>
    </blockquote>

    <ul>
      <li>
        <h4 id="-vsc--1">💻 <a href="https://code.visualstudio.com/">VSC</a> +</h4>
      </li>
      <li>
        <h4 id="️-instalación-de-extensión-1">🔨⬇️ Instalación de Extensión:</h4>
        <ul>
          <li>
            <h5 id="-llama-coder">🤖🖊 <a href="https://marketplace.visualstudio.com/items?itemName=ex3ndr.llama-coder">Llama Coder</a></h5>
            <ul>
              <li>
                <h6 id="-instalaciónuso-de-ollama-">🦙 Instalación/Uso de <a href="https://ollama.com/download">Ollama</a> +</h6>
              </li>
              <li>
                <h6 id="️-instalación-del-modelo">⬇️ Instalación del Modelo:</h6>
                <div class="language-bash highlighter-rouge"><div class="highlight"><pre class="highlight"><code>ollama pull stable-code:3b-code-q4_0
</code></pre></div>                </div>
              </li>
            </ul>
          </li>
        </ul>
      </li>
    </ul>
  </li>
  <li>
    <h3 id="3️⃣--codificación-integral-con-ia">3️⃣ 🤖🦾 Codificación Integral con IA</h3>

    <blockquote>
      <h3 id="ia-codifica-compila-prueba-y-mejora-automáticamente">IA codifica, compila, prueba y mejora automáticamente.</h3>
    </blockquote>

    <ul>
      <li>
        <h4 id="-vsc--2">💻 <a href="https://code.visualstudio.com/">VSC</a> +</h4>
      </li>
      <li>
        <h4 id="️-instalación-de-extensión-2">🔨⬇️ Instalación de Extensión:</h4>
        <ul>
          <li>
            <h5 id="-cline-prev-claude-dev">🤖🦾 <a href="https://marketplace.visualstudio.com/items?itemName=saoudrizwan.claude-dev">Cline (prev. Claude Dev)</a></h5>
            <ul>
              <li>
                <h5 id="-instalaciónuso-de-ollama--1">🦙 Instalación/Uso de <a href="https://ollama.com/download">Ollama</a> +</h5>
              </li>
              <li>
                <h5 id="️-instalación-de-modelos-1">⬇️ Instalación de Modelos:</h5>
                <div class="language-bash highlighter-rouge"><div class="highlight"><pre class="highlight"><code>ollama pull hhao/qwen2.5-coder-tools:0.5b
ollama pull hhao/qwen2.5-coder-tools:32b
</code></pre></div>                </div>
              </li>
            </ul>
          </li>
        </ul>
      </li>
    </ul>
  </li>
  <li>
    <h3 id="4️⃣-️-acceso-al-api-de-ia">4️⃣ 🤖⚙️ Acceso al API de IA</h3>

    <blockquote>
      <h3 id="integración-de-ia-mediante-programación-directa">Integración de IA mediante programación directa.</h3>
    </blockquote>

    <ul>
      <li>
        <h4 id="-instalaciónuso-de-ollama--hhaoqwen25-coder-tools32b">🦙 Instalación/Uso de <a href="https://ollama.com/download">Ollama</a> + <code class="language-plaintext highlighter-rouge">hhao/qwen2.5-coder-tools:32b</code></h4>
      </li>
      <li>
        <h4 id="-vsc--3">💻 <a href="https://code.visualstudio.com/">VSC</a> +</h4>
      </li>
      <li>
        <h4 id="-python-y">🐍 <a href="https://www.python.org/">Python</a> y</h4>
        <ul>
          <li>⚙️ libreria <a href="https://pypi.org/project/ollama/">ollama</a>
            <ul>
              <li>
                <h4 id="️-instalación-de-ambiente-de-python">⬇️ Instalación de ambiente de Python</h4>
                <div class="language-bash highlighter-rouge"><div class="highlight"><pre class="highlight"><code>python <span class="nt">-m</span> venv .venv
</code></pre></div>                </div>
              </li>
              <li>
                <h4 id="️-activación-de-ambiente">⚙️ Activación de ambiente:</h4>
                <ul>
                  <li>
                    <h5 id="-powershell">🪟 (PowerShell):</h5>
                    <div class="language-bash highlighter-rouge"><div class="highlight"><pre class="highlight"><code>.venv/Scripts/activate 
</code></pre></div>                    </div>
                  </li>
                  <li>
                    <h5 id="--">🍎 | 🐧:</h5>
                    <div class="language-bash highlighter-rouge"><div class="highlight"><pre class="highlight"><code><span class="nb">source</span> .venv/bin/activate
</code></pre></div>                    </div>
                  </li>
                </ul>
              </li>
              <li>
                <h4 id="️-instalación-de-libreria">⬇️ Instalación de libreria:</h4>
                <div class="language-bash highlighter-rouge"><div class="highlight"><pre class="highlight"><code>pip <span class="nb">install </span>ollama
</code></pre></div>                </div>
              </li>
            </ul>
          </li>
        </ul>
      </li>
      <li>
        <h4 id="️-código-apipy">⚙️ Código <code class="language-plaintext highlighter-rouge">api.py</code></h4>
        <div class="language-py highlighter-rouge"><div class="highlight"><pre class="highlight"><code><span class="kn">import</span> <span class="n">ollama</span>
<span class="n">response</span> <span class="o">=</span> <span class="n">ollama</span><span class="p">.</span><span class="nf">chat</span><span class="p">(</span><span class="n">model</span><span class="o">=</span><span class="sh">'</span><span class="s">hhao/qwen2.5-coder-tools:32b</span><span class="sh">'</span><span class="p">,</span>
                    <span class="n">messages</span><span class="o">=</span><span class="p">[</span>
                          <span class="p">{</span><span class="sh">'</span><span class="s">role</span><span class="sh">'</span><span class="p">:</span> <span class="sh">'</span><span class="s">user</span><span class="sh">'</span><span class="p">,</span>
                          <span class="sh">'</span><span class="s">content</span><span class="sh">'</span><span class="p">:</span> <span class="sh">'</span><span class="s">Cual es tu modelo de LLM?</span><span class="sh">'</span><span class="p">,</span>
                          <span class="p">},</span> <span class="p">])</span>
<span class="nf">print</span><span class="p">(</span><span class="n">response</span><span class="p">[</span><span class="sh">'</span><span class="s">message</span><span class="sh">'</span><span class="p">][</span><span class="sh">'</span><span class="s">content</span><span class="sh">'</span><span class="p">])</span>
</code></pre></div>        </div>
      </li>
    </ul>
  </li>
</ul>

<h2 id="referencias">Referencias</h2>

<ul>
  <li><a href="https://www.youtube.com/watch?v=pYRZgz8w7i4">🔥 INSTALA Qwen 2.5-Coder en Cursor | ¿Mejor que GPT-4o? Pruébalo 🚀</a></li>
  <li><a href="https://www.youtube.com/watch?v=P5YXTTS8OFk">Cline with Ollama - Install and Test Locally - AI Coding Assistant - VSCode Extension</a></li>
</ul>]]></content><author><name>Martin Nelbren Cuellar</name></author><category term="es" /><category term="ollama" /><category term="ai" /><category term="chatgpt" /><category term="api" /><category term="ai" /><category term="ollama" /><category term="chatgpt" /><category term="api" /><summary type="html"><![CDATA[Asistencia, Codificación e Integración de Desarrollo con Inteligencia Artificial ejecutándose Localmente]]></summary></entry><entry><title type="html">Calificaciones ponderadas automáticamente y ChatGPT v2</title><link href="https://nelbren.com/es/blackboard/canvas/chatgpt/grades-weighted-automatically_and_ChatGPT_v2/" rel="alternate" type="text/html" title="Calificaciones ponderadas automáticamente y ChatGPT v2" /><published>2024-03-07T00:00:00-06:00</published><updated>2024-03-07T11:58:27-06:00</updated><id>https://nelbren.com/es/blackboard/canvas/chatgpt/grades-weighted-automatically_and_ChatGPT_v2</id><content type="html" xml:base="https://nelbren.com/es/blackboard/canvas/chatgpt/grades-weighted-automatically_and_ChatGPT_v2/"><![CDATA[<h1 id="calificaciones-ponderadas-automáticamente-y-chatgpt-v2">Calificaciones ponderadas automáticamente y ChatGPT v2</h1>

<h2 id="introducción">Introducción</h2>

<p><img src="/assets/images/posts/grades-weighted-automatically_and_ChatGPT/examenes-memes-2490761.jpg" alt="" /></p>

<p>Los sistemas de gestión de aprendizaje (LMS por sus siglas en inglés) son herramientas fundamentales para administrar el proceso educativo. Entre sus funciones principales se encuentra la gestión de calificaciones, que permite evaluar el desempeño de los estudiantes en diversas actividades y calcular su calificación final en el curso.</p>

<p>Sin embargo, en muchos casos es necesario integrar estas calificaciones con otros sistemas externos. Esto plantea la oportunidad de desarrollar soluciones que faciliten la transferencia de datos de calificaciones entre el LMS y otros sistemas, optimizando así la gestión académica y administrativa.</p>

<hr />

<h2 id="qué-es-blackboard">¿Qué es Blackboard?</h2>

<p><img src="/assets/images/posts/grades-weighted-automatically_and_ChatGPT/Blackboard.png" alt="" /></p>

<p>El primer LMS utilizado fue <a href="https://www.blackboard.com/">Blackboard Learn</a>, una plataforma en línea que capacita a los profesores para crear y gestionar cursos virtuales, y a los estudiantes para acceder a estos cursos, interactuar con el material de estudio y completar actividades y evaluaciones en línea.</p>

<p>Aunque el uso del LMS fue efectivo hasta este punto 👍, se identificó un problema: la necesidad de transferir las calificaciones finales ponderadas a otro sistema de gestión de calificaciones.”</p>

<hr />

<h2 id="sistema-de-calificaciones">Sistema de Calificaciones</h2>

<p><img src="/assets/images/posts/grades-weighted-automatically_and_ChatGPT/Calificaciones.jpg" alt="" /></p>

<p>En este sistema, es necesario aplicar una ponderación a la calificación máxima de cada examen (un total de 3), además de considerar un acumulativo. Esta ponderación se realizaba manualmente, lo que generalmente funcionaba correctamente. Sin embargo, en algunos casos donde las calificaciones excedían la ponderación prevista, era necesario realizar redistribuciones.</p>

<p>Esta situación identificó la necesidad de mejorar el proceso. Surgió así la oportunidad de desarrollar una solución que automatizara la distribución de la nota final, permitiendo ajustar las ponderaciones según se requiera y garantizando un cálculo más preciso mediante el uso de decimales. La intervención humana, habitual en estos casos, suele propiciar errores en los cálculos, por lo que una solución automatizada sería más confiable y eficiente.</p>

<hr />

<h2 id="solución-i">Solución I</h2>

<p><img src="/assets/images/posts/grades-weighted-automatically_and_ChatGPT/6133884.png" alt="" /></p>

<p>La primera solución implementada fue bastante básica, ya que su único propósito era generar las calificaciones ponderadas. Utilizando la funcionalidad de exportación a formato CSV del sistema LMS Blackboard, se desarrolló un programa denominado ‘<a href="https://github.com/nelbren/grades-weighted-automatically/tree/0a93a42a4e6e5df494d7e03378f52e70030e92f2">grades-weighted-automatically</a>’, el cual analizaba los archivos generados para obtener el resultado deseado. Aunque esta solución cumplió su función durante un tiempo determinado, pronto se identificaron limitaciones y oportunidades de mejora.</p>

<hr />

<h2 id="cambio-de-lms">Cambio de LMS</h2>

<p><img src="/assets/images/posts/grades-weighted-automatically_and_ChatGPT/Cambio.png" alt="" /></p>

<p>La institución educativa migró su plataforma de gestión de aprendizaje (<strong>LMS</strong>) de <strong>Blackboard</strong> a <strong>Canvas</strong>.</p>

<hr />

<h2 id="qué-es-canvas">¿Qué es Canvas?</h2>

<p><img src="/assets/images/posts/grades-weighted-automatically_and_ChatGPT/Canvas_Stacked_ByInstructure_Color_RGB.png" alt="" /></p>

<p><a href="https://www.instructure.com/lms-learning-management-system">Canvas</a> es un sistema de gestión de aprendizaje en línea que proporciona una amplia variedad de herramientas y funcionalidades diseñadas para facilitar la enseñanza y el aprendizaje a través de la web. Destaca por su enfoque en la usabilidad y la experiencia del usuario, lo que lo convierte en una opción popular entre educadores y estudiantes.</p>

<hr />

<h2 id="solución-ii">Solución II</h2>

<p><img src="/assets/images/posts/grades-weighted-automatically_and_ChatGPT/6133884.png" alt="" /></p>

<p>Esta segunda solución también conserva su simplicidad, ya que una vez más el objetivo es generar las calificaciones ponderadas. Utilizando el sistema de LMS Canvas, es posible exportar las calificaciones a un archivo CSV. Para adaptarse a este cambio, se realiza una modificación en el programa ‘<a href="https://github.com/nelbren/grades-weighted-automatically/tree/7af1b12381ec6e6af18f0519a4e00b5d3f2a2c42">grades-weighted-automatically</a>’, manteniendo el proceso de lectura de los archivos generados para obtener el resultado deseado.</p>

<p>Al concluir la migración al nuevo LMS, surgió la pregunta: <strong>¿sería posible eliminar el paso de exportación y consultar directamente al LMS utilizando su API?</strong> Motivados por esta idea, se decidió investigar la viabilidad de esta opción, y se solicitó la asistencia de ChatGPT para explorar esta posibilidad.</p>

<hr />

<h2 id="qué-es-una-api">¿Qué es una API?</h2>

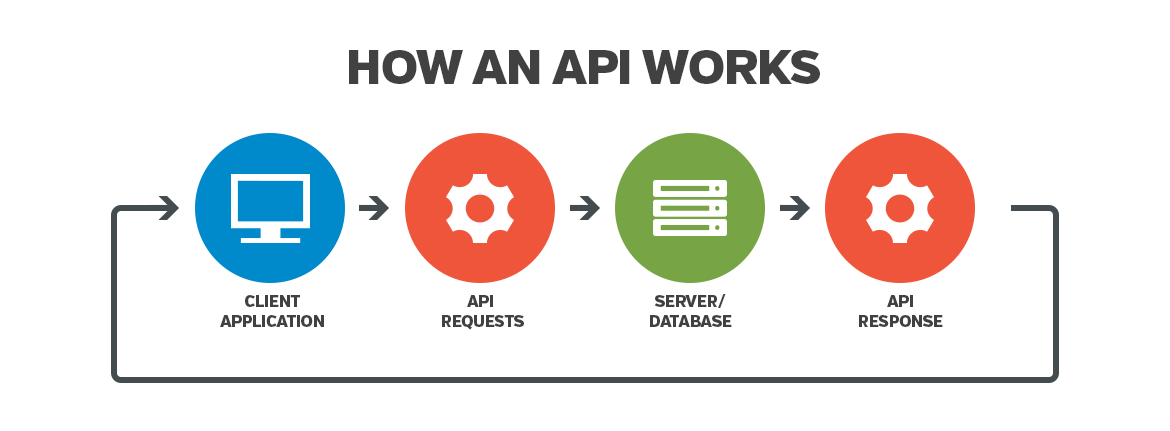
<p><img src="/assets/images/posts/grades-weighted-automatically_and_ChatGPT/API-EN-1.png" alt="" /></p>

<p>Una API (Interfaz de Programación de Aplicaciones) en el desarrollo de sistemas es un conjunto de reglas y definiciones que permiten que distintas aplicaciones se comuniquen entre sí. Básicamente, una API define cómo interactuar con un sistema o servicio determinado, especificando qué operaciones se pueden realizar y cómo se deben enviar y recibir los datos.</p>

<h2 id="qué-es-chatgpt">¿Qué es ChatGPT?</h2>

<p><img src="/assets/images/posts/grades-weighted-automatically_and_ChatGPT/ChatGPT.png" alt="" /></p>

<p><strong>Estamos en una fase emocionante en el desarrollo de la tecnología de Inteligencia Artificial (IA). Los continuos avances en la investigación y desarrollo de la IA están posibilitando la creación de aplicaciones cada vez más sofisticadas y complejas que impactan diversos campos.</strong></p>

<p>La IA ha encontrado aplicaciones crecientes en campos como la <strong>medicina</strong>, la <strong>educación</strong>, la <strong>investigación científica</strong>, el <strong>transporte</strong> y la <strong>manufactura</strong>. Estos avances han propiciado mejoras significativas en la eficiencia, precisión y productividad en estas áreas.</p>

<p>Un modelo de lenguaje de IA conocido como <strong><a href="https://chat.openai.com/chat">ChatGTP</a></strong> está desempeñando un papel crucial en el impulso hacia un futuro más inteligente y sofisticado. Aunque esta herramienta reconoce sus limitaciones en comparación con la creatividad humana, está comprometida a ayudar y espera seguir haciéndolo en el futuro. (Esta introducción ha sido generada por ChatGPT, con pequeñas modificaciones)</p>

<h2 id="ayuda-de-chatgtp">Ayuda de ChatGTP</h2>

<p>A continuación, se presentan las consultas, ayuda y soporte recibido por parte de la inteligencia artificial.</p>

<ol>
  <li>
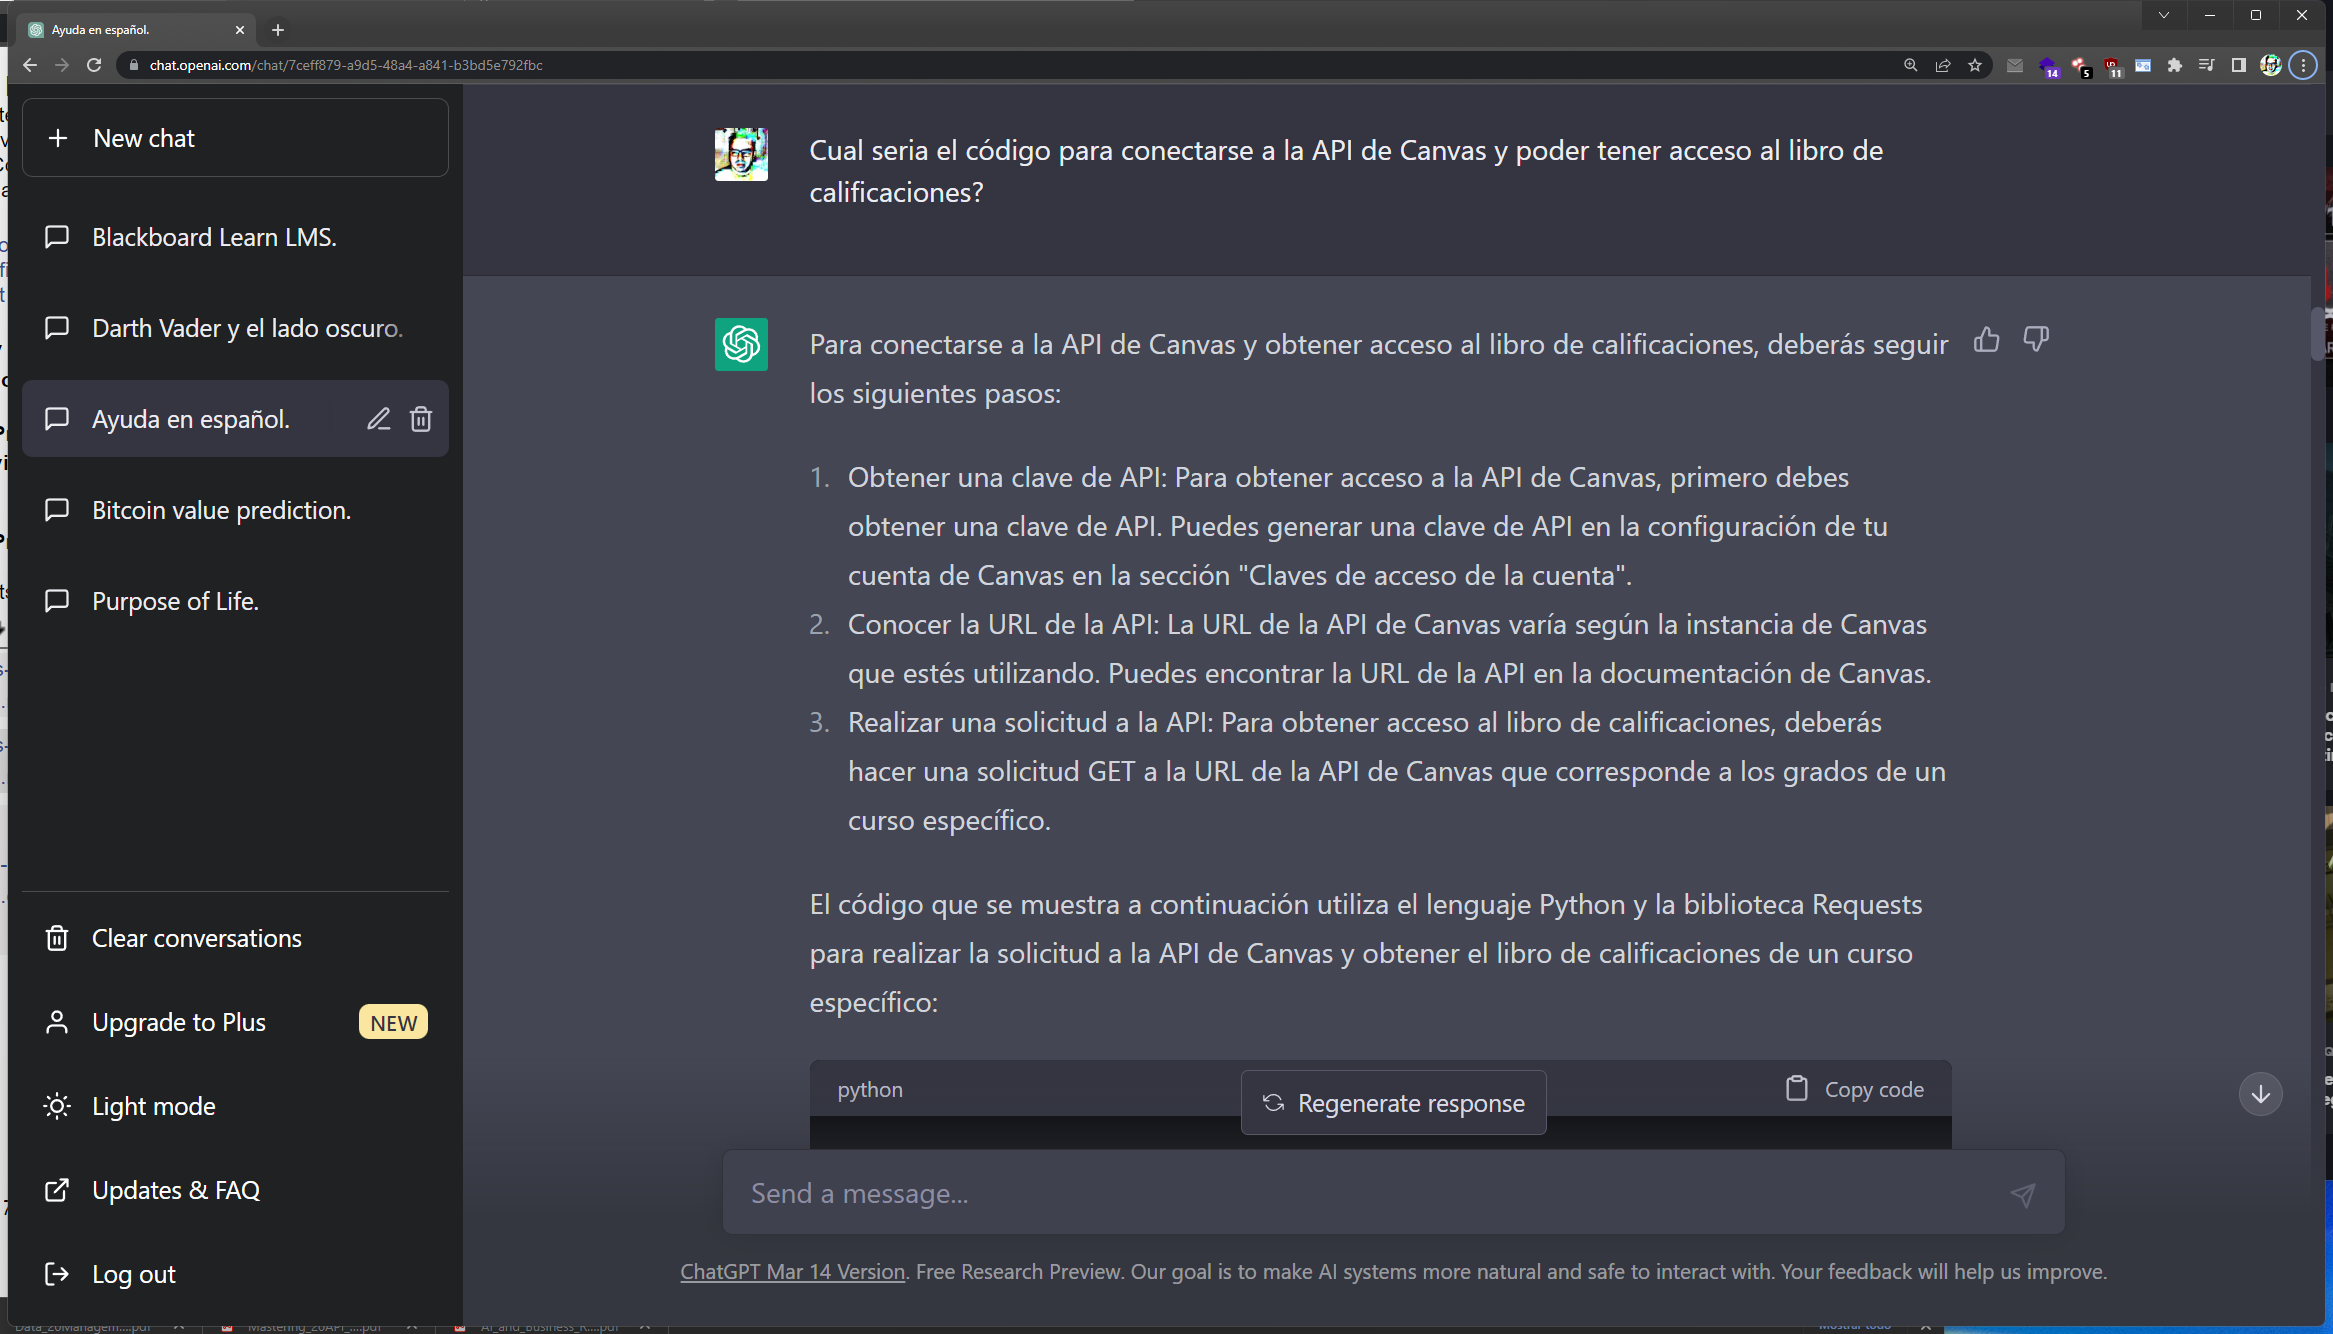
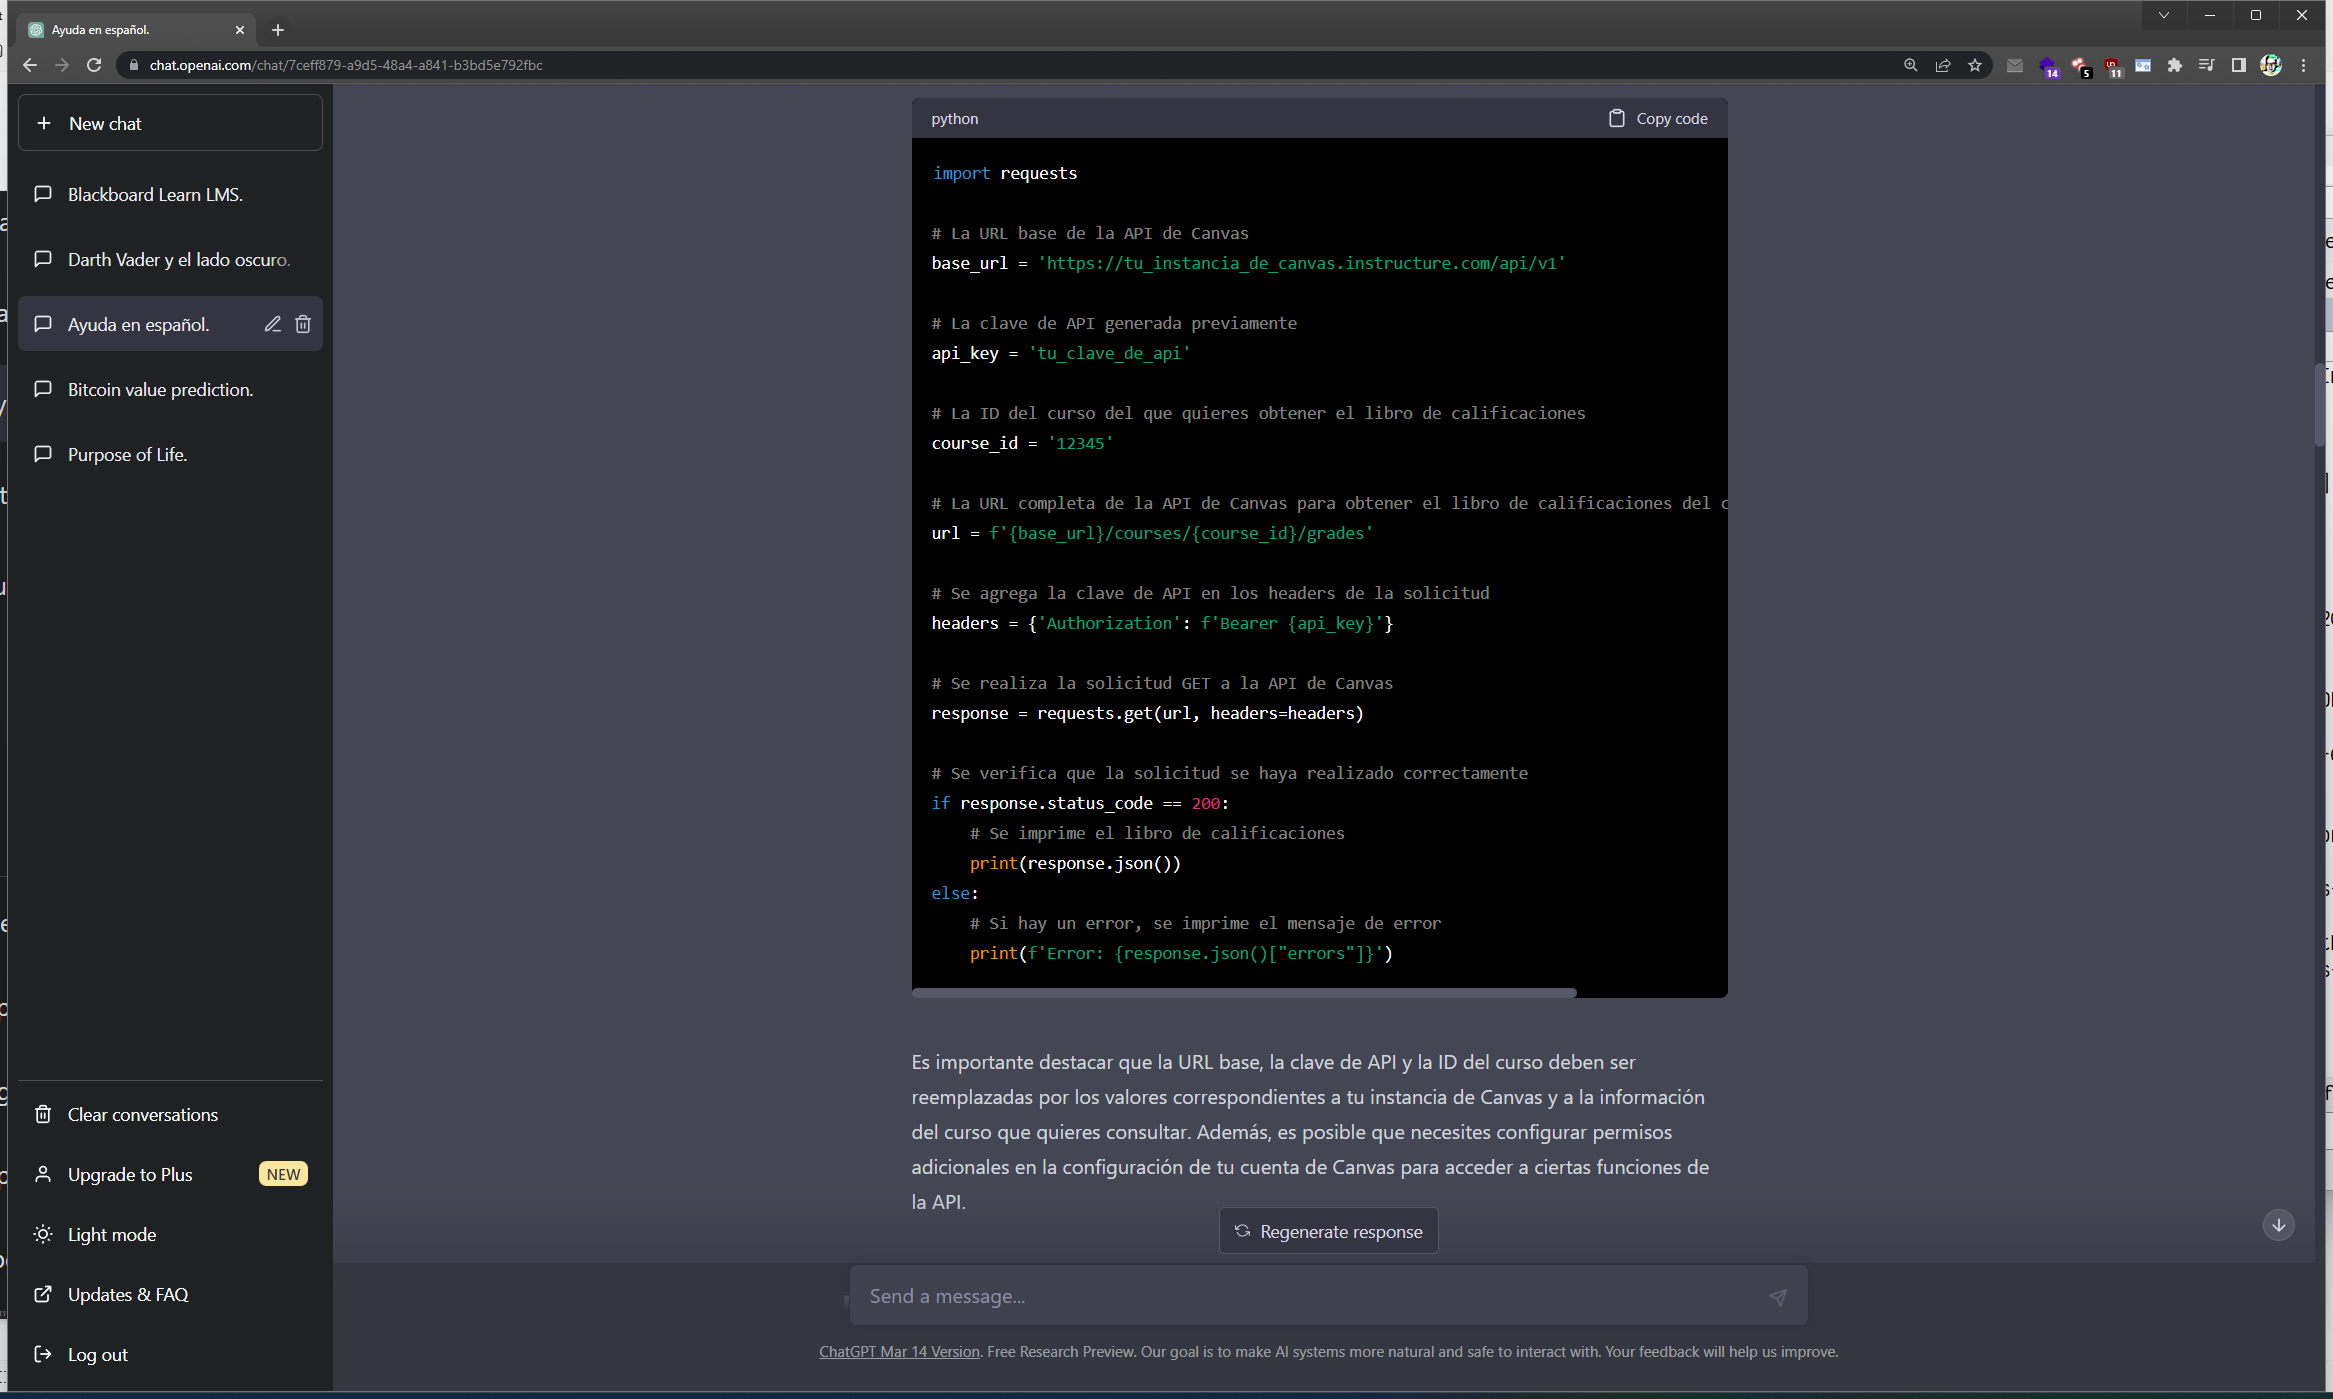
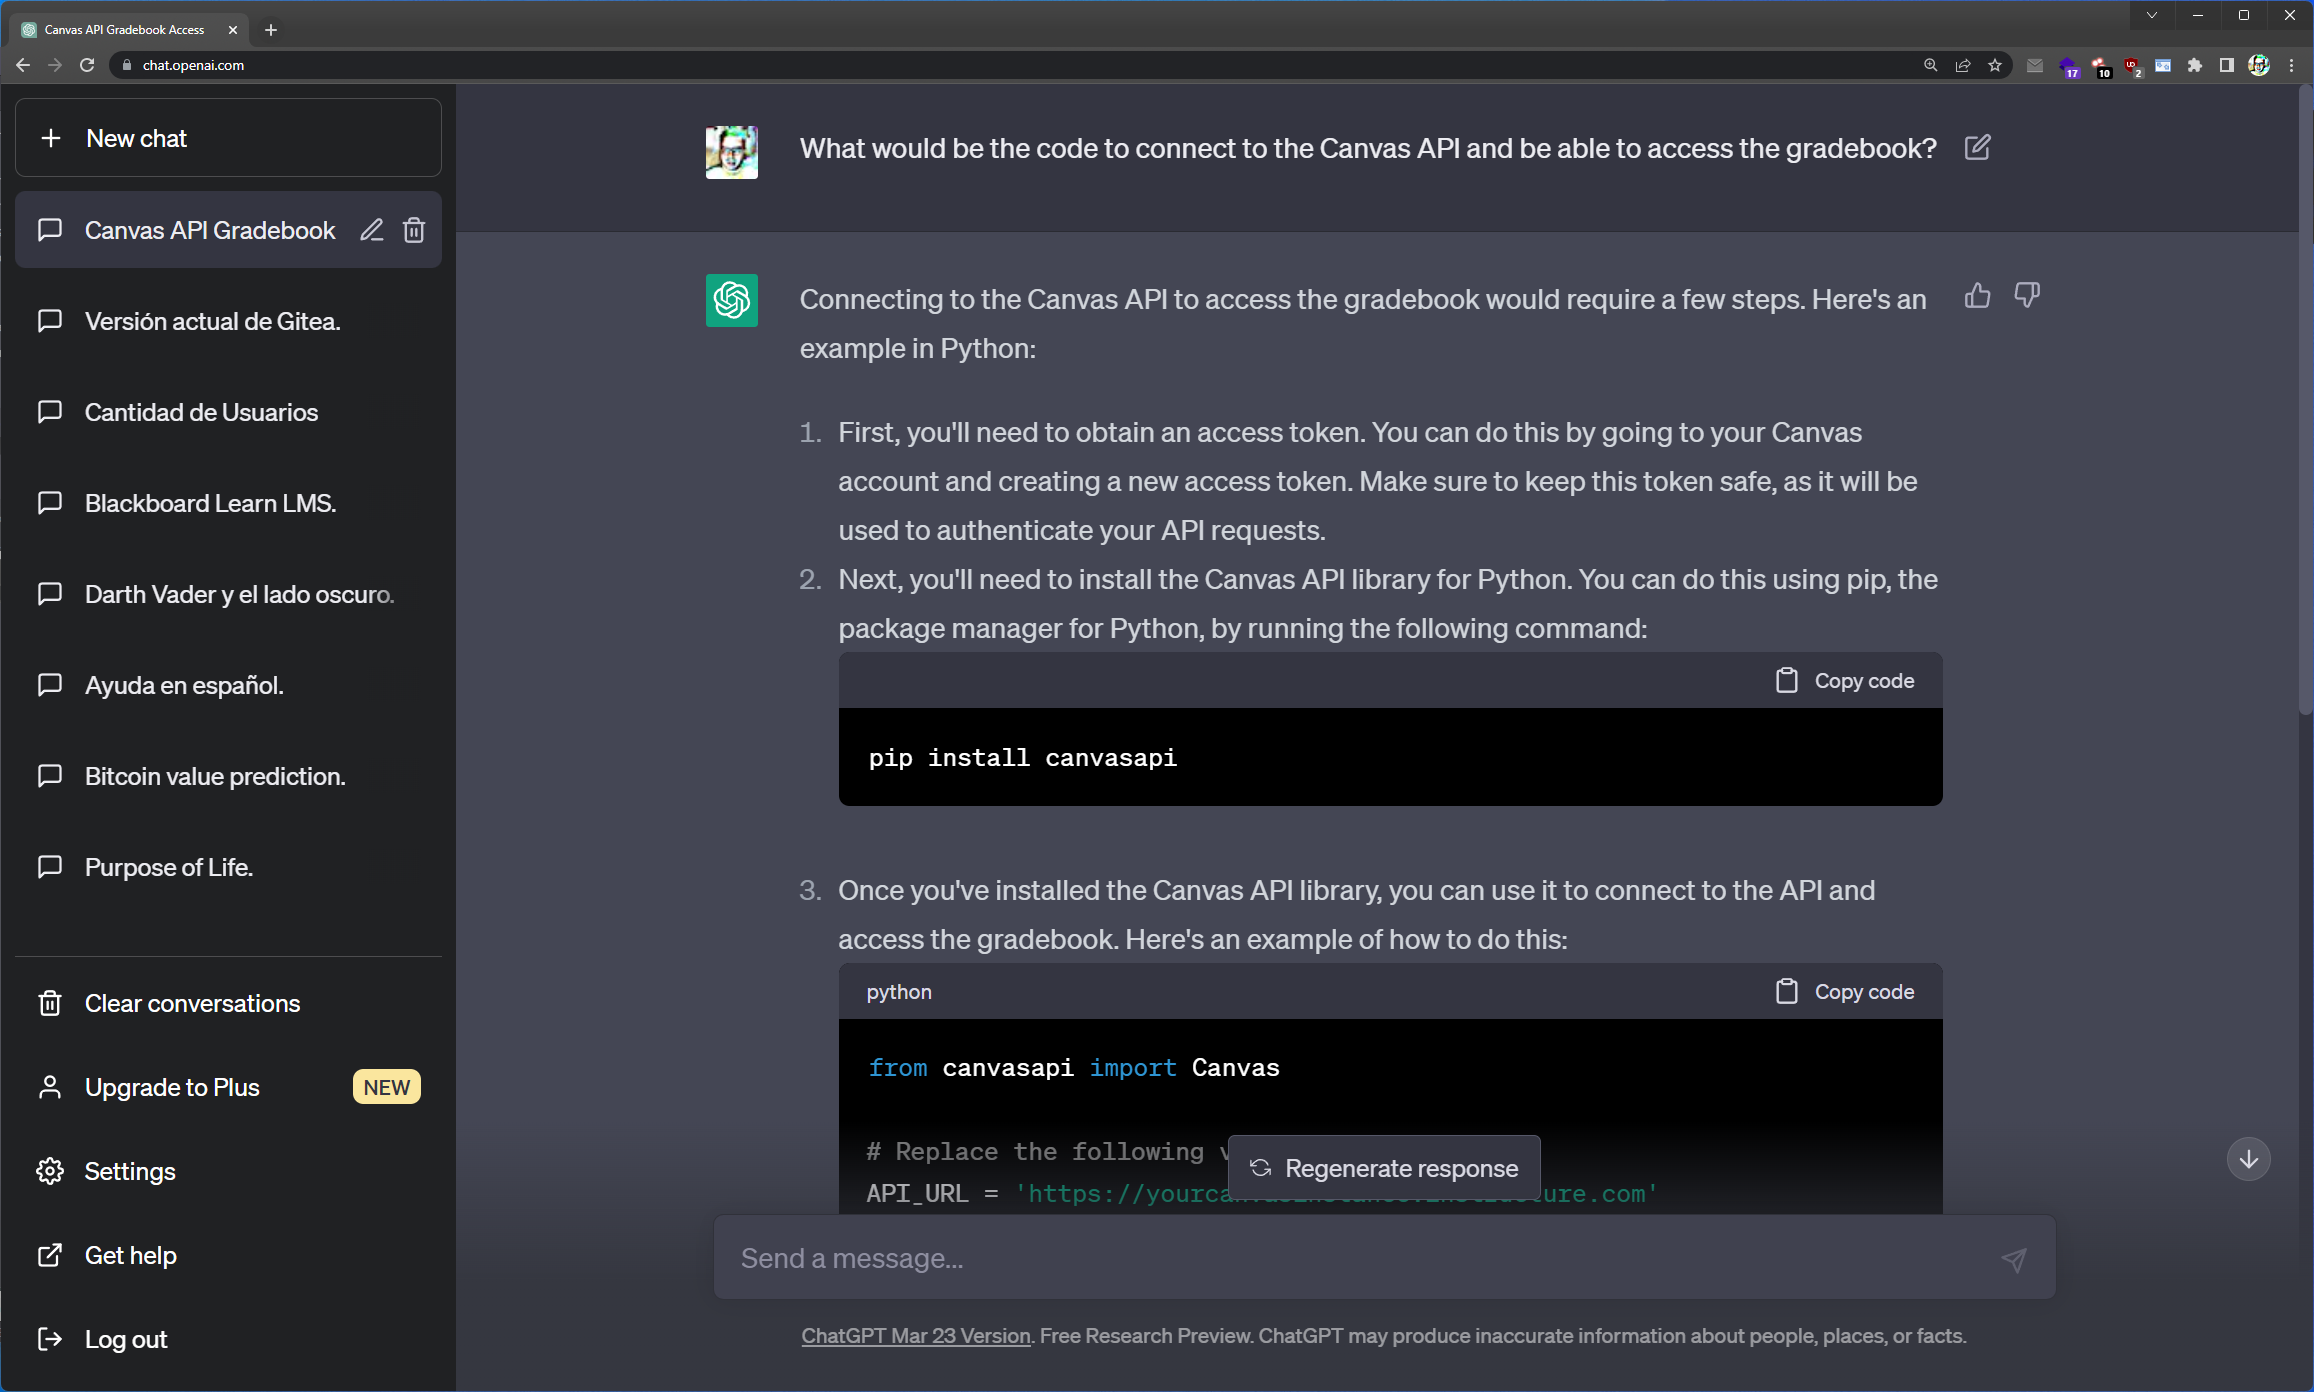
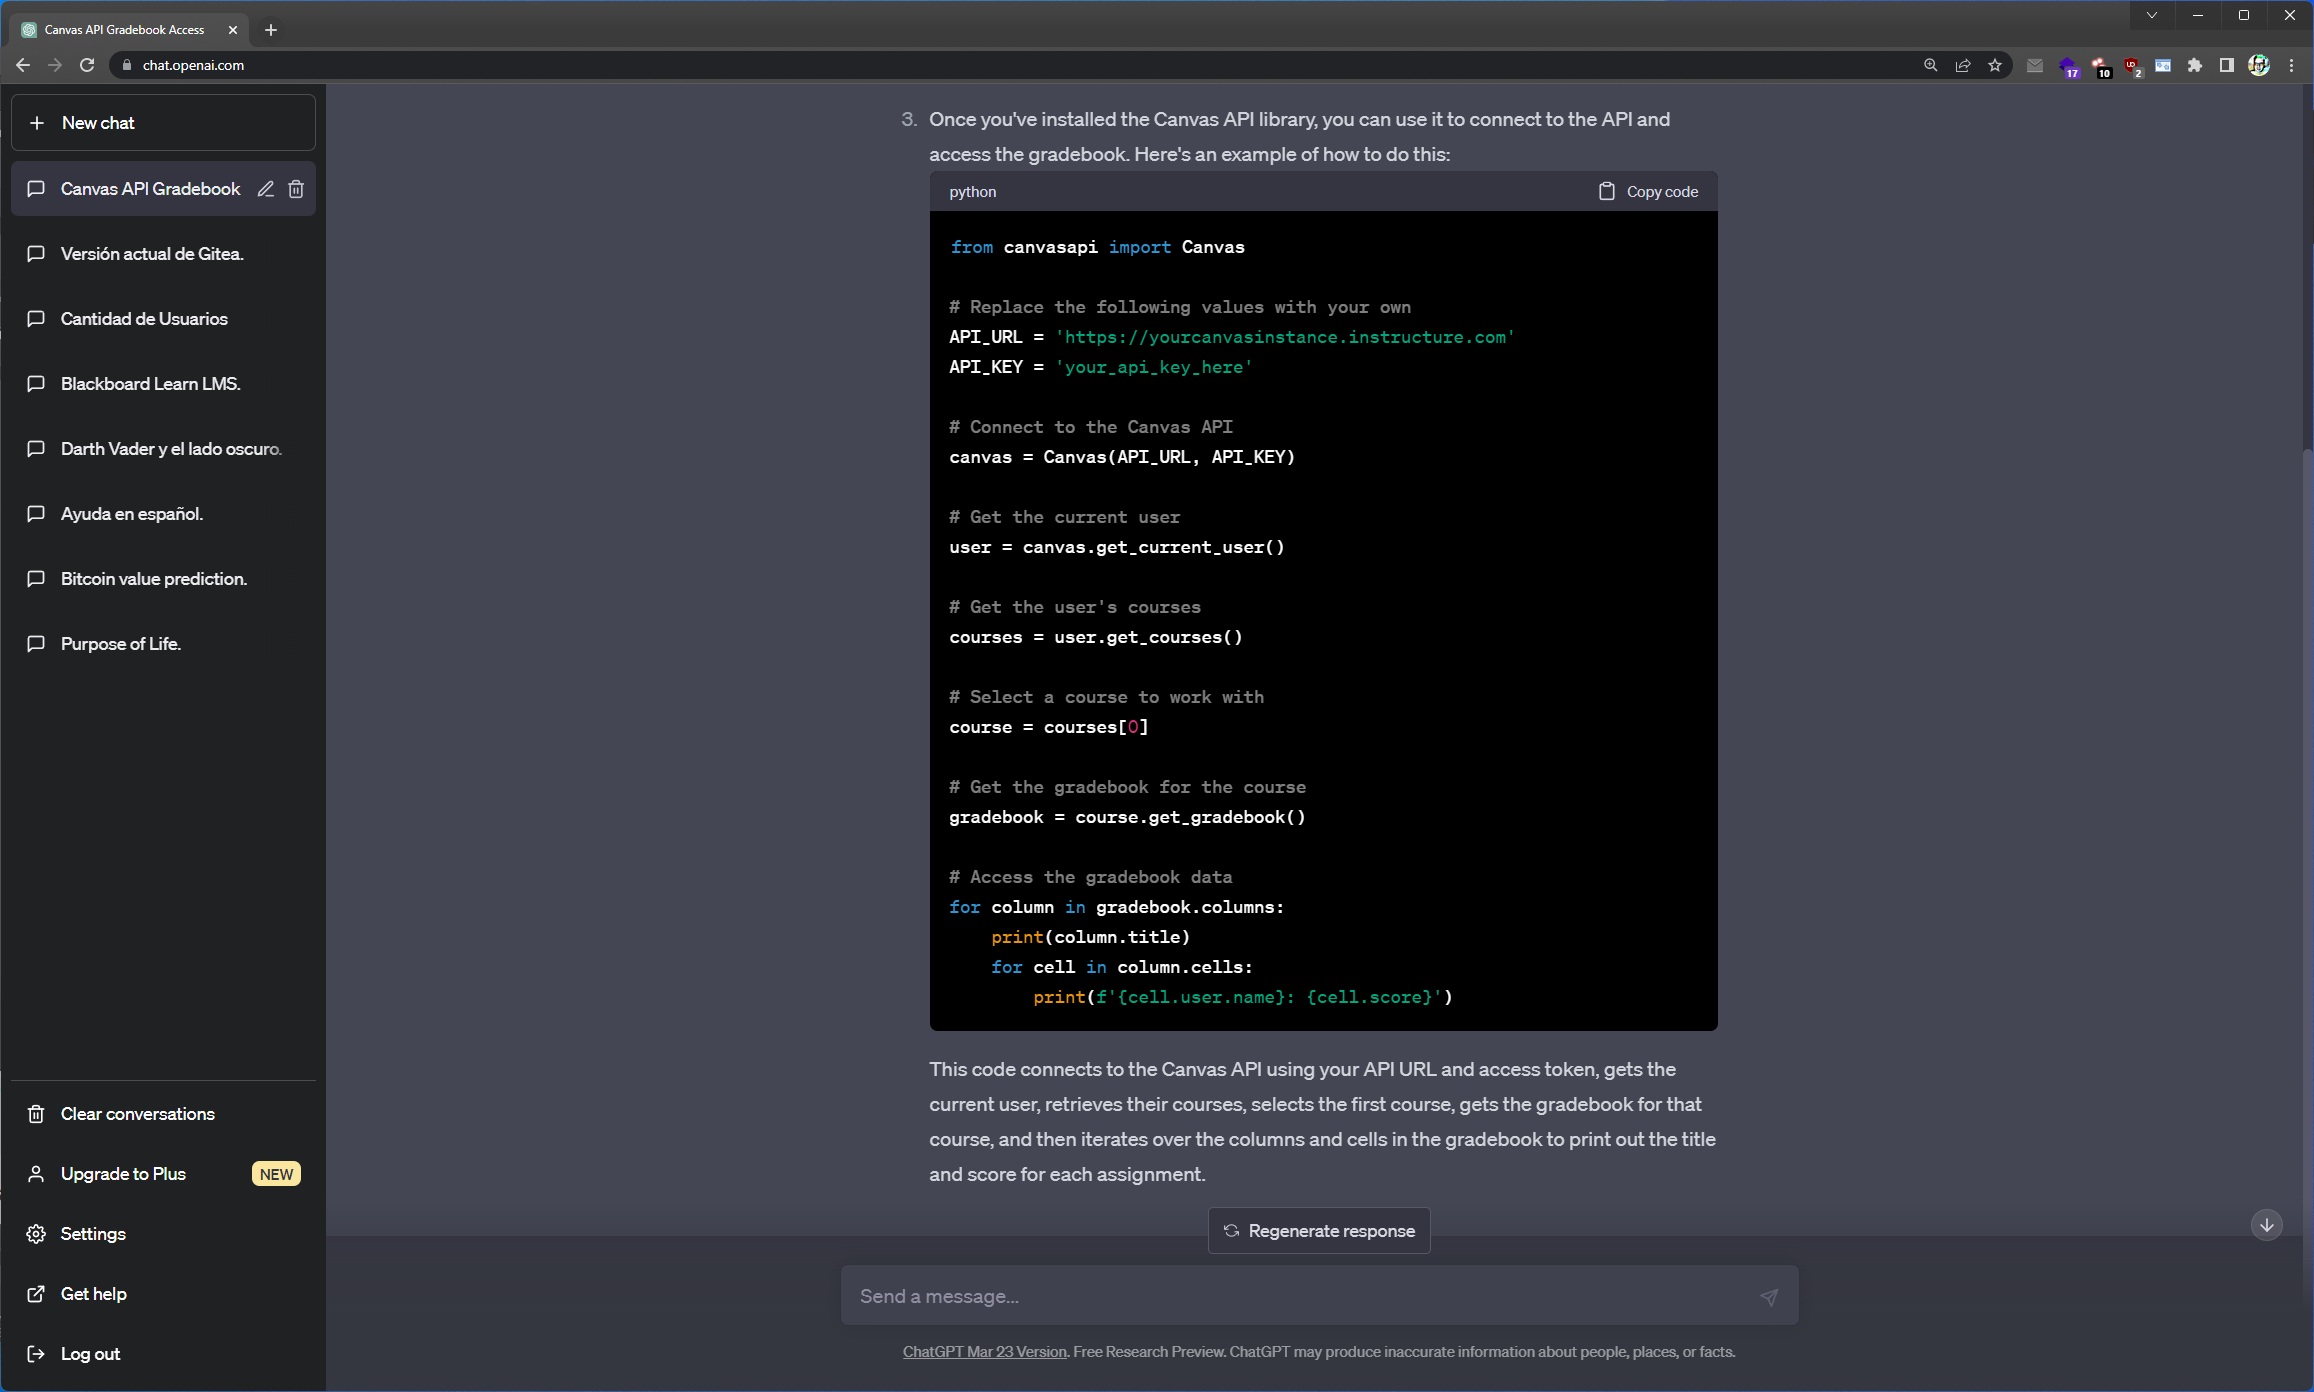
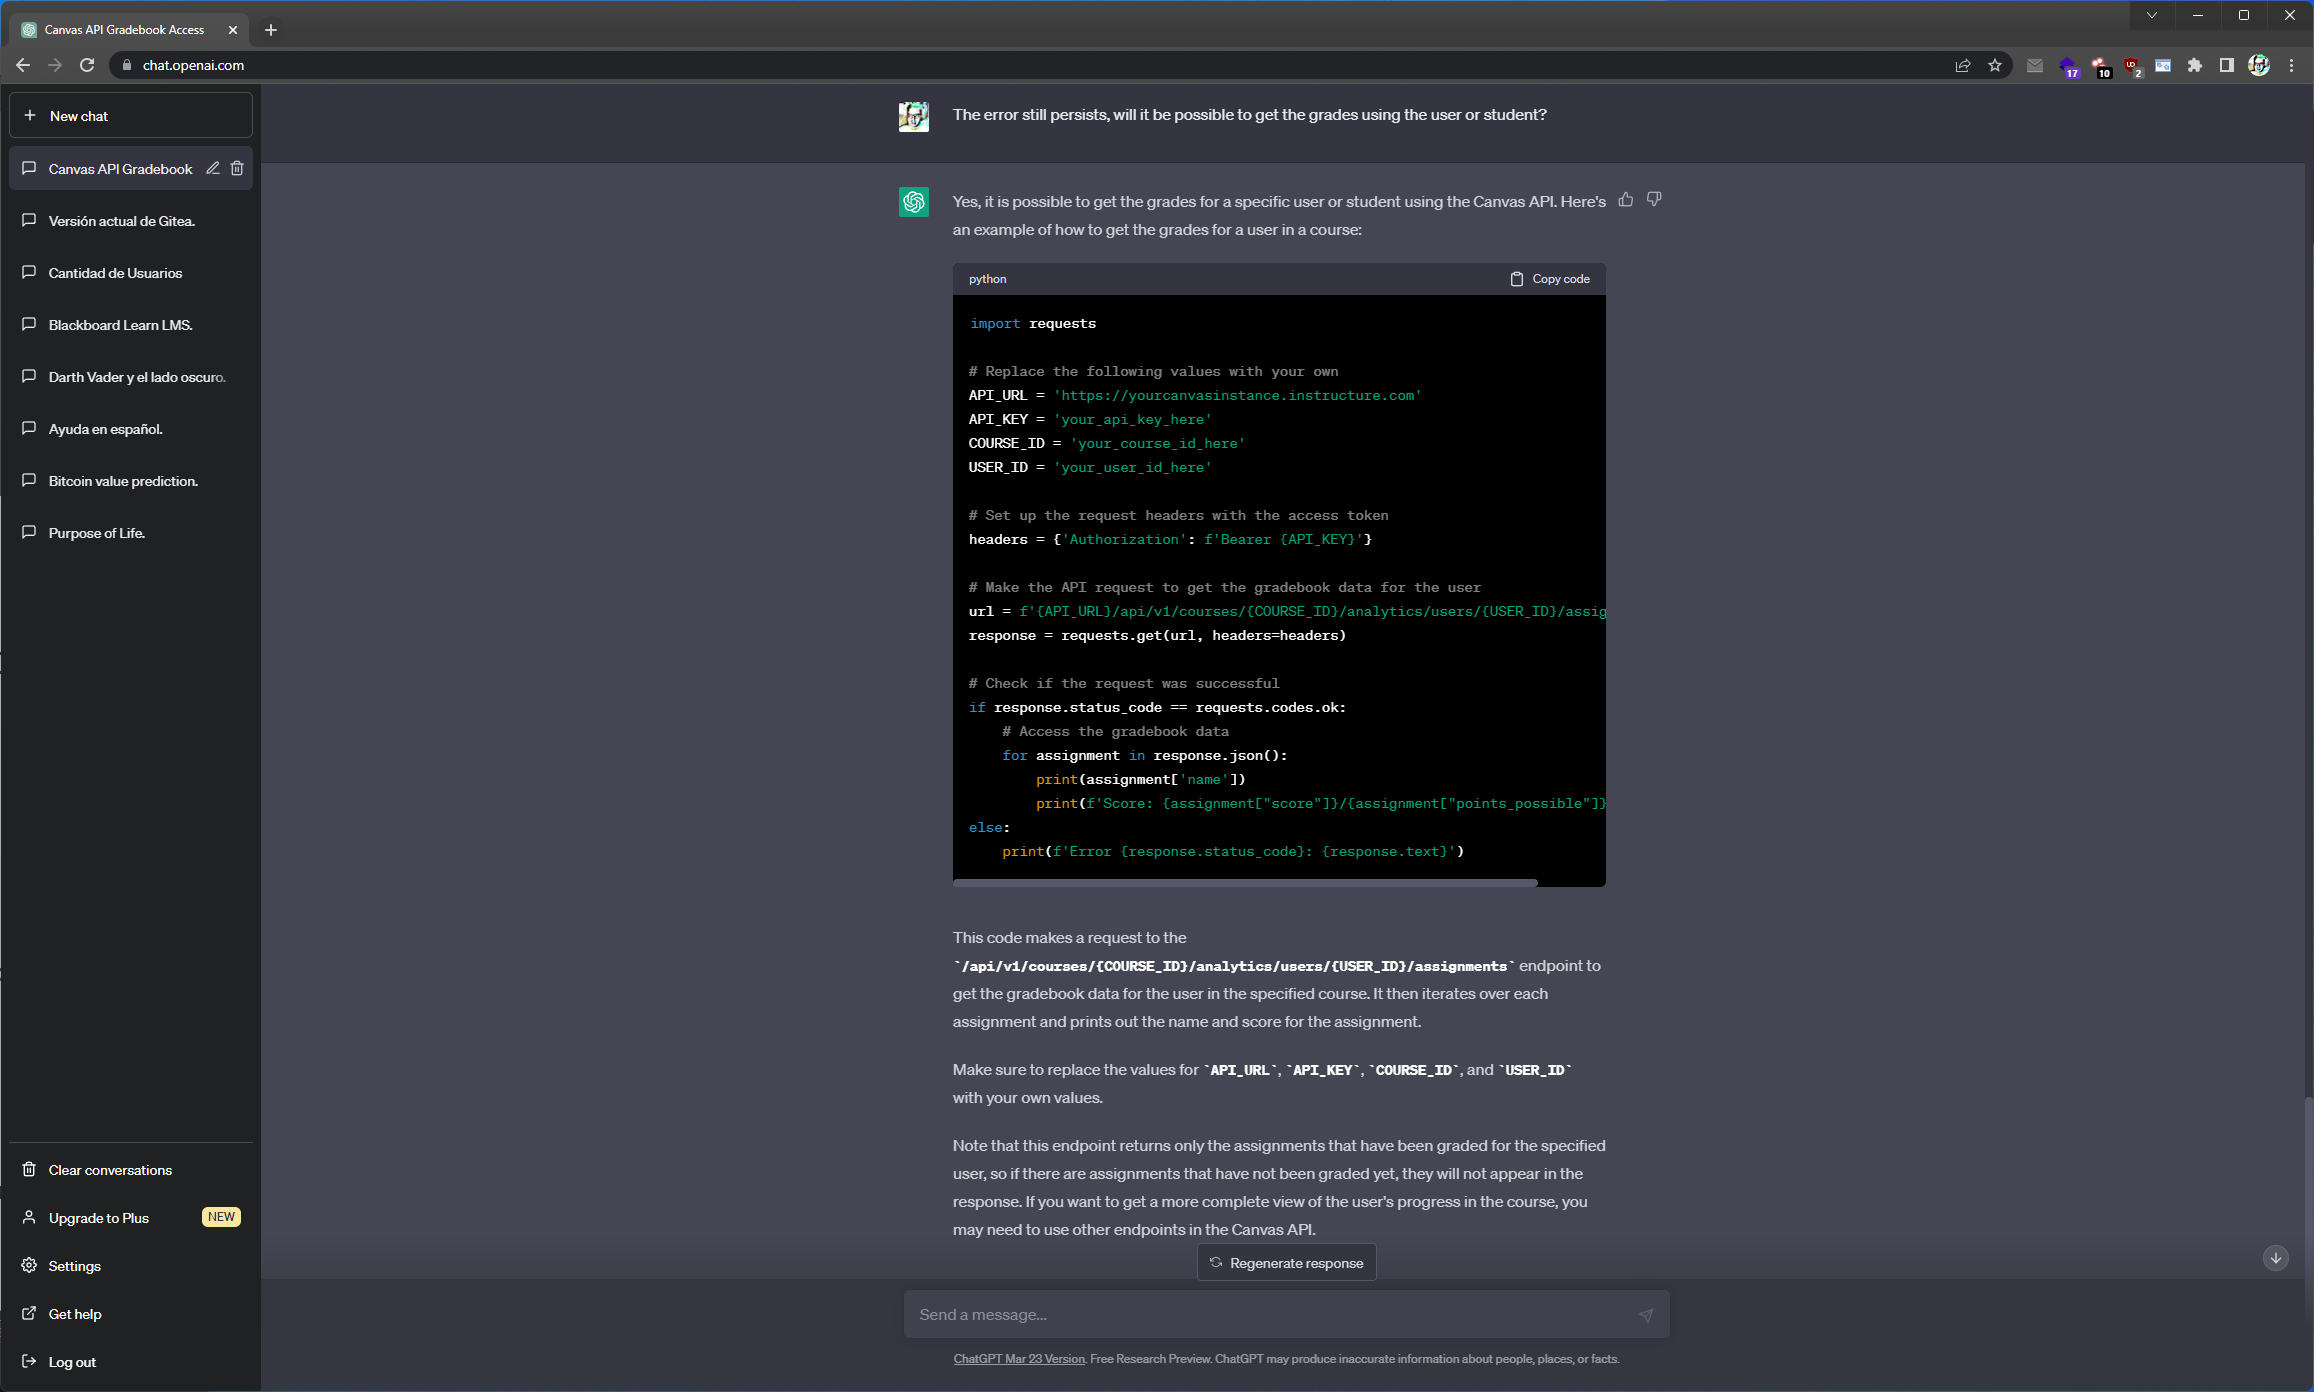
    <h3 id="cual-seria-el-código-para-conectarse-a-la-api-de-canvas-y-poder-tener-acceso-al-libro-de-calificaciones">Cual seria el código para conectarse a la API de Canvas y poder tener acceso al libro de calificaciones?</h3>
    <p><img src="/assets/images/posts/grades-weighted-automatically_and_ChatGPT/es/ChatGPT-001-001.png" alt="" />
<img src="/assets/images/posts/grades-weighted-automatically_and_ChatGPT/es/ChatGPT-001-002.png" alt="" /></p>
    <blockquote>
      <p>Se procedió a investigar cómo era el proceso de generación de la llave de acceso a la API, así como probar que el código funcionara. Dicho proceso fue exitoso, por lo que la AI, tenía razón de la factibilidad de llevar a cabo dicha tarea.
Sin embargo, no todo fue color de rosa, ya que, aun no se había logrado el acceso a las calificaciones de los alumnos.</p>
    </blockquote>
  </li>
  <li>
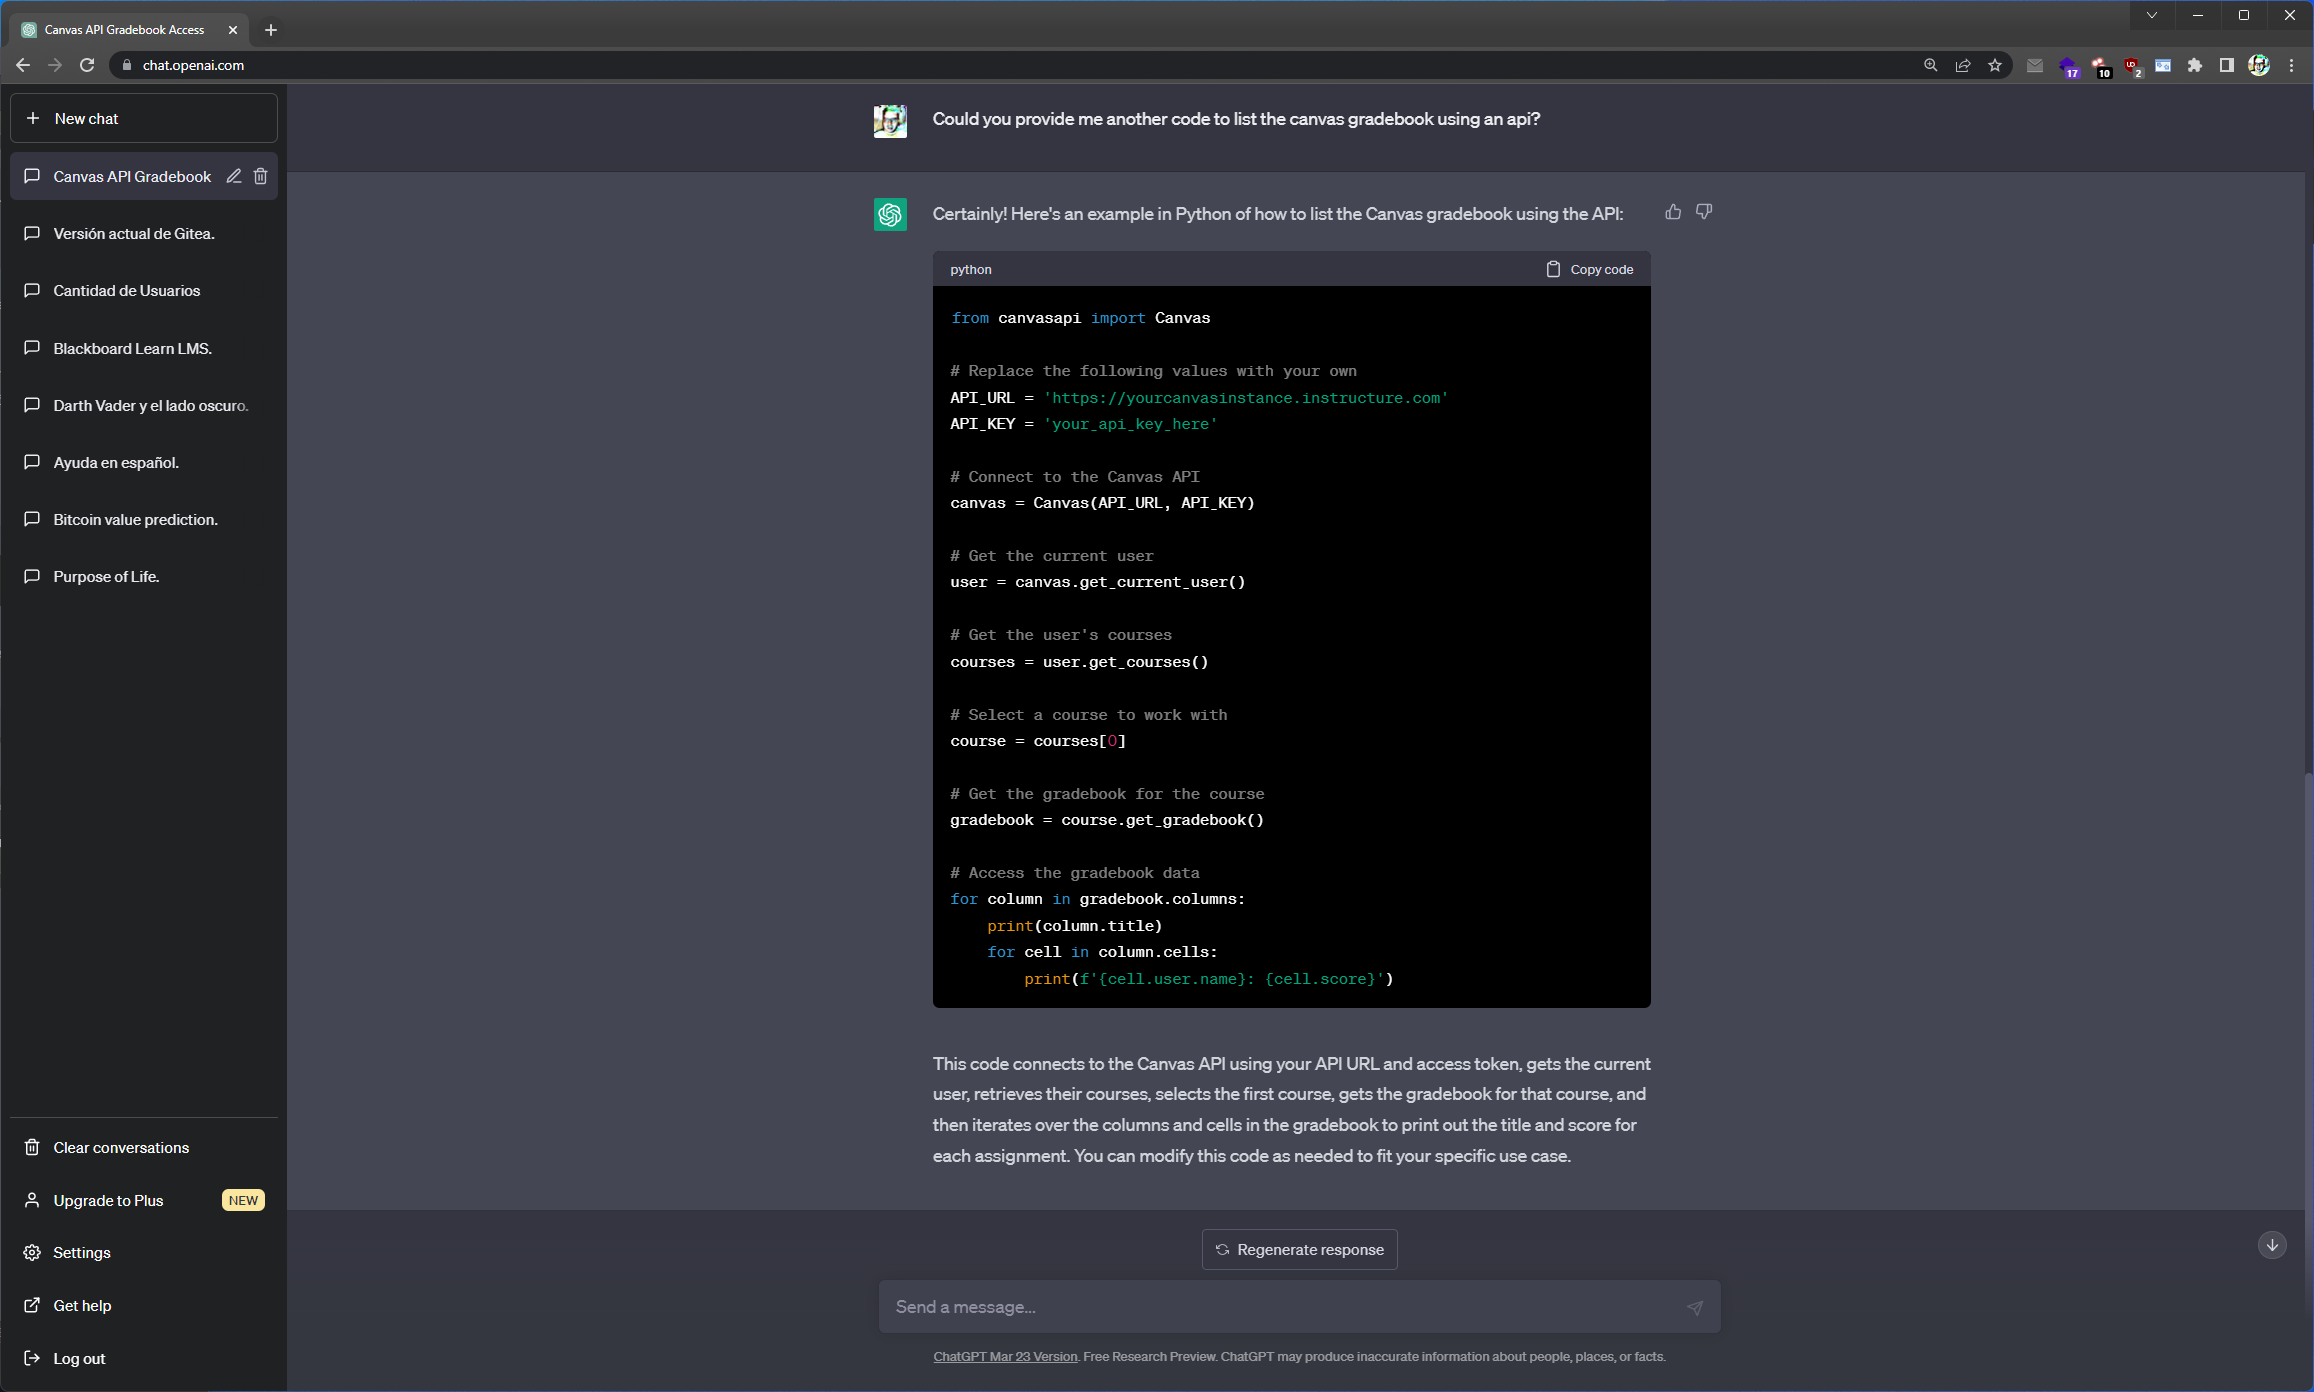
    <h3 id="podrías-proporcionarme-otro-código-para-listar-el-libro-de-calificaciones-de-canvas-usando-una-api">Podrías proporcionarme otro código para listar el libro de calificaciones de canvas usando una api?</h3>
    <p><img src="/assets/images/posts/grades-weighted-automatically_and_ChatGPT/es/ChatGPT-002-001.png" alt="" />
<img src="/assets/images/posts/grades-weighted-automatically_and_ChatGPT/es/ChatGPT-002-002.png" alt="" /></p>
    <blockquote>
      <p>Todavia no se tenía acceso a las calificaciones de los alumnos.</p>
    </blockquote>
  </li>
  <li>
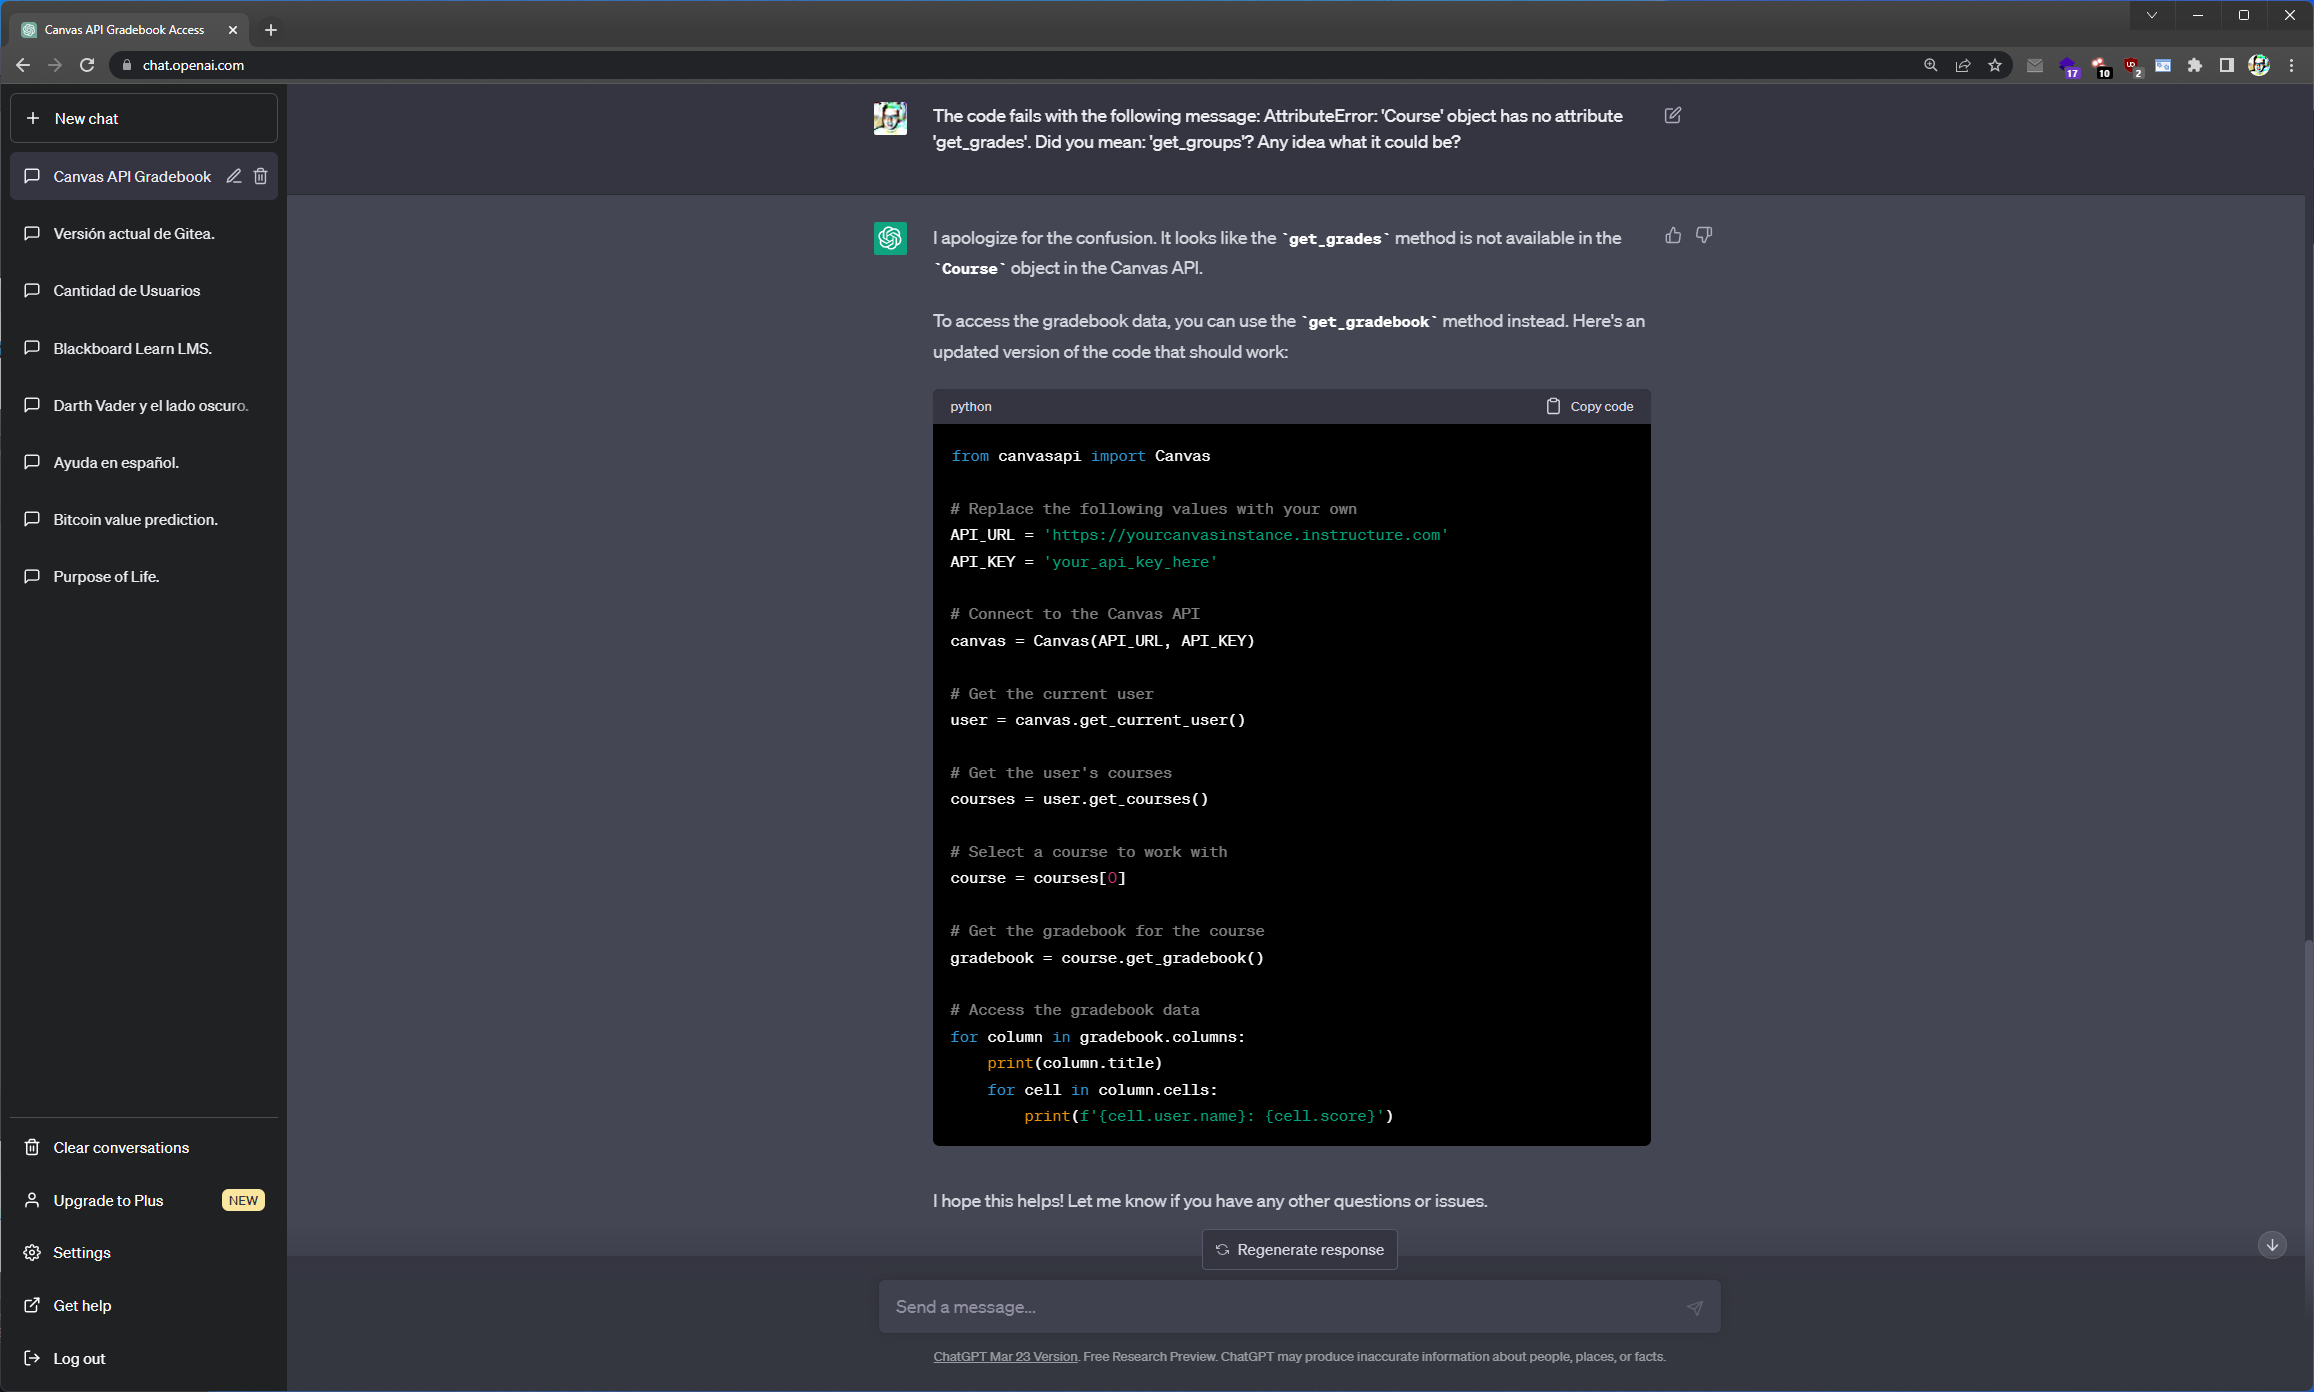
    <h3 id="el-código-falla-con-el-siguiente-mensaje-attributeerror-course-object-has-no-attribute-get_grades-did-you-mean-get_groups-alguna-idea-de-que-puede-ser">El código falla con el siguiente mensaje: AttributeError: ‘Course’ object has no attribute ‘get_grades’. Did you mean: ‘get_groups’? Alguna idea de que puede ser?</h3>
    <p><img src="/assets/images/posts/grades-weighted-automatically_and_ChatGPT/es/ChatGPT-003-001.png" alt="" /></p>
    <blockquote>
      <p>Se verifico que no era ese el problema, ya que sí se contaba con la ultima version de la libreria, por lo que se intento sin libreria.</p>
    </blockquote>
  </li>
  <li>
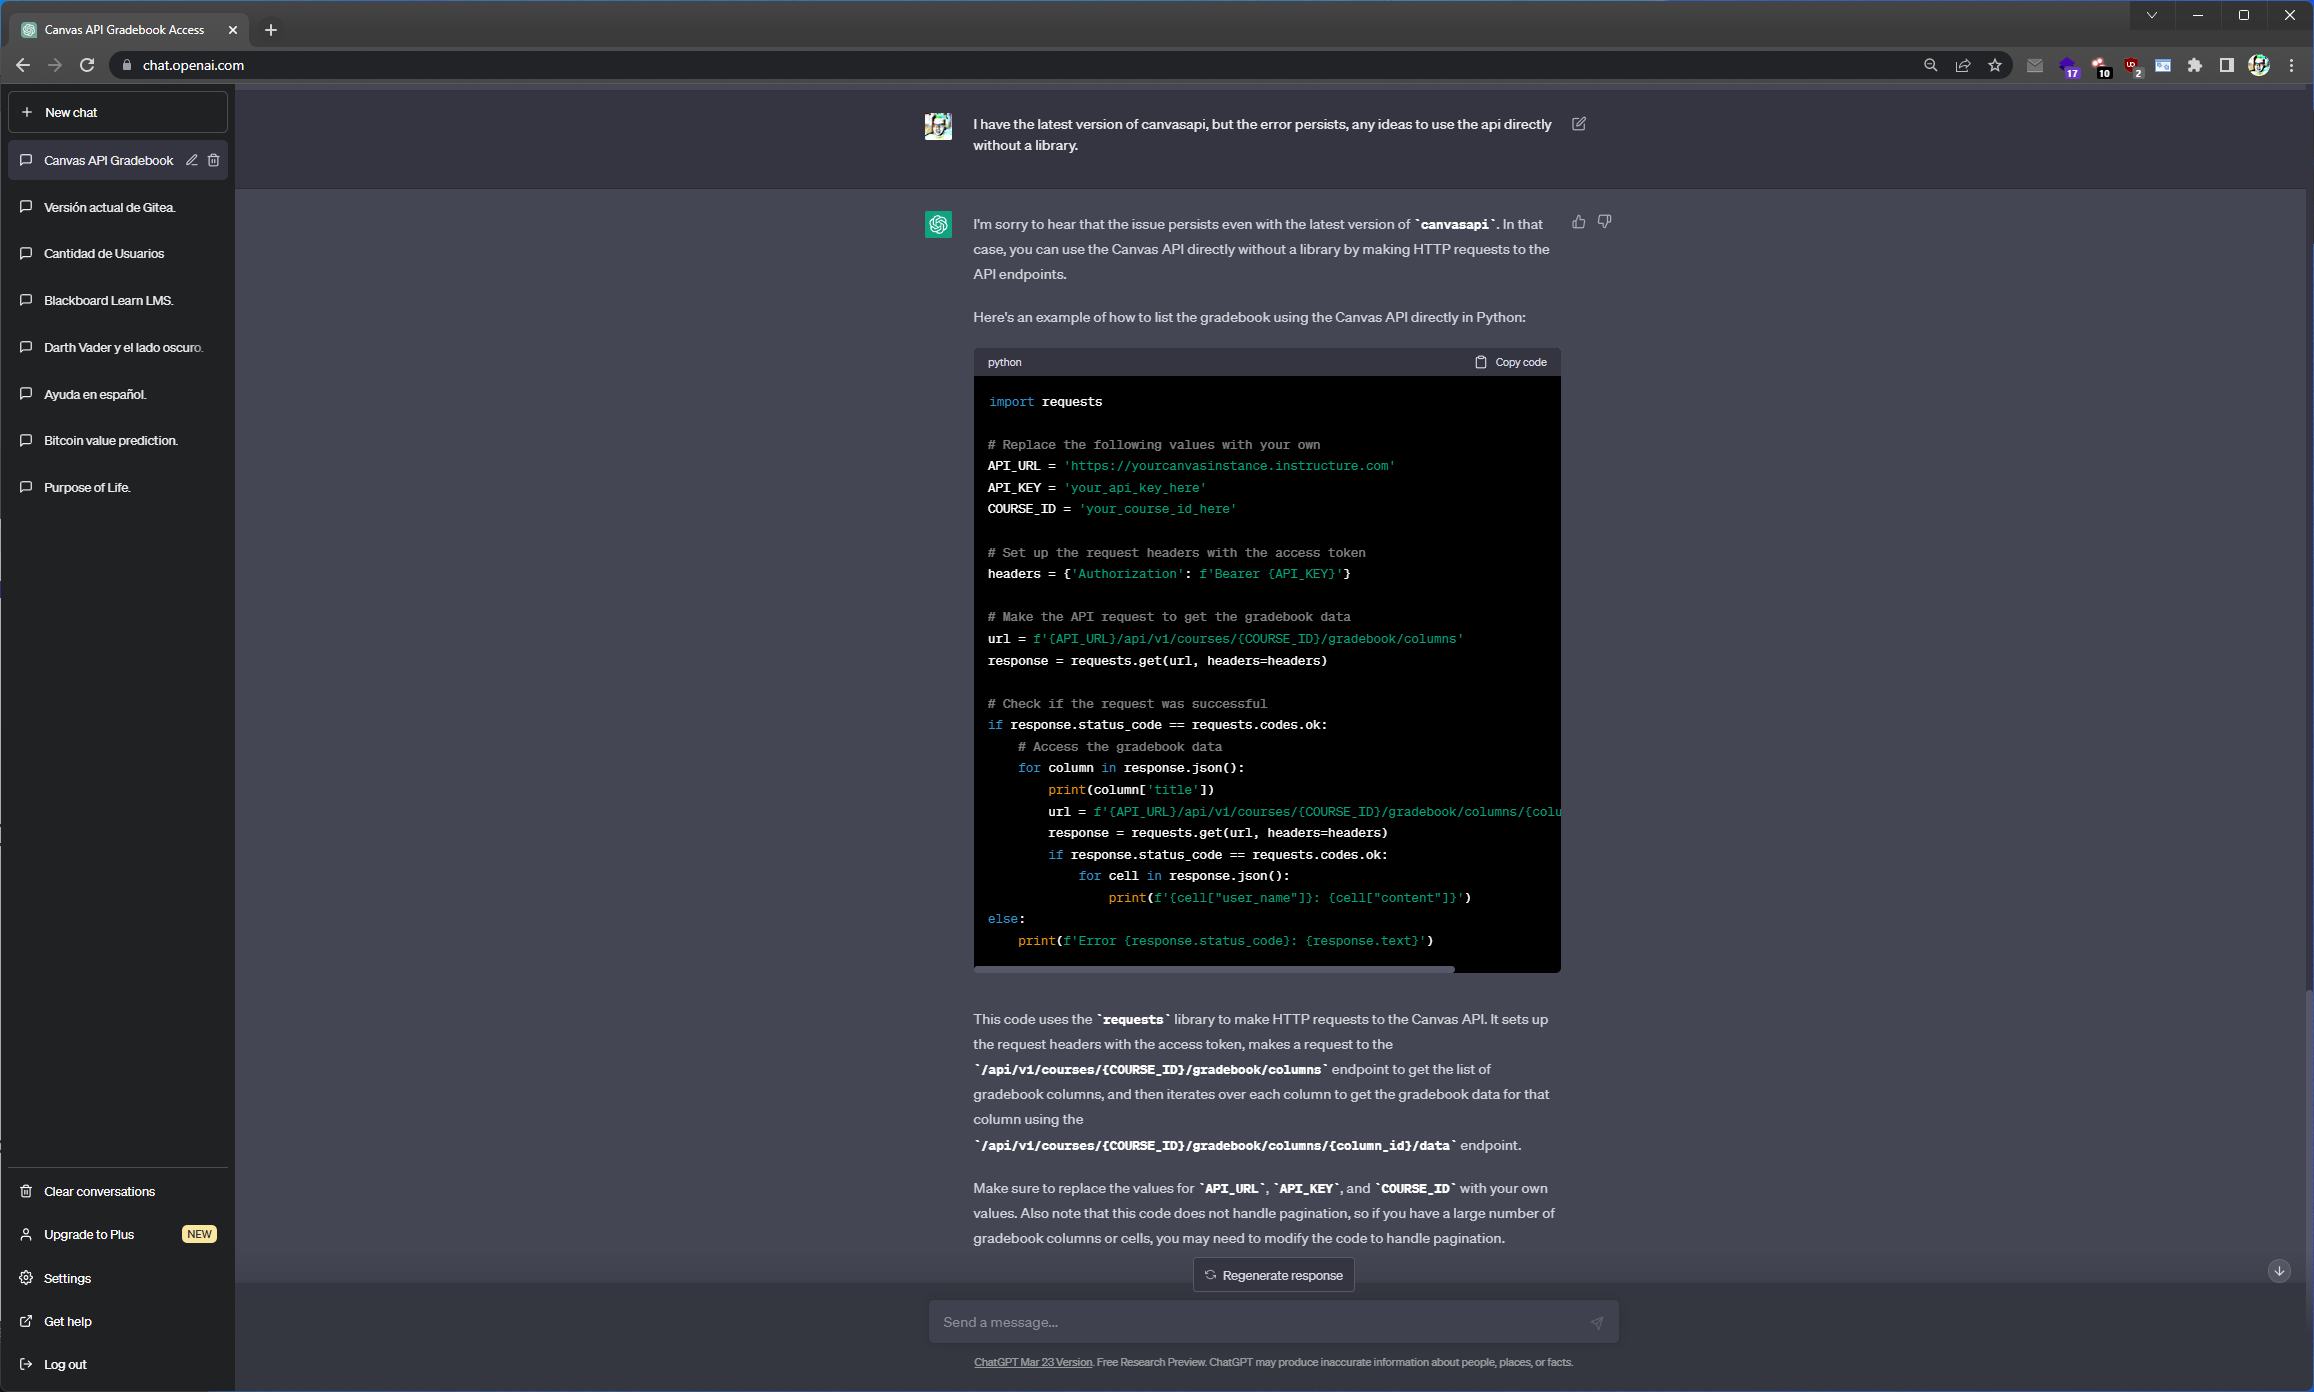
    <h3 id="tengo-la-ultima-versión-de-canvasapi-pero-el-error-persiste-alguna-idea-para-usar-el-api-directamente-sin-una-librería">Tengo la ultima versión de canvasapi, pero el error persiste, alguna idea para usar el api directamente sin una librería.</h3>
    <p><img src="/assets/images/posts/grades-weighted-automatically_and_ChatGPT/es/ChatGPT-004-001.png" alt="" /></p>
  </li>
  <li>
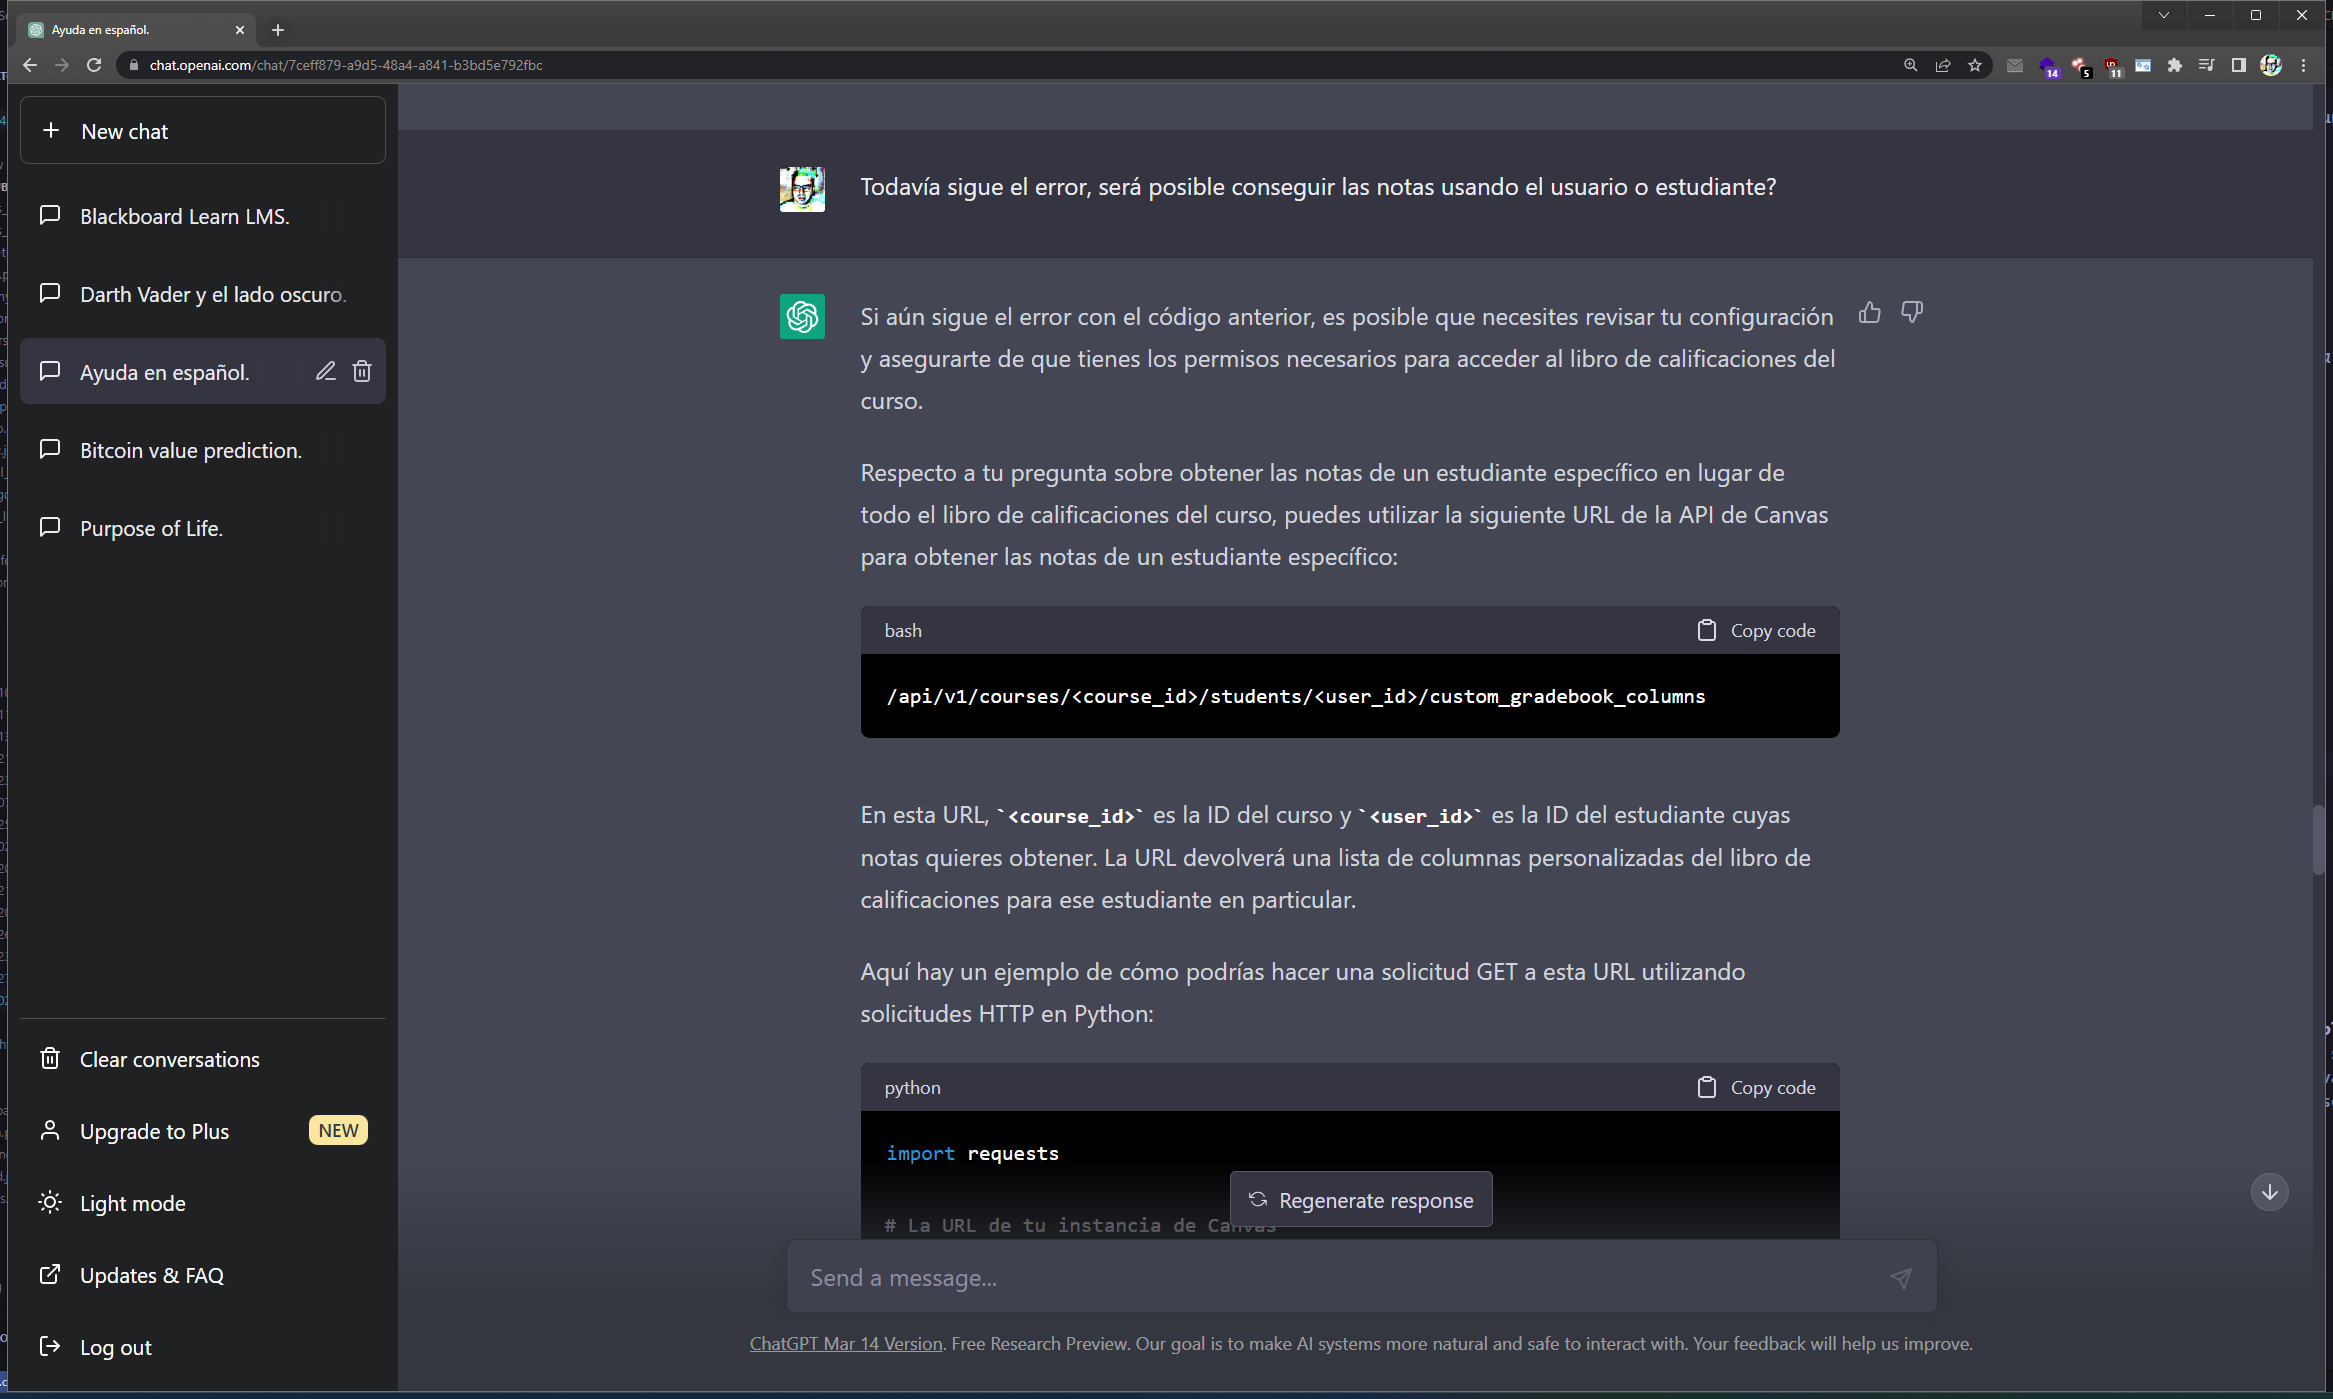
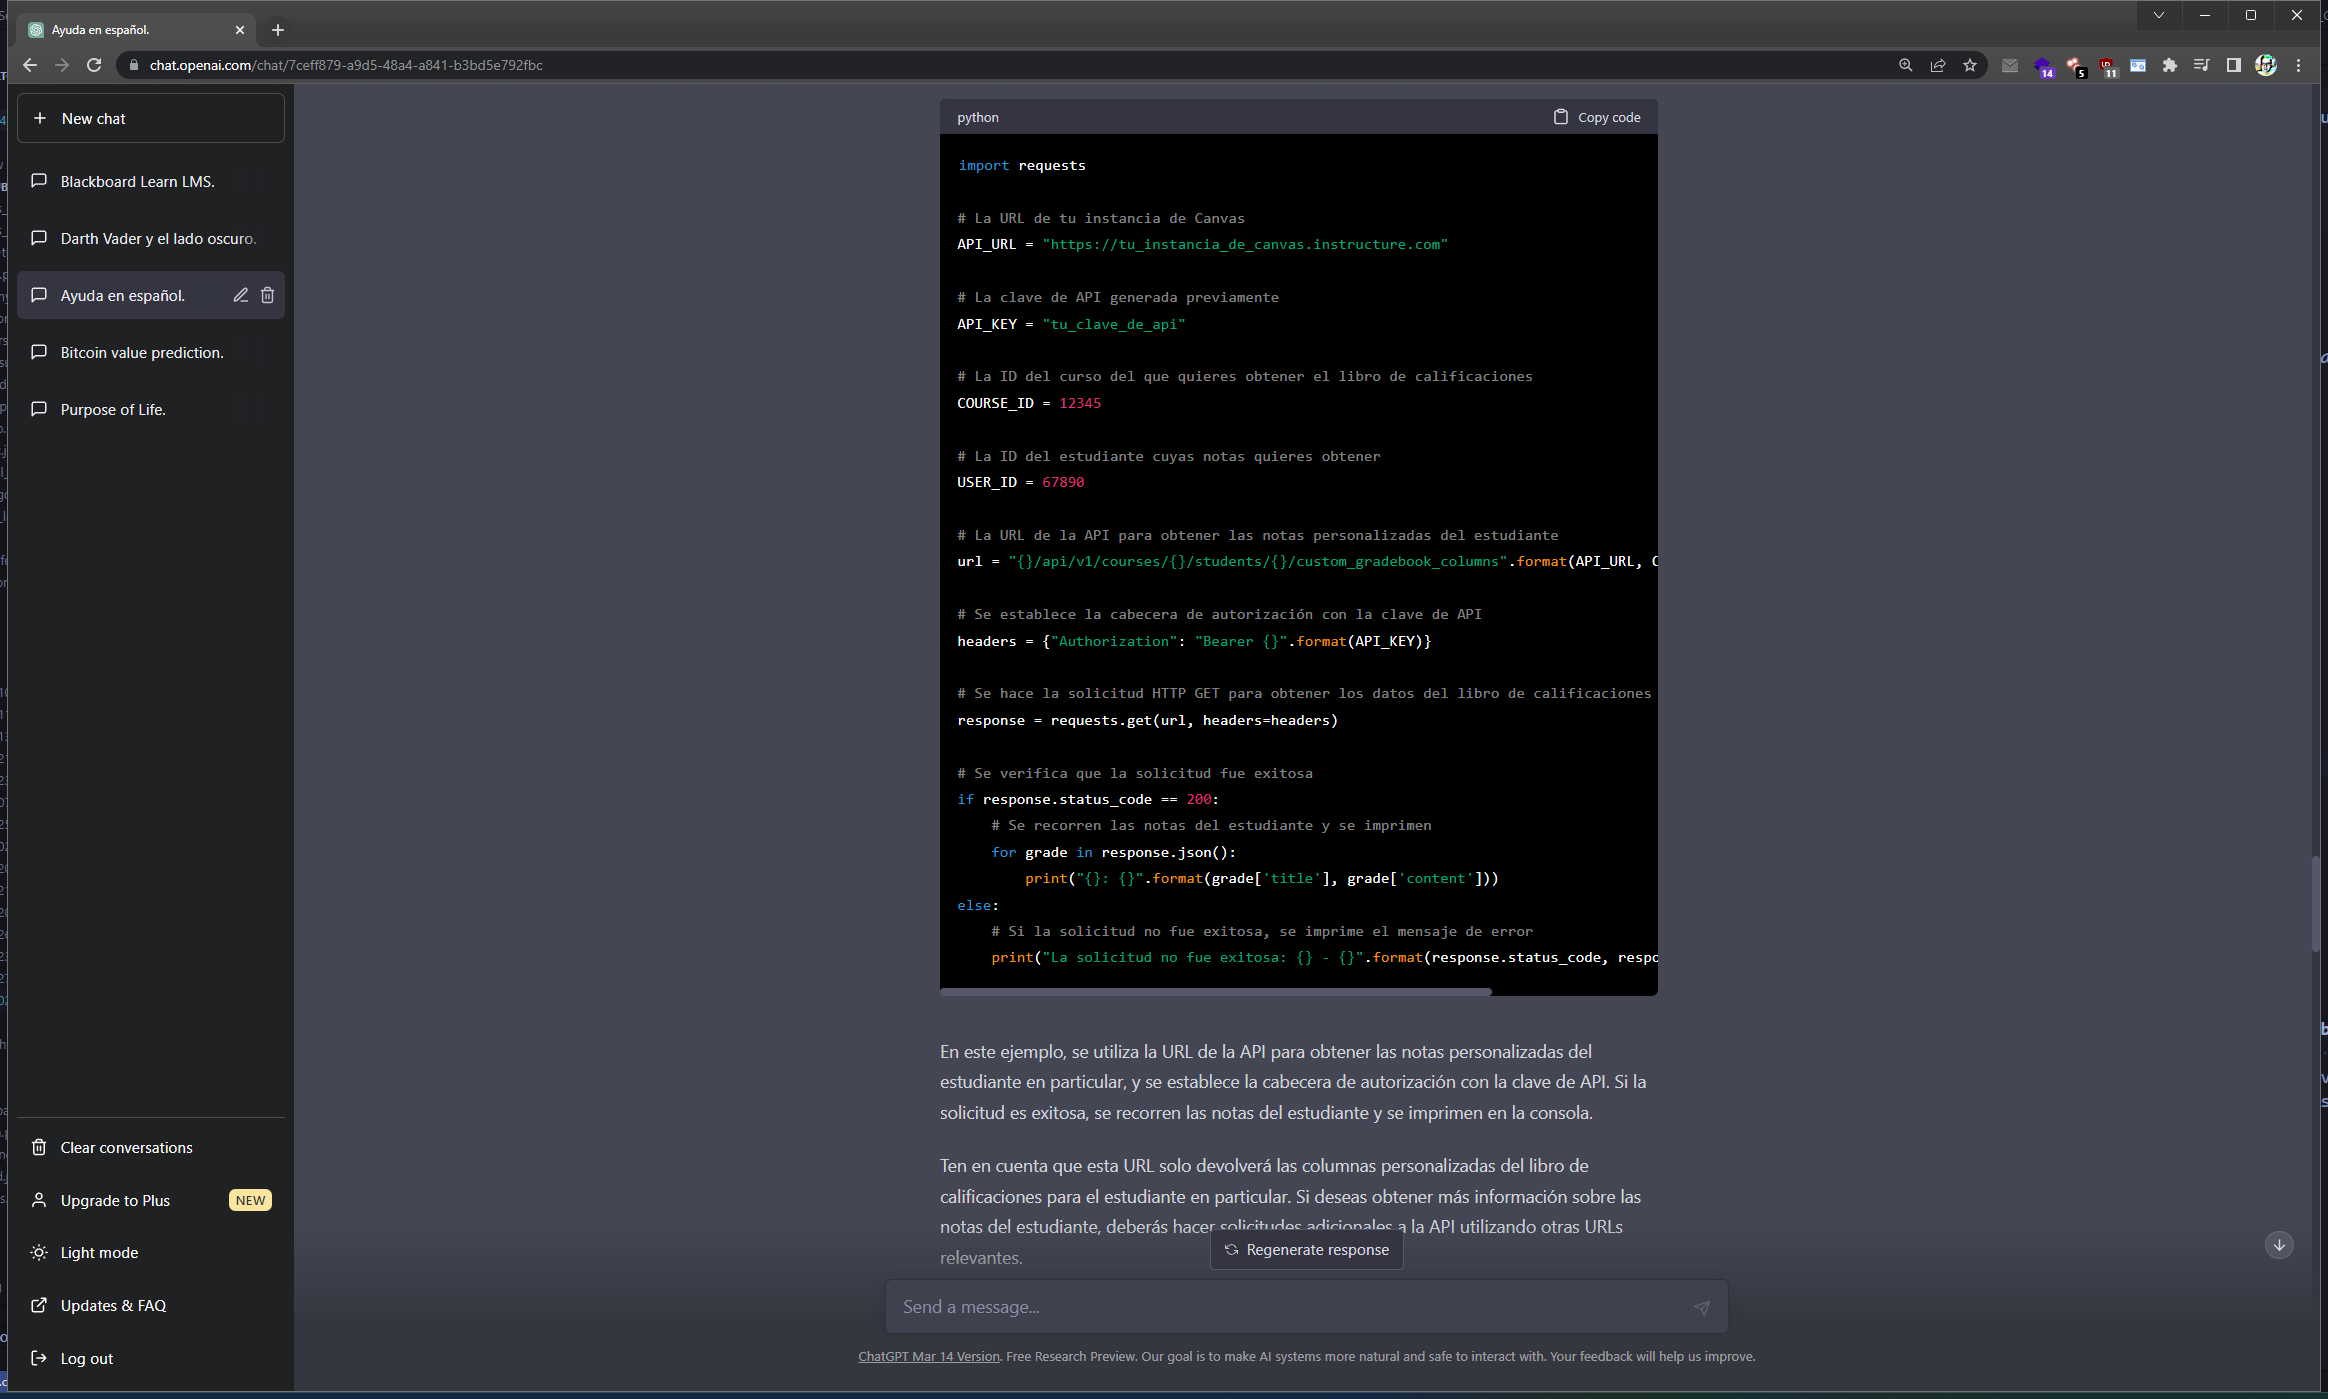
    <h3 id="todavía-sigue-el-error-será-posible-conseguir-las-notas-usando-el-usuario-o-estudiante">Todavía sigue el error, será posible conseguir las notas usando el usuario o estudiante?</h3>
    <p><img src="/assets/images/posts/grades-weighted-automatically_and_ChatGPT/es/ChatGPT-005-001.png" alt="" />
<img src="/assets/images/posts/grades-weighted-automatically_and_ChatGPT/es/ChatGPT-005-002.png" alt="" /></p>
  </li>
  <li>
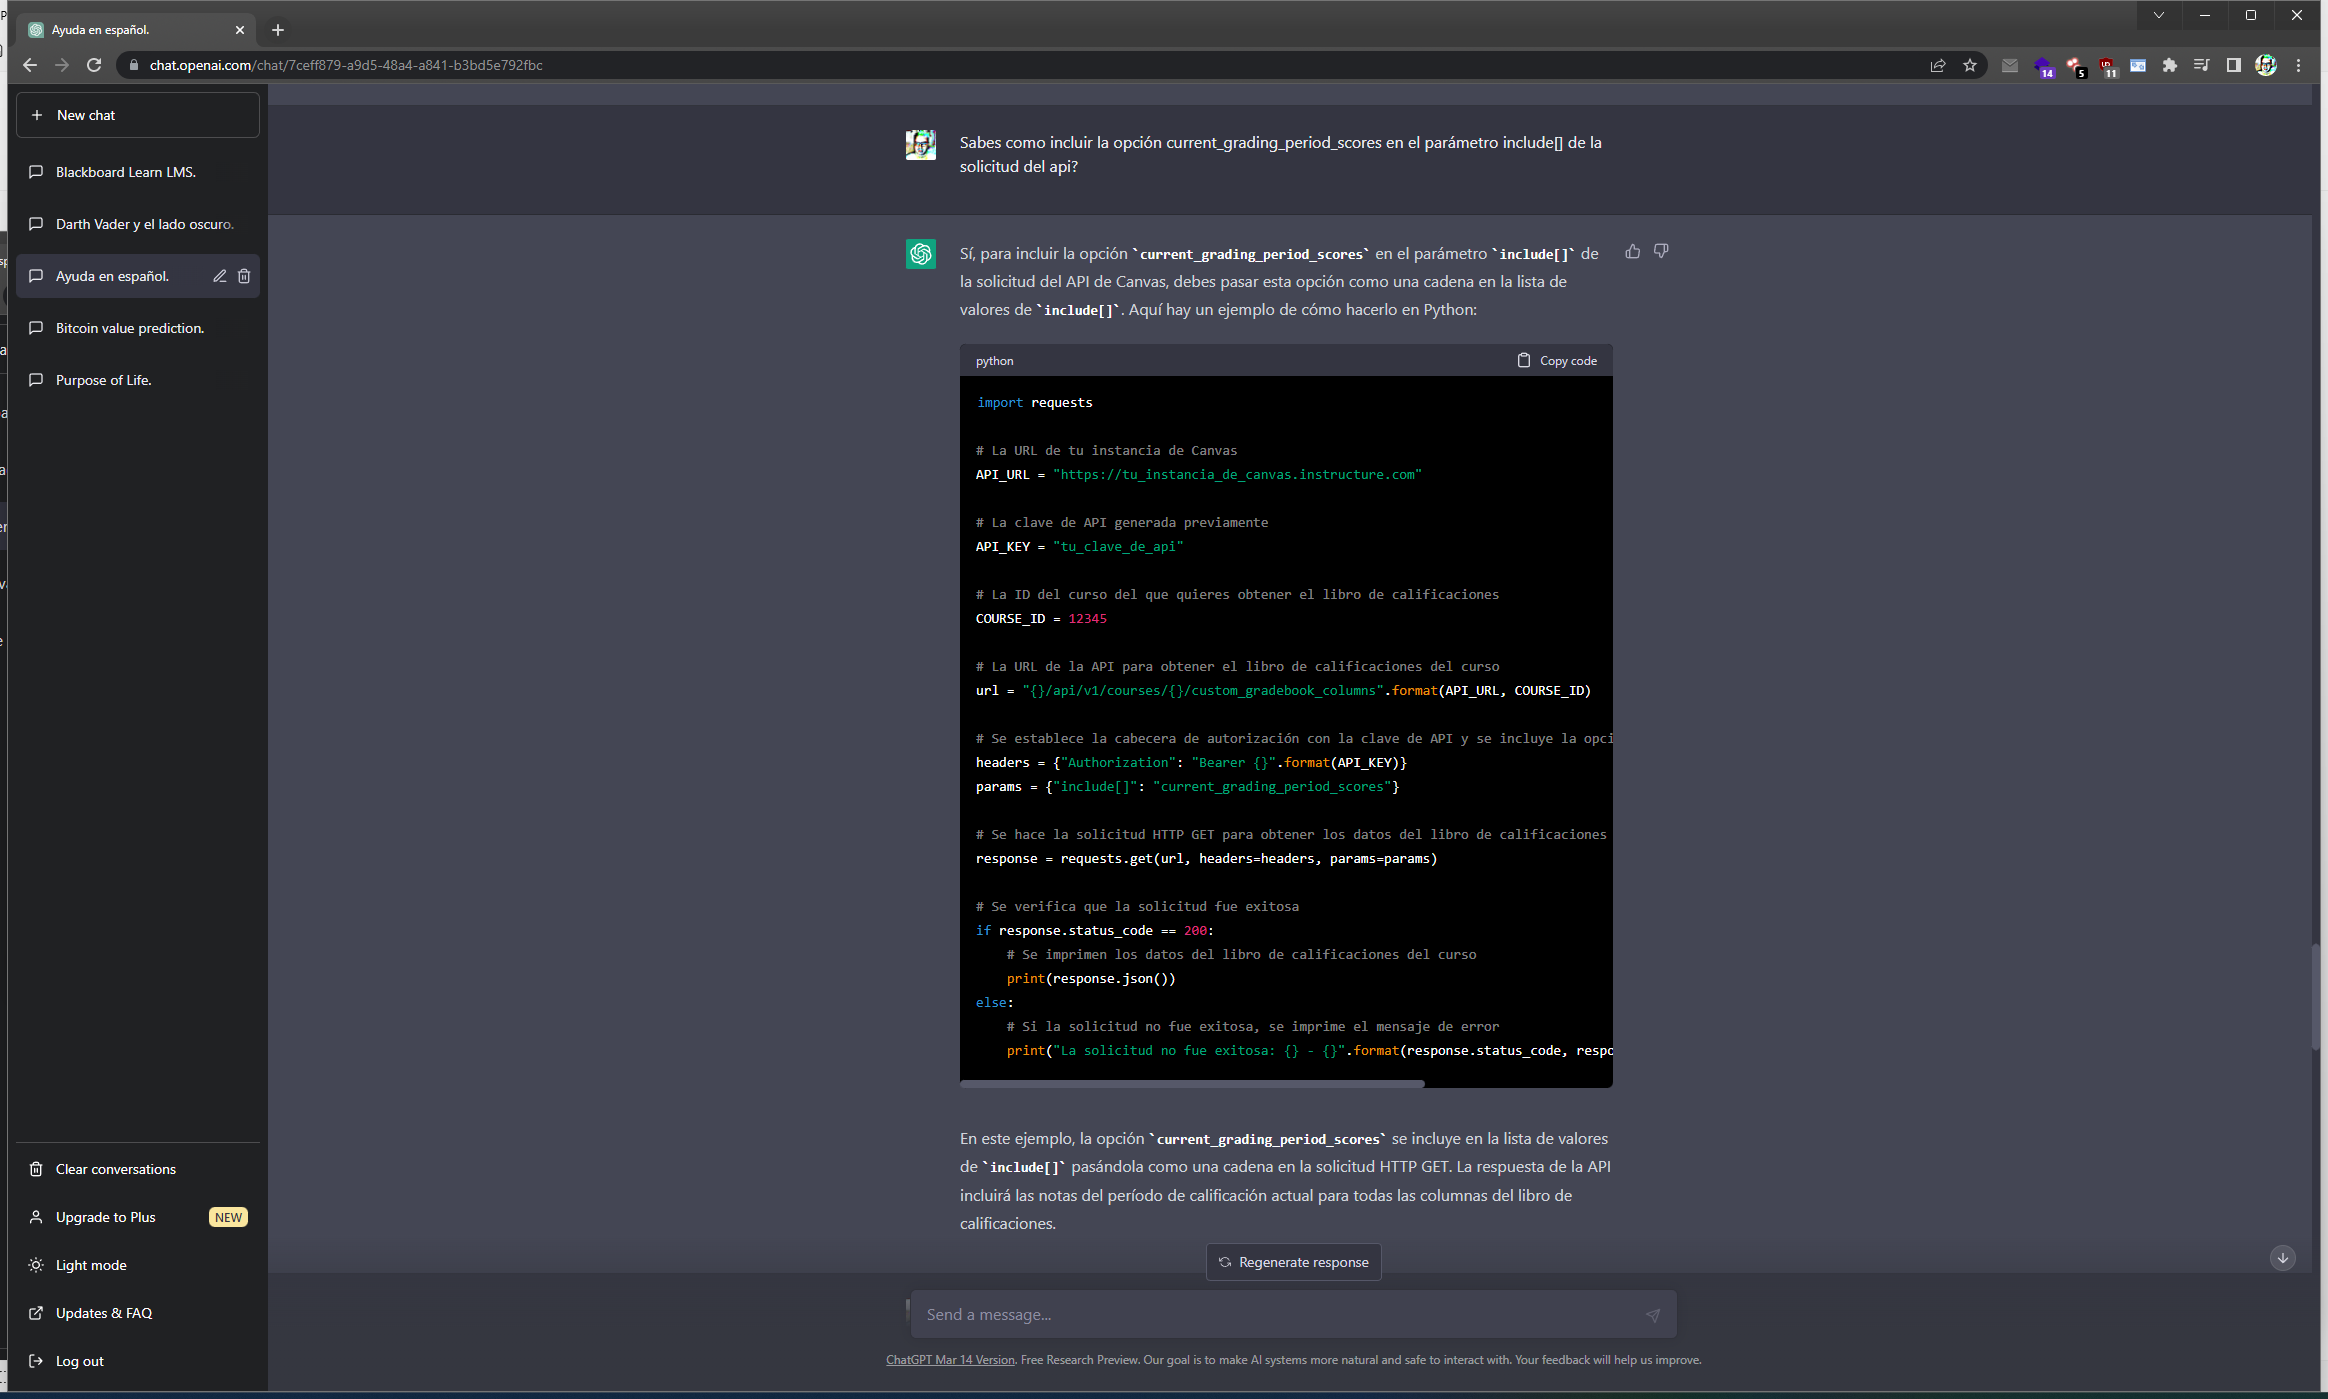
    <h3 id="sabes-como-incluir-la-opción-current_grading_period_scores-en-el-parámetro-include-de-la-solicitud-del-api">Sabes como incluir la opción current_grading_period_scores en el parámetro include[] de la solicitud del api?</h3>
    <p><img src="/assets/images/posts/grades-weighted-automatically_and_ChatGPT/es/ChatGPT-006-001.png" alt="" /></p>
  </li>
  <li>
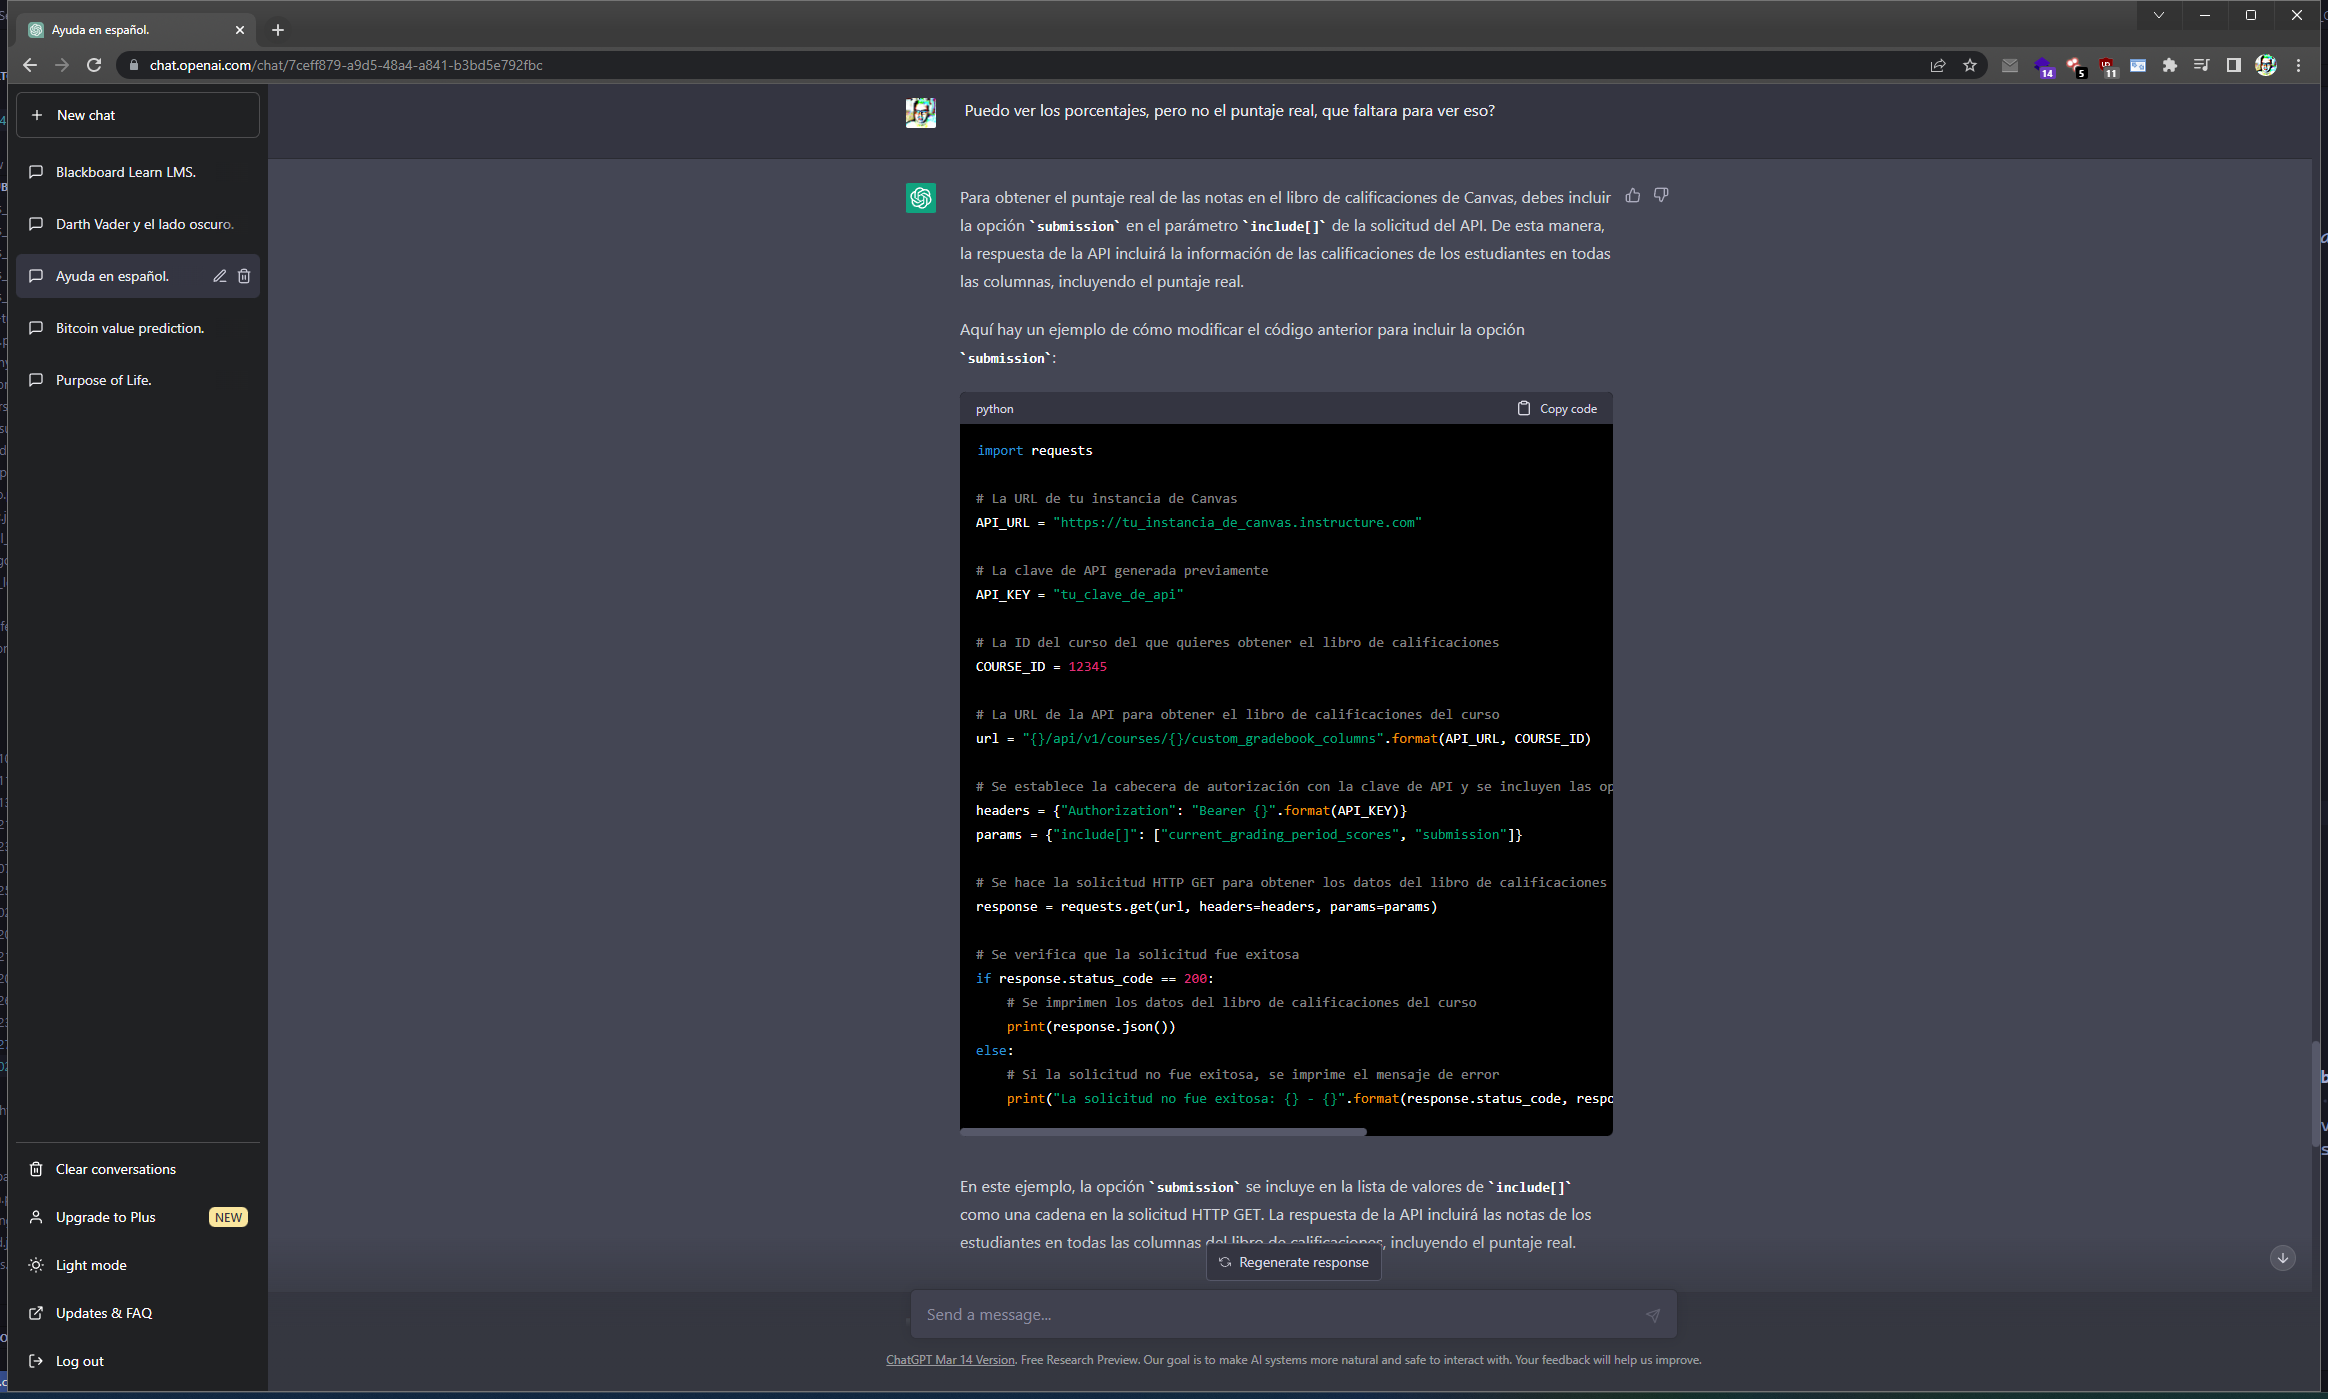
    <h3 id="puedo-ver-los-porcentajes-pero-no-el-puntaje-real-que-faltara-para-ver-eso">Puedo ver los porcentajes, pero no el puntaje real, que faltara para ver eso?</h3>
    <p><img src="/assets/images/posts/grades-weighted-automatically_and_ChatGPT/es/ChatGPT-007-001.png" alt="" /></p>
  </li>
  <li>
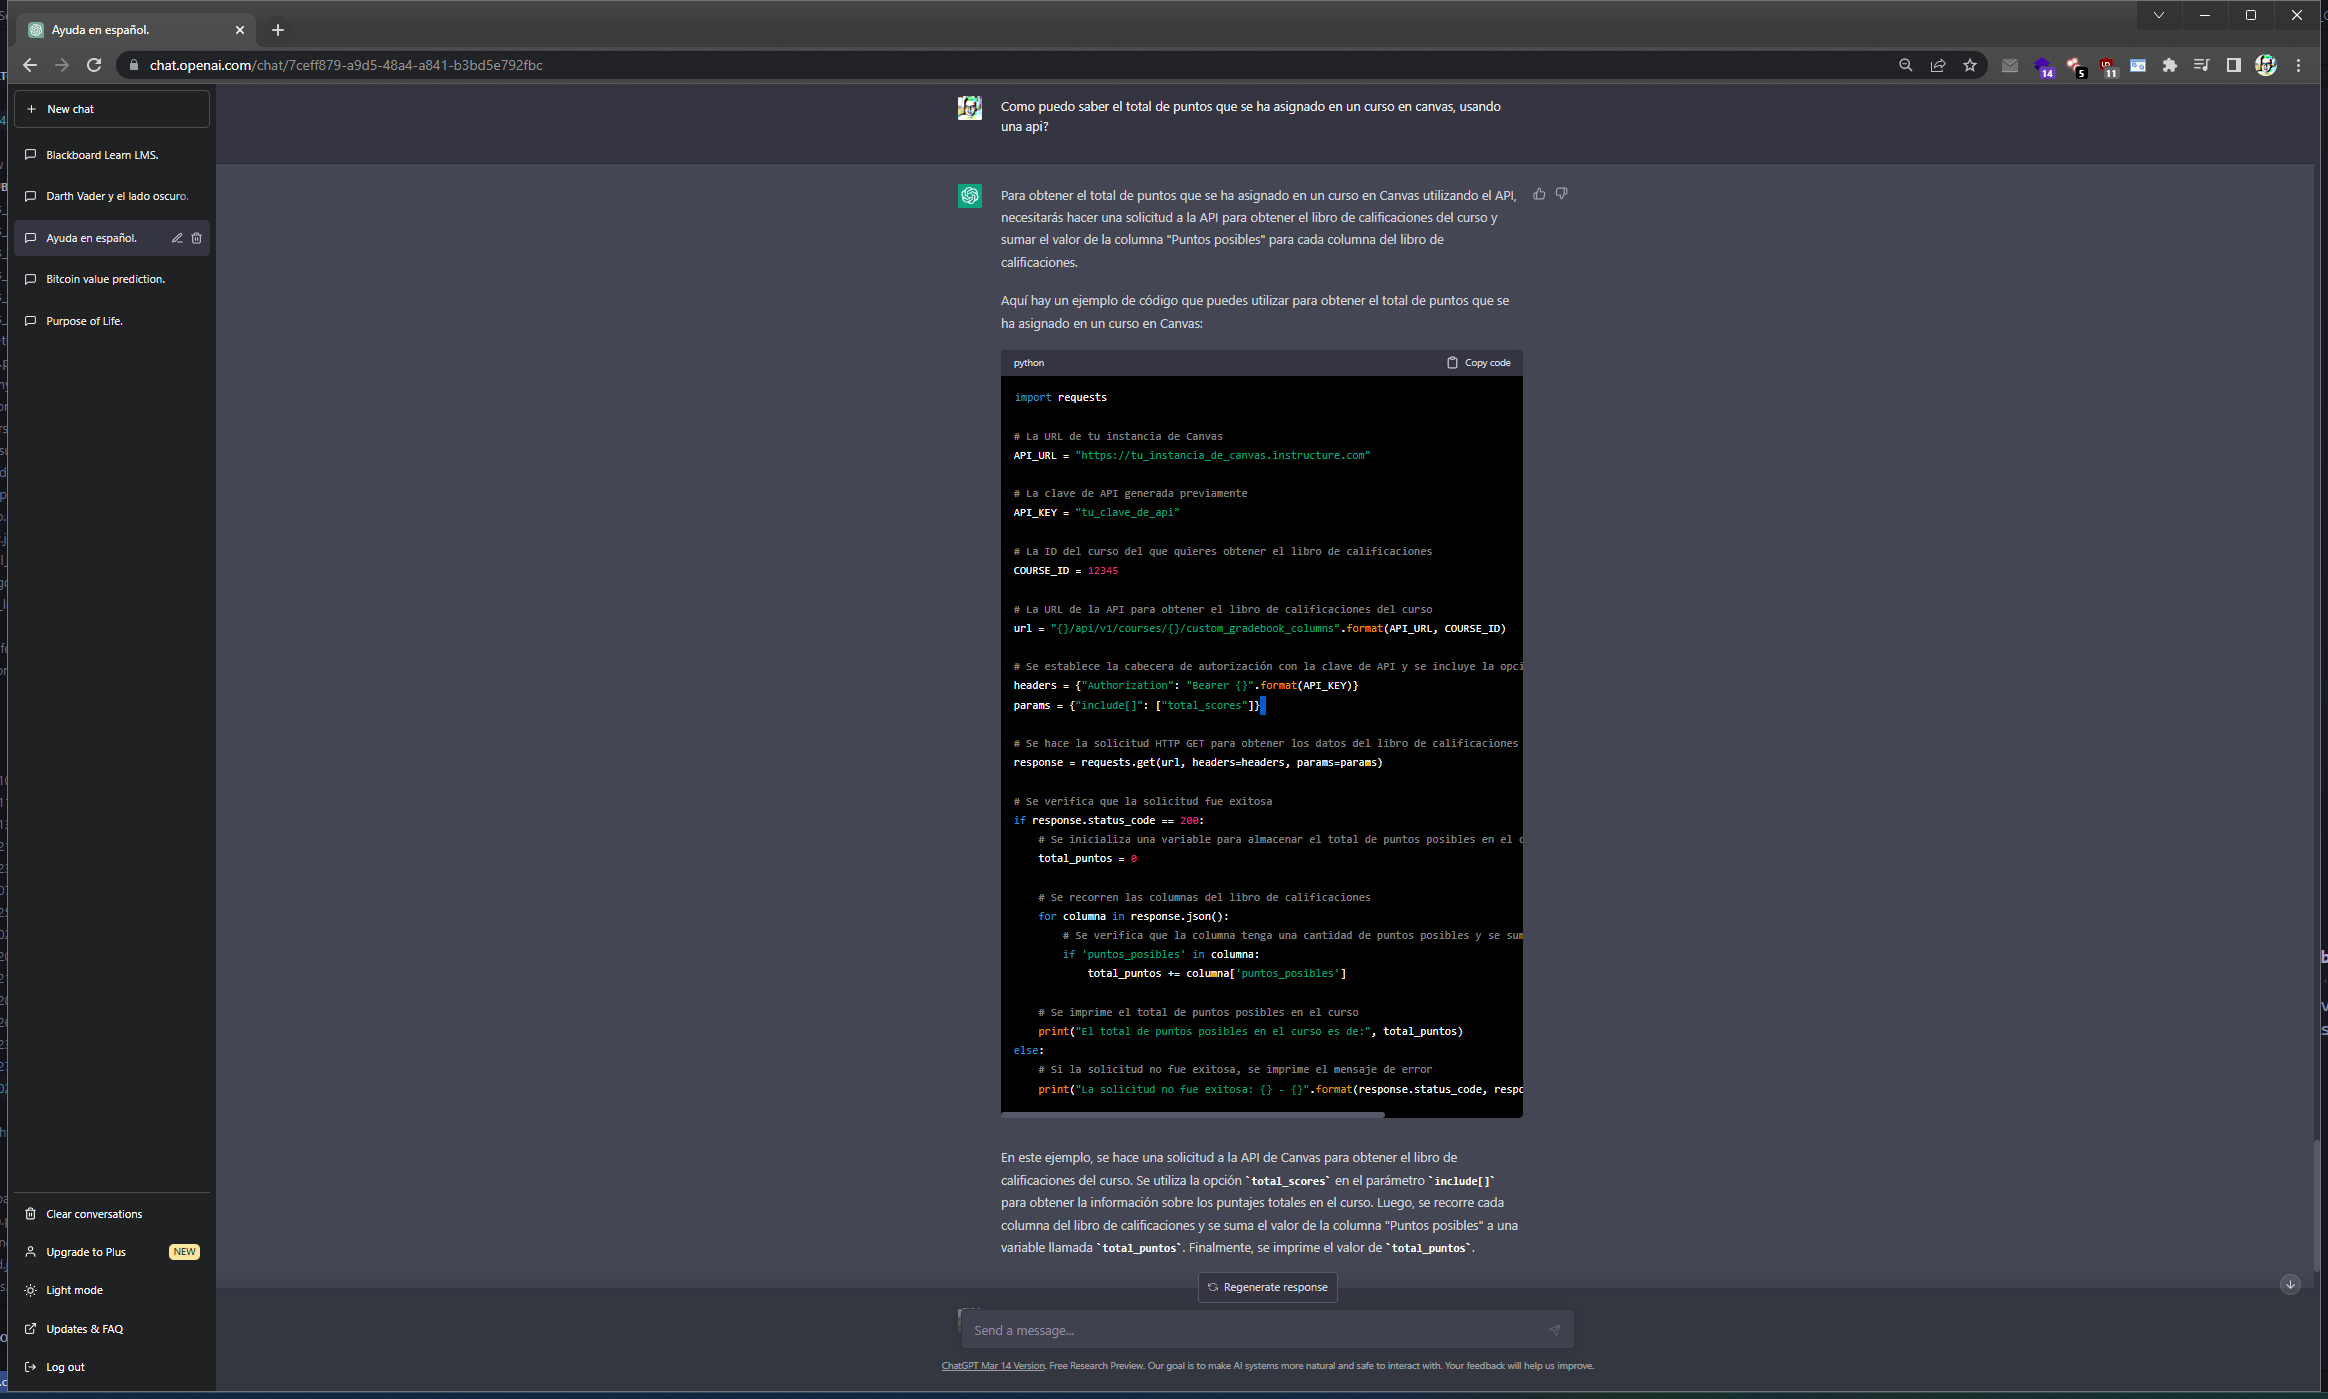
    <h3 id="como-puedo-saber-el-total-de-puntos-que-se-ha-asignado-en-un-curso-en-canvas-usando-una-api">Como puedo saber el total de puntos que se ha asignado en un curso en canvas, usando una api?</h3>
    <p><img src="/assets/images/posts/grades-weighted-automatically_and_ChatGPT/es/ChatGPT-008-001.png" alt="" /></p>
  </li>
  <li>
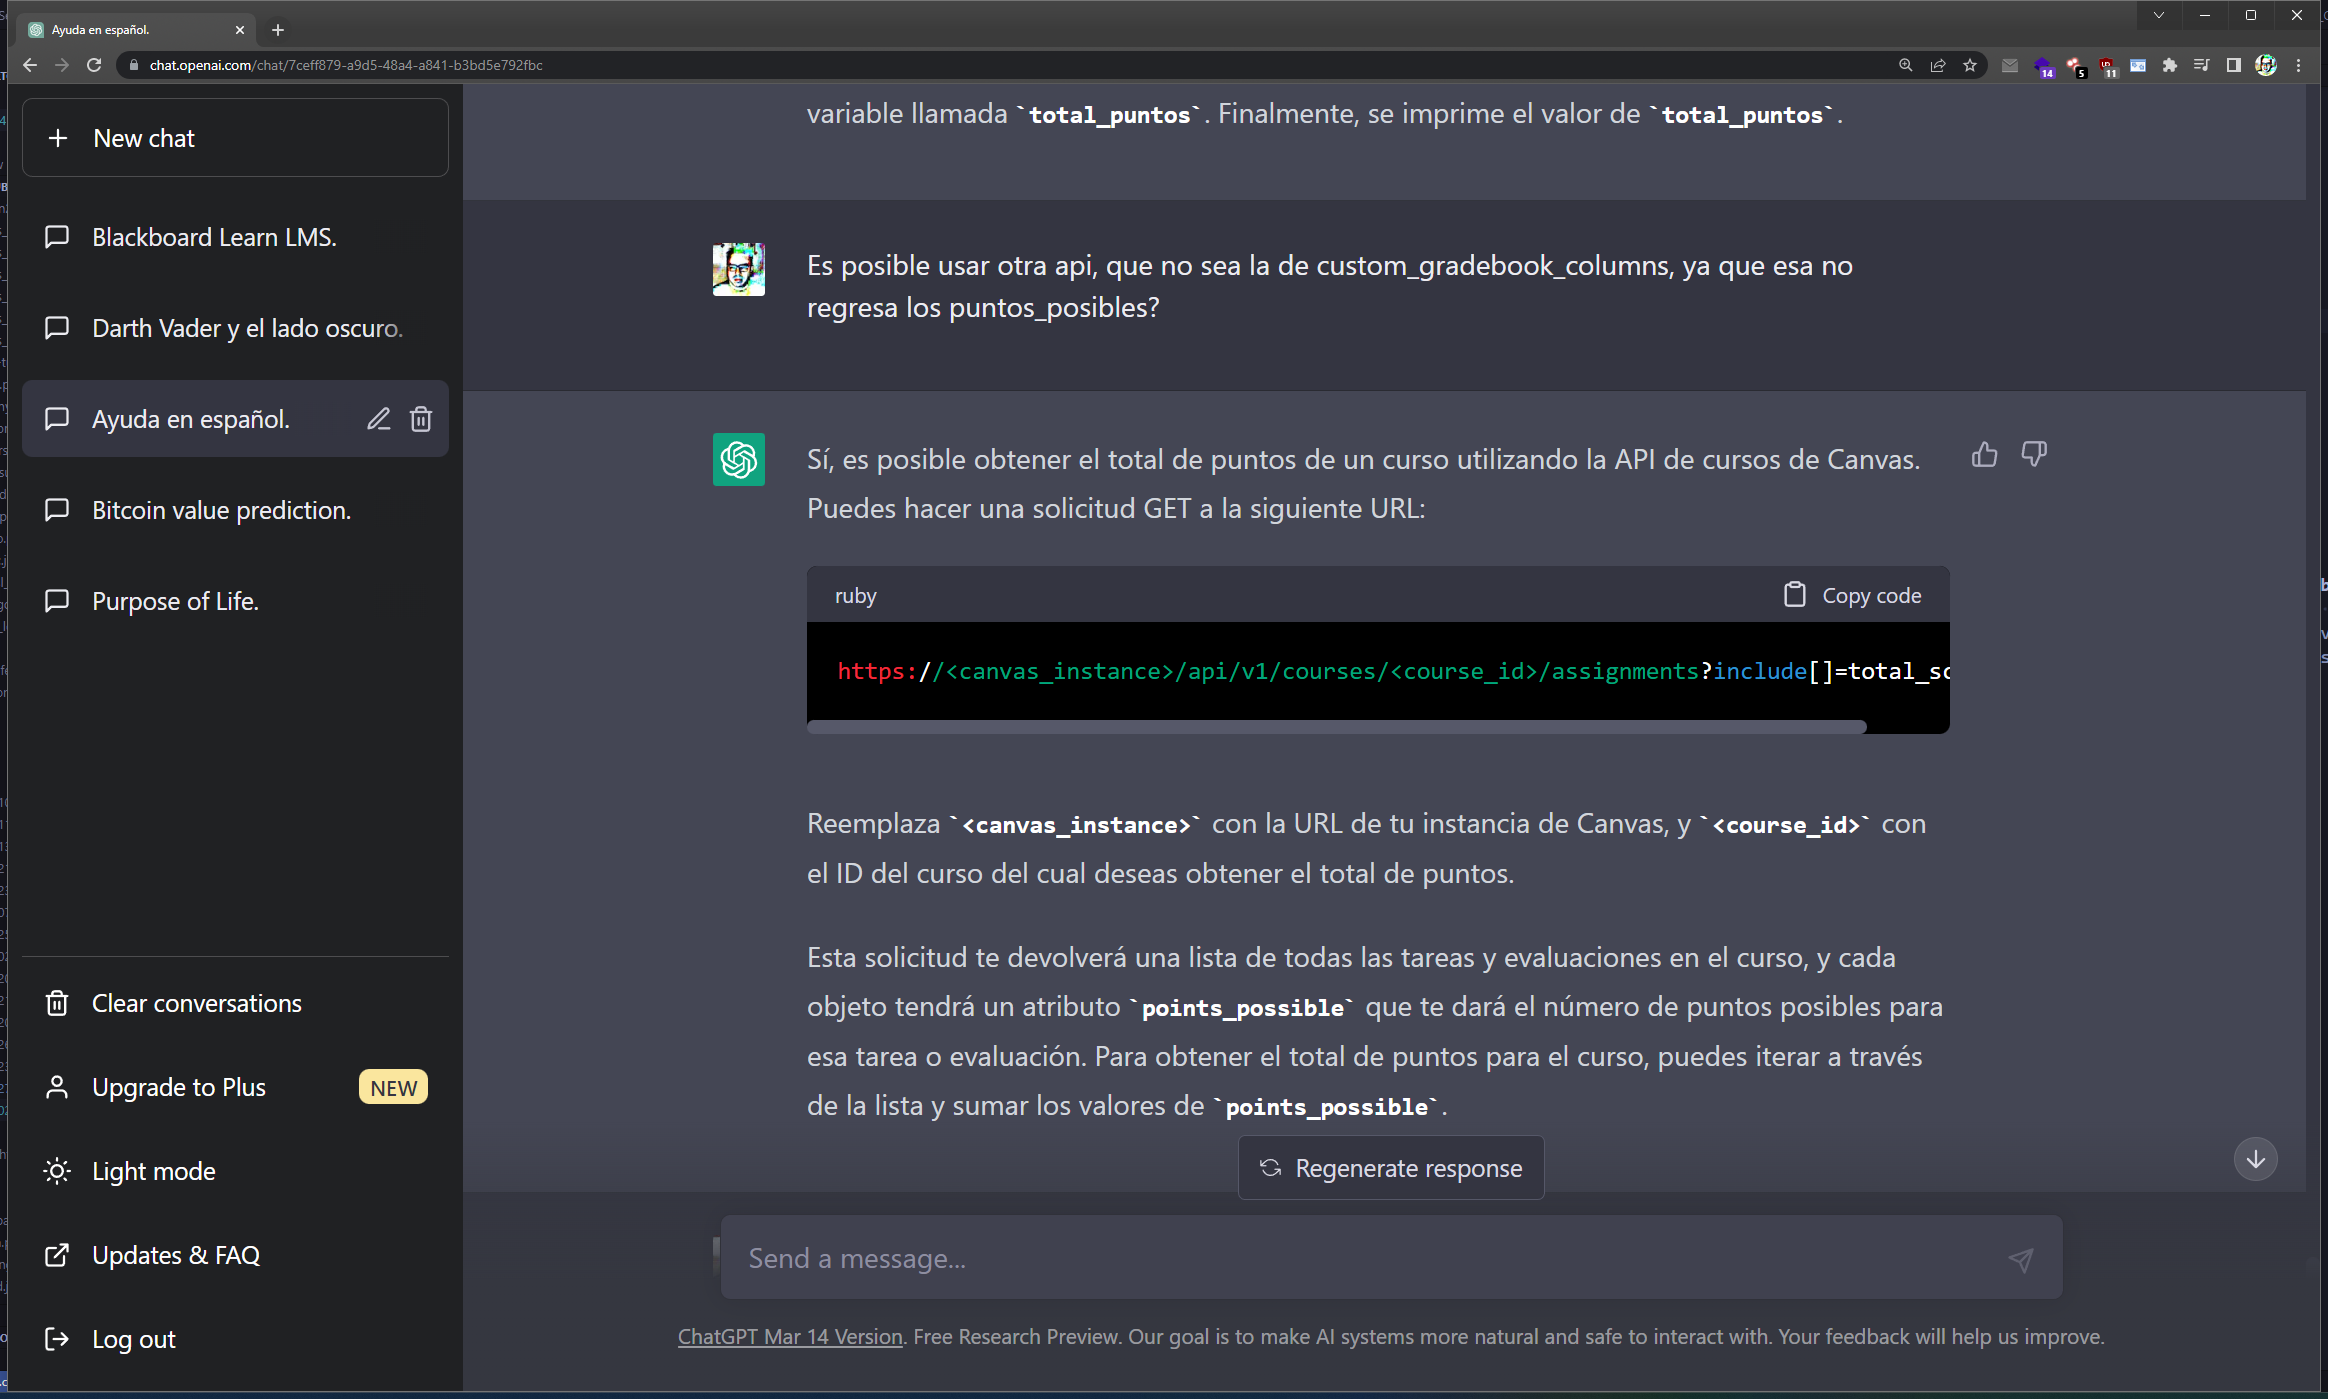
    <h3 id="es-posible-usar-otra-api-que-no-sea-la-de-custom_gradebook_columns-ya-que-esa-no-regresa-los-puntos_posibles">Es posible usar otra api, que no sea la de custom_gradebook_columns, ya que esa no regresa los puntos_posibles?</h3>
    <p><img src="/assets/images/posts/grades-weighted-automatically_and_ChatGPT/es/ChatGPT-009-001.png" alt="" /></p>
  </li>
  <li>
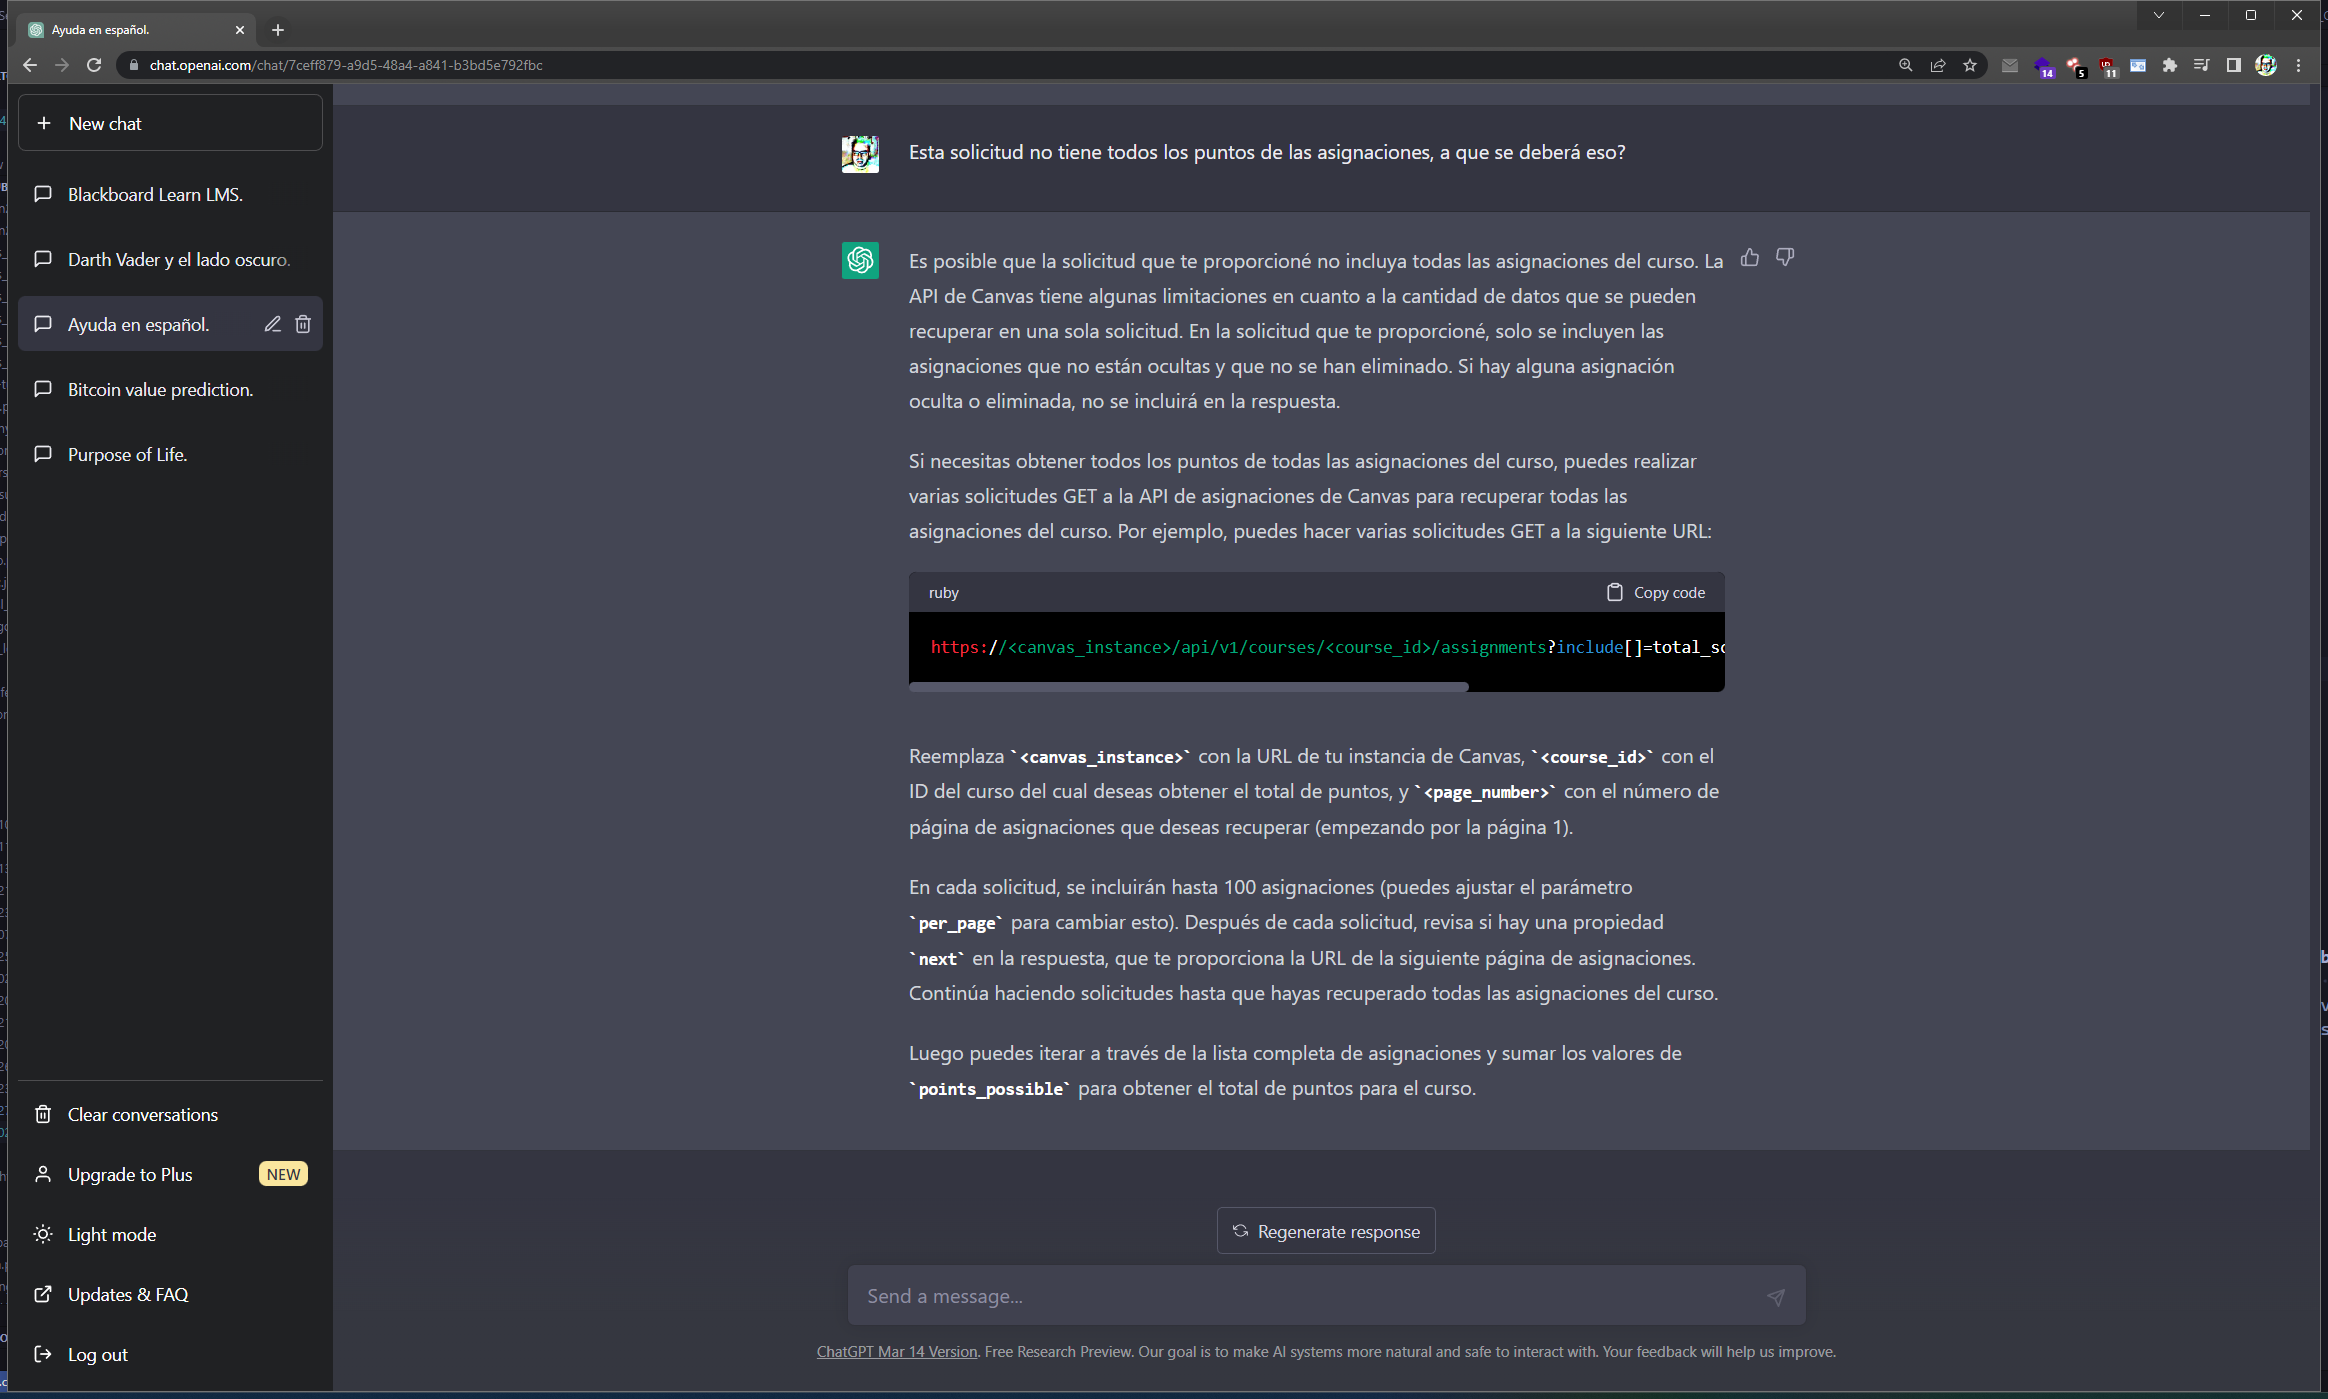
    <h3 id="esta-solicitud-no-tiene-todos-los-puntos-de-las-asignaciones-a-que-se-deberá-eso">Esta solicitud no tiene todos los puntos de las asignaciones, a que se deberá eso?</h3>
    <p><img src="/assets/images/posts/grades-weighted-automatically_and_ChatGPT/es/ChatGPT-010-001.png" alt="" /></p>
  </li>
  <li>
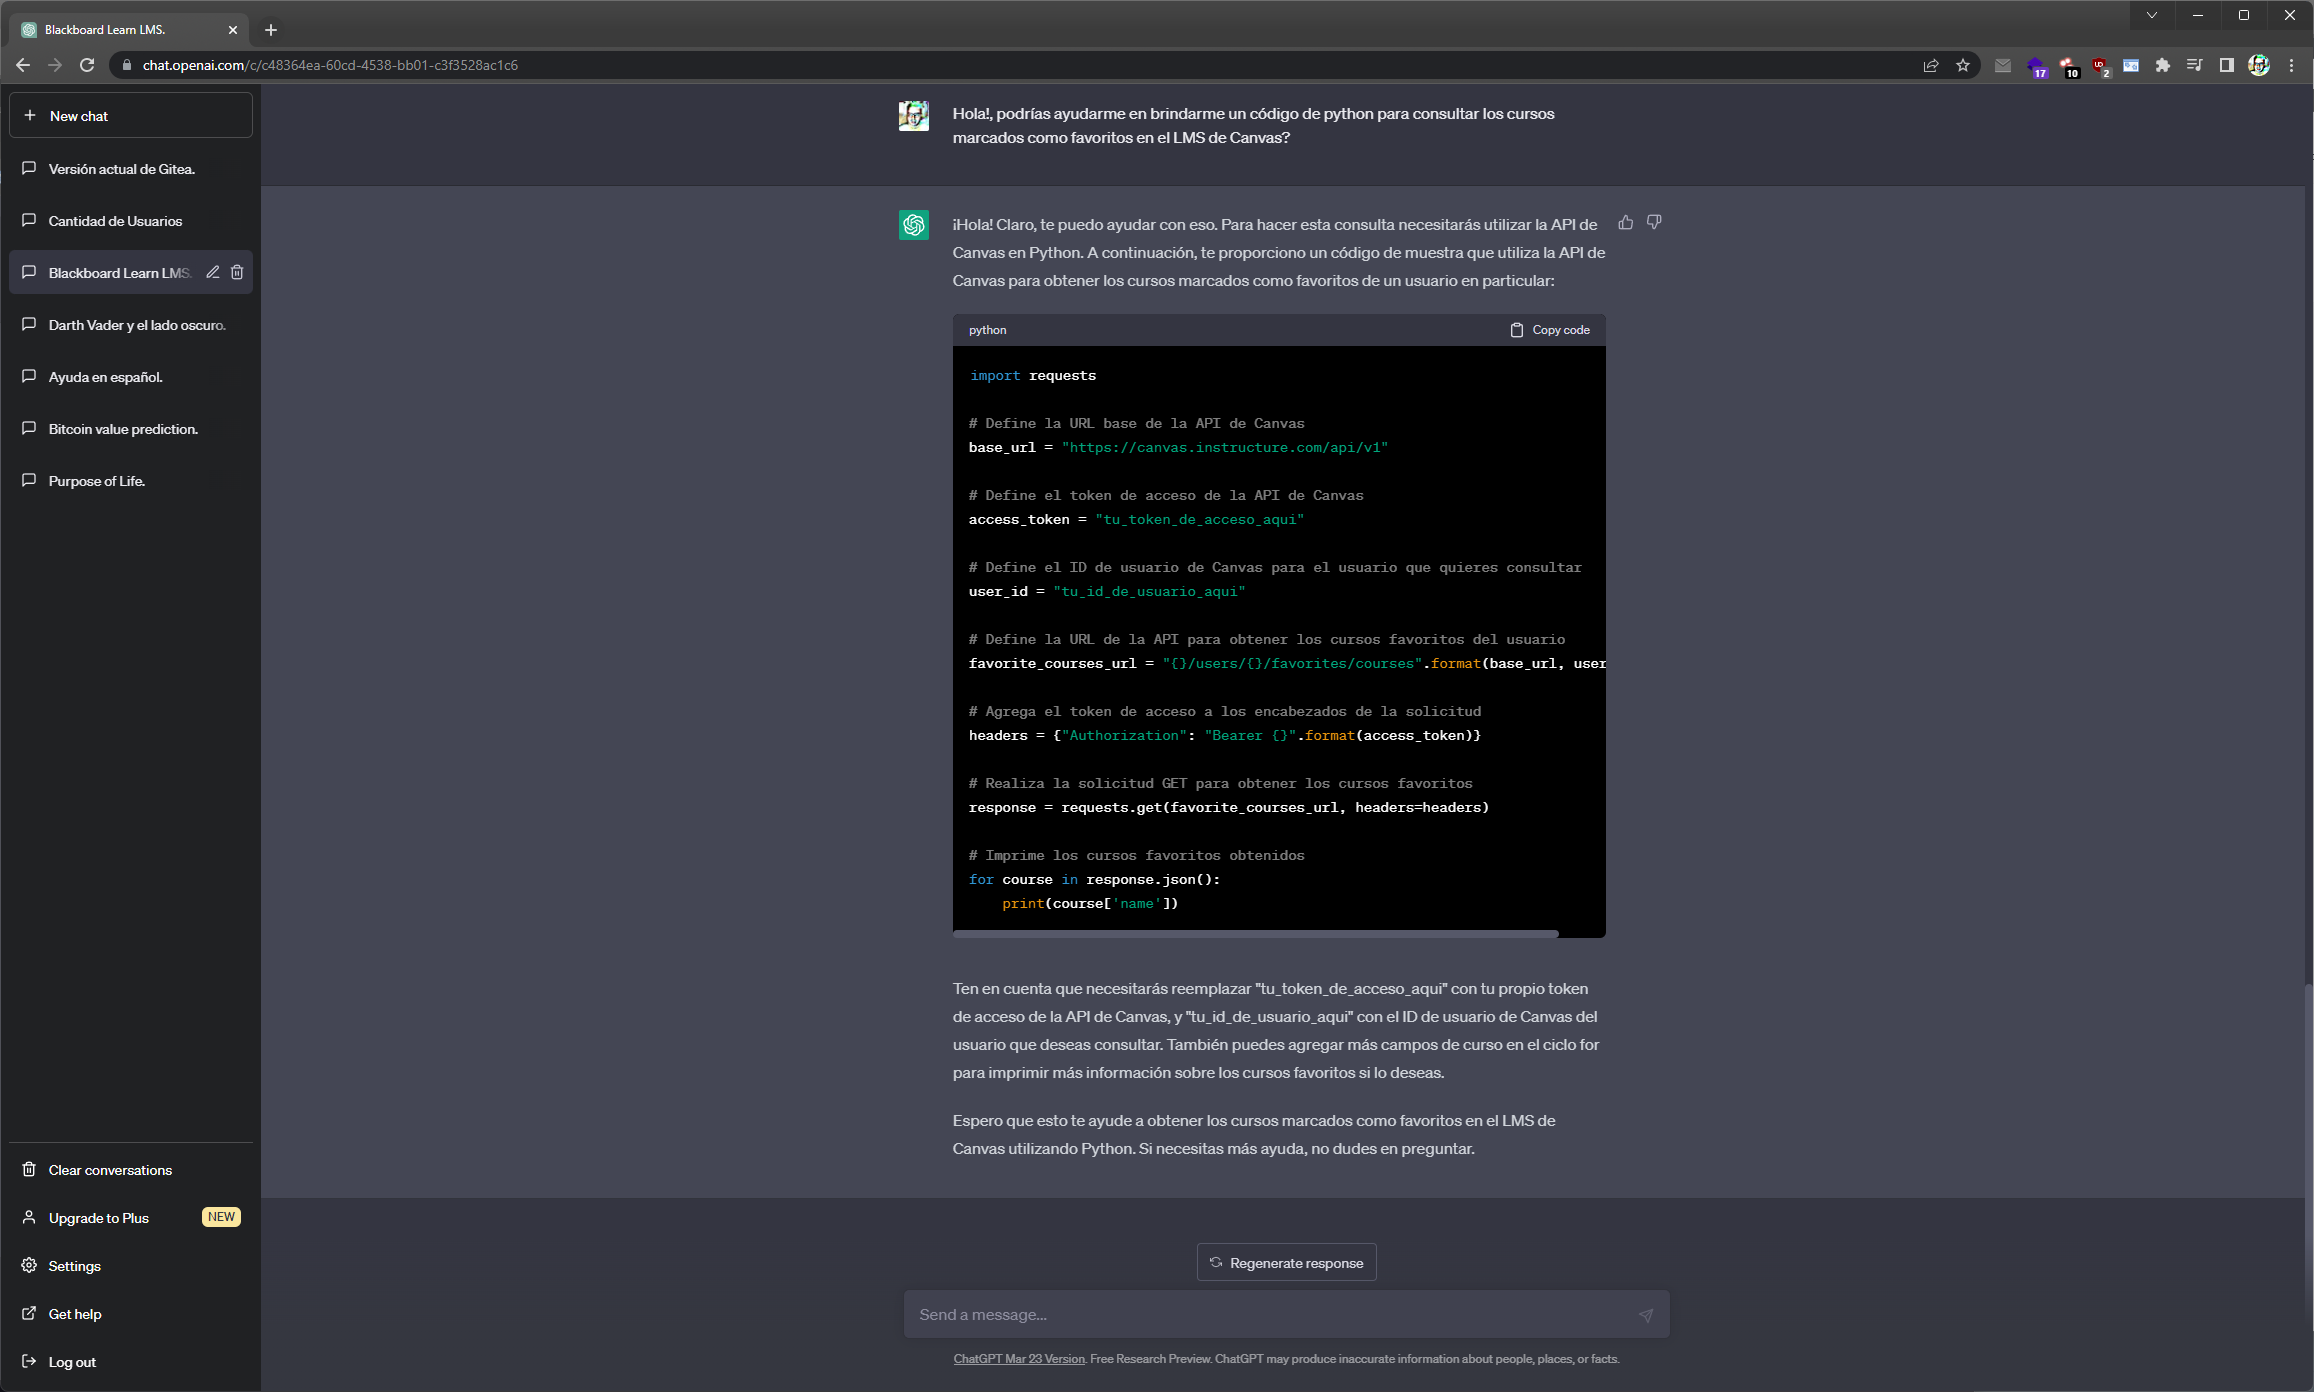
    <h3 id="hola-podrías-ayudarme-en-brindarme-un-código-de-python-para-consultar-los-cursos-marcados-como-favoritos-en-el-lms-de-canvas">Hola!, podrías ayudarme en brindarme un código de python para consultar los cursos marcados como favoritos en el LMS de Canvas?</h3>
    <p><img src="/assets/images/posts/grades-weighted-automatically_and_ChatGPT/es/ChatGPT-011-001.png" alt="" /></p>
  </li>
  <li>
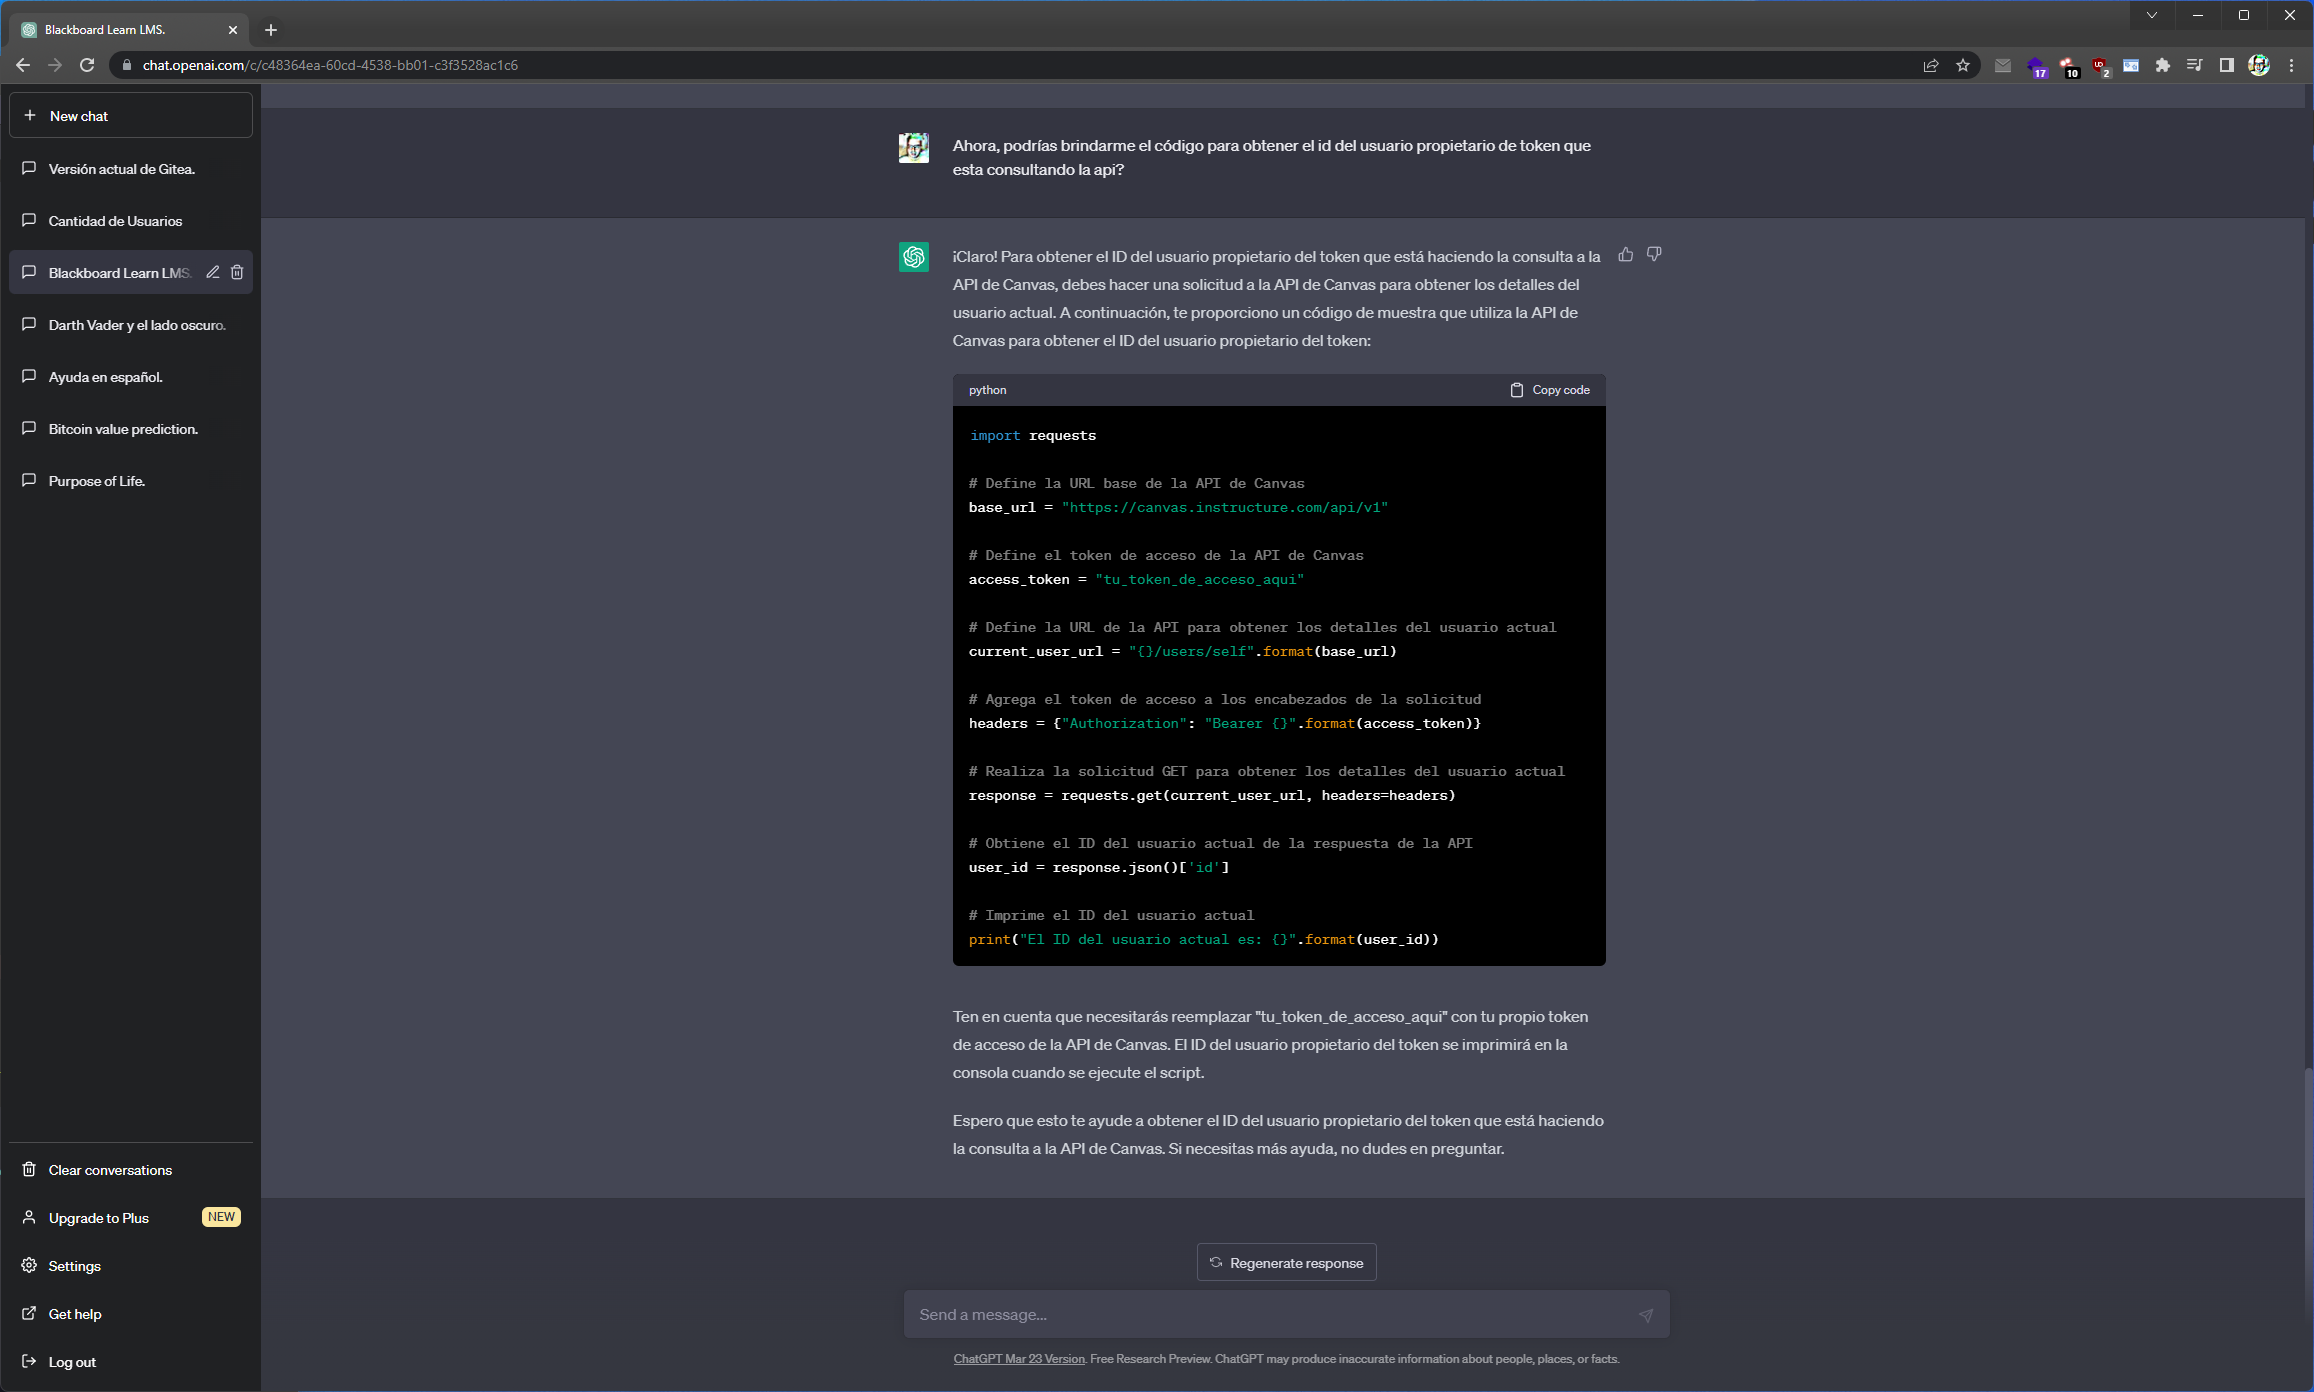
    <h3 id="ahora-podrías-brindarme-el-código-para-obtener-el-id-del-usuario-propietario-de-token-que-esta-consultando-la-api">Ahora, podrías brindarme el código para obtener el id del usuario propietario de token que esta consultando la api?</h3>
    <p><img src="/assets/images/posts/grades-weighted-automatically_and_ChatGPT/es/ChatGPT-012-001.png" alt="" /></p>
  </li>
</ol>

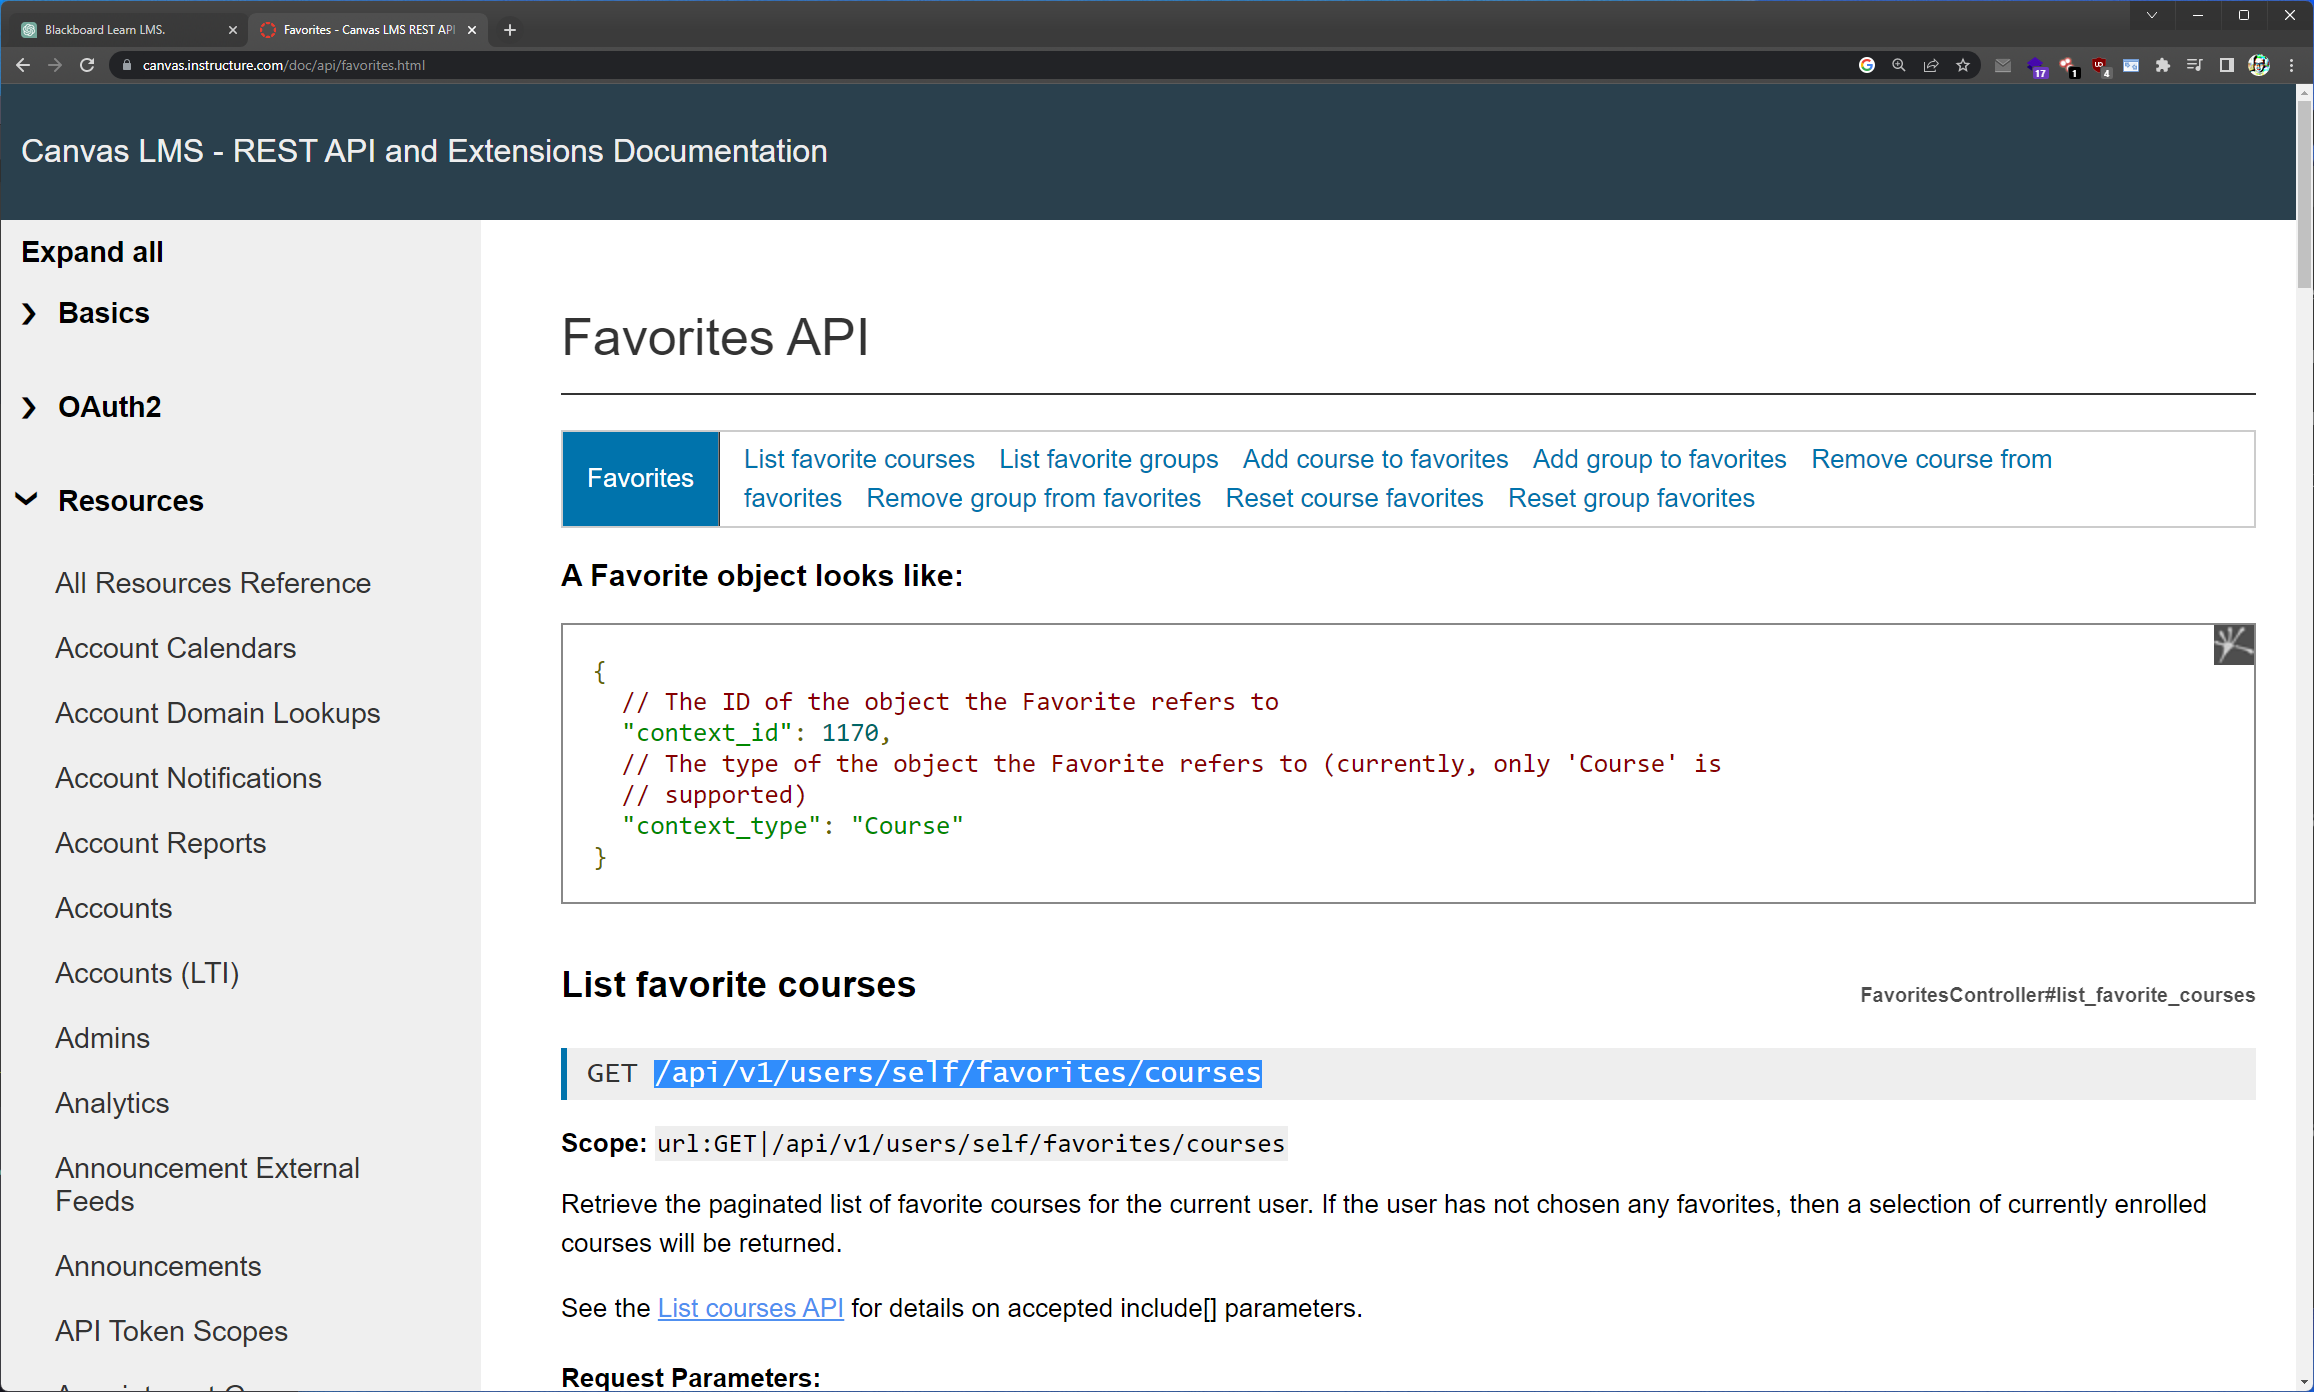
<h2 id="ayuda-de-la-documentación-del-api-de-canvas">Ayuda de la <a href="https://canvas.instructure.com/doc/api/favorites.html">documentación del API de Canvas</a></h2>

<p><img src="/assets/images/posts/grades-weighted-automatically_and_ChatGPT/Canvas_LMS_REST_API_and_Extenions_Documentation_001.png" alt="" /></p>

<h2 id="solución-iii">Solución III</h2>

<p><img src="/assets/images/posts/grades-weighted-automatically_and_ChatGPT/tutorial-preview-large.png" alt="" /></p>

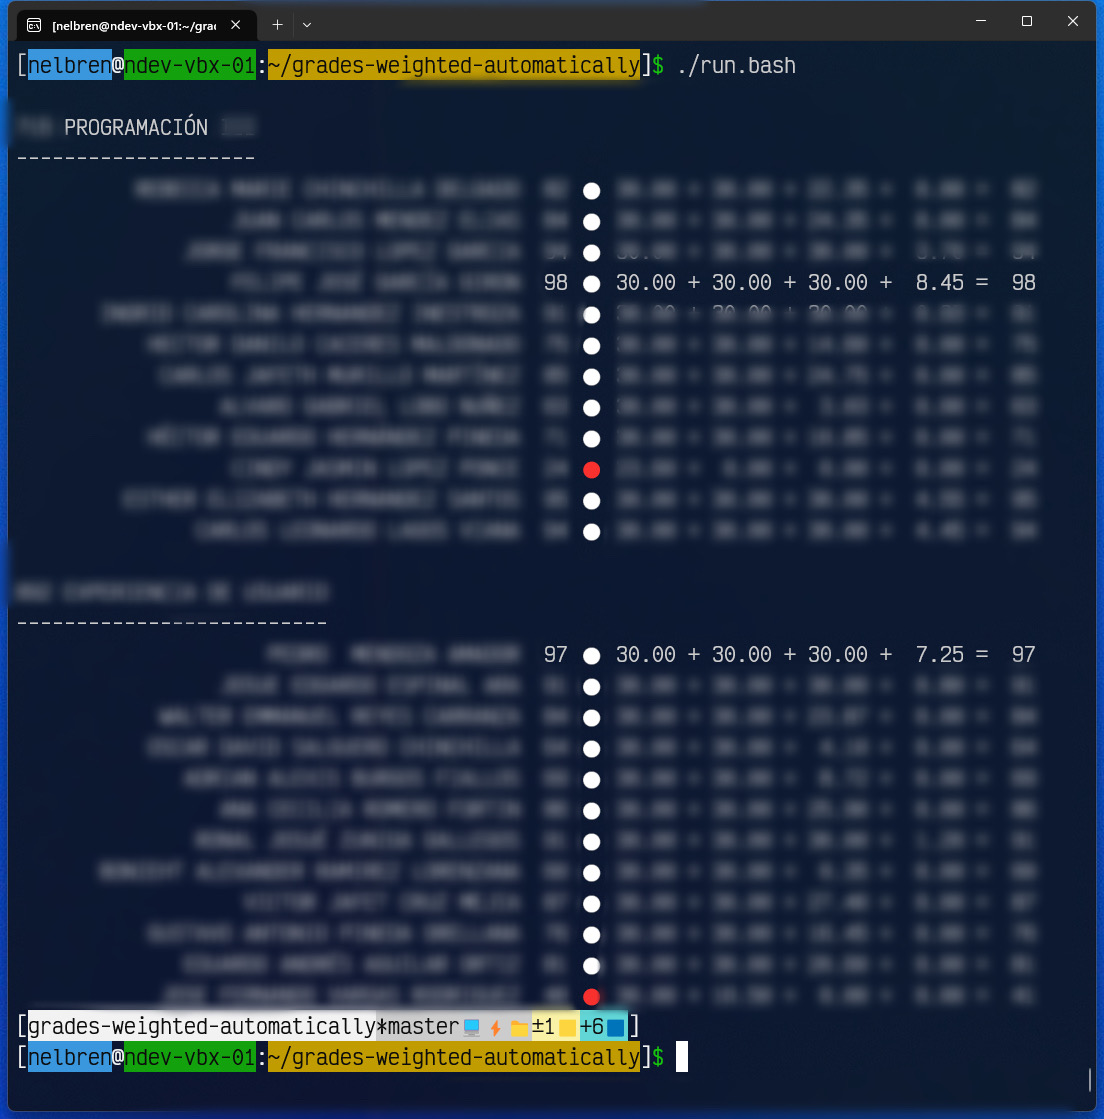
<p>Esta <a href="https://github.com/nelbren/grades-weighted-automatically">tercera solución</a> presenta la ventaja de utilizar la API directamente, eliminando la necesidad de exportar archivos CSV, mientras genera las calificaciones ponderadas. 😎</p>

<p><img src="/assets/images/posts/grades-weighted-automatically_and_ChatGPT/grades-weighted-automatically.jpg" alt="" /></p>

<hr />

<h2 id="conclusiones">Conclusiones</h2>

<ul>
  <li>
    <h3 id="cumplimiento">Cumplimiento</h3>
    <p><img src="/assets/images/posts/grades-weighted-automatically_and_ChatGPT/AI.png" alt="" /></p>
    <ul>
      <li>
        <h4 id="la-conversación-con-chatgpt-nos-permitió-identificar-lo-siguiente">La conversación con <strong>ChatGPT</strong> nos permitió identificar lo siguiente:</h4>
        <ul>
          <li>La viabilidad de trabajar con la <strong>API</strong>.</li>
          <li>Cómo enviar opciones al parámetro <strong>“include[]”</strong>.</li>
          <li>La metodología para generar los <strong>puntos posibles</strong>.</li>
          <li>La utilidad del parámetro <strong>“page_number”</strong>.</li>
          <li>El proceso para obtener <strong>los cursos favoritos</strong>.</li>
        </ul>
      </li>
    </ul>
  </li>
  <li>
    <h3 id="propósito">Propósito</h3>
    <p><img src="/assets/images/posts/grades-weighted-automatically_and_ChatGPT/Persona.png" alt="" /></p>
    <ul>
      <li>
        <h4 id="considerando-el-objetivo-nos-centramos-en-buscar-una-respuesta-utilizando-los-datos-obtenidos">Considerando el objetivo, nos centramos en buscar una respuesta utilizando los datos obtenidos.</h4>
      </li>
    </ul>
  </li>
</ul>

<h2 id="referencias">Referencias</h2>

<ul>
  <li><a href="https://chat.openai.com/chat">ChatGTP</a></li>
  <li><a href="https://canvas.instructure.com/doc/api/index.html">Welcome to the Canvas LMS API Documentation</a></li>
  <li><a href="https://www.youtube.com/watch?v=8LB_GKZhhf4">Qué empresas crecerán con Inteligencia Artificial (y cuáles no)</a></li>
  <li><a href="https://www.youtube.com/watch?v=D0Y-8LS-7gY">¿La IA es una amenaza para la humanidad? ¿Debemos prohibirla?</a></li>
</ul>]]></content><author><name>Martin Nelbren Cuellar</name></author><category term="es" /><category term="blackboard" /><category term="canvas" /><category term="chatgpt" /><category term="blackboard" /><category term="canvas" /><category term="chatgpt" /><category term="api" /><summary type="html"><![CDATA[Calificaciones ponderadas automáticamente y ChatGPT v2]]></summary></entry><entry><title type="html">Automatically weighted grades and ChatGPT</title><link href="https://nelbren.com/en/blackboard/canvas/chatgpt/grades-weighted-automatically_and_ChatGPT/" rel="alternate" type="text/html" title="Automatically weighted grades and ChatGPT" /><published>2023-04-02T00:00:00-06:00</published><updated>2023-04-18T03:30:00-06:00</updated><id>https://nelbren.com/en/blackboard/canvas/chatgpt/grades-weighted-automatically_and_ChatGPT</id><content type="html" xml:base="https://nelbren.com/en/blackboard/canvas/chatgpt/grades-weighted-automatically_and_ChatGPT/"><![CDATA[<h1 id="automatically-weighted-grades-and-chatgpt">Automatically weighted grades and ChatGPT</h1>

<h2 id="introduction">Introduction</h2>

<p><img src="/assets/images/posts/grades-weighted-automatically_and_ChatGPT/examenes-memes-2490761.jpg" alt="" /></p>

<p>One of the activities that is carried out when working with learning management systems (LMS) is to manage the grades obtained by students, either to report on their performance; this allows them to see their grades on each activity and the final grade for the course.</p>

<p>However, it is sometimes necessary to report scores to other external systems, so this creates an opportunity to develop a solution that performs this process.</p>

<hr />

<h2 id="what-is-blackboard">What is Blackboard?</h2>

<p><img src="/assets/images/posts/grades-weighted-automatically_and_ChatGPT/Blackboard.png" alt="" /></p>

<p>The first LMS used is <a href="https://www.blackboard.com/">Blackboard Learn</a>; It is an online platform that allows teachers to create and manage online courses, and students to access these courses, interact with teaching material, and complete online activities and assessments.</p>

<p>So far, so good with the use of the LMS 👍, however, a problem was identified, since it was necessary to transfer the final grade of <strong>weighted form</strong> to another system of administration of the qualifications.</p>

<hr />

<h2 id="grading-system">Grading System</h2>

<p><img src="/assets/images/posts/grades-weighted-automatically_and_ChatGPT/Calificaciones.jpg" alt="" /></p>

<p>In this system it is necessary to carry out a <strong>weighting</strong> of the maximum grade of each exam (a total of 3) plus a cumulative one. So this was done manually, where many times it worked without problems, but in some cases, that the notes were greater than the weight, it had to be distributed. The latter, I create an opportunity for improvement in order to create a solution that allows the distribution of the final grade, in the weightings that are needed and that is calculated more precisely using decimals, since when it is done with human intervention normally generated errors in the calculations.</p>

<hr />

<h2 id="solution-i">Solution I</h2>

<p><img src="/assets/images/posts/grades-weighted-automatically_and_ChatGPT/6133884.png" alt="" /></p>

<p>This first solution is very simple, since the only thing that is wanted is to generate the weighted grades. The <strong>LMS Blackboard</strong> system allows you to export grades to a CSV file, so a program called <a href="https://github.com/nelbren/grades-weighted-automatically/tree/0a93a42a4e6e5df494d7e03378f52e70030e92f2">grades-weighted-automatically</a> was developed; that read the generated file or files, obtaining the desired result. This solution was functional for a while.</p>

<hr />

<h2 id="lms-change">LMS change</h2>

<p><img src="/assets/images/posts/grades-weighted-automatically_and_ChatGPT/Cambio.png" alt="" /></p>

<p>The educational entity made a change of <strong>LMS</strong>, going from <strong>Blackboard</strong> to <strong>Canvas</strong>.</p>

<hr />

<h2 id="what-is-canvas">What is Canvas?</h2>

<p><img src="/assets/images/posts/grades-weighted-automatically_and_ChatGPT/Canvas_Stacked_ByInstructure_Color_RGB.png" alt="" /></p>

<p><a href="https://www.instructure.com/lms-learning-management-system">Canvas</a> is an online learning management system that offers a wide range of tools and features for online teaching and learning, with a focus on ease of use and user experience.</p>

<hr />

<h2 id="solution-ii">Solution II</h2>

<p><img src="/assets/images/posts/grades-weighted-automatically_and_ChatGPT/6133884.png" alt="" /></p>

<p>This second solution also maintains its simplicity, since again the only thing that is wanted is to generate the weighted scores. The <strong>LMS Canvas</strong> system allows exporting to a CSV file with grades, so the <a href="https://github.com/nelbren/grades-weighted-automatically/tree/7af1b12381ec6e6af18f0519a4e00b5d3f2a2c42">grades-weighted-automatically</a> program is modified; keeping the scheme of reading the generated files, obtaining the desired result.</p>

<p>Finishing the migration to the use of the new LMS, this server thought: is it possible to eliminate the export step and consult the LMS directly using an <strong>API</strong>?; so we proceeded to make the query to <strong>ChatGPT</strong>.</p>

<hr />

<h2 id="what-is-chatgpt">What is ChatGPT?</h2>

<p><img src="/assets/images/posts/grades-weighted-automatically_and_ChatGPT/ChatGPT.png" alt="" /></p>

<p><strong>We are living in an exciting time when it comes to AI technology, as advances in AI research and development are enabling more sophisticated and complex applications in a variety of fields.</strong></p>

<p>In particular, AI has been increasingly used in areas such as medicine, education, scientific research, transportation, and manufacturing. This has enabled significant advances in efficiency, precision and productivity in these fields.</p>

<p>An AI language model known as <a href="https://chat.openai.com/chat">ChatGTP</a> is helping propel technology into a more sophisticated and intelligent future. This tool, which itself recognizes that its impact is limited compared to human creativity and innovation, expresses that it is here to help and that it hopes to continue doing so in the future. (This introduction is generated by ChatGPT, with minor modifications)</p>

<h2 id="what-is-an-api">What is an API?</h2>

<p><img src="/assets/images/posts/grades-weighted-automatically_and_ChatGPT/API-EN-1.png" alt="" /></p>

<p>An API (Application Programming Interface) is a piece of code that allows different applications to communicate with each other and share information and functionality. An API is an intermediary between two systems, allowing one application to communicate with another and request specific data or actions.</p>

<h2 id="chatgtp-help">ChatGTP Help</h2>

<p>Below are the queries, help and support received from artificial intelligence.</p>

<ol>
  <li>
    <h3 id="what-would-be-the-code-to-connect-to-the-canvas-api-and-be-able-to-access-the-gradebook">What would be the code to connect to the Canvas API and be able to access the gradebook?</h3>
    <p><img src="/assets/images/posts/grades-weighted-automatically_and_ChatGPT/en/ChatGPT-001-001.png" alt="" />
<img src="/assets/images/posts/grades-weighted-automatically_and_ChatGPT/en/ChatGPT-001-002.png" alt="" /></p>
    <blockquote>
      <p>We proceeded to investigate what the API access key generation process was like, as well as to test that the code worked. Said process was successful, so the AI was right about the feasibility of carrying out said task.
However, not everything was rosy, since access to student grades had not yet been achieved.</p>
    </blockquote>
  </li>
  <li>
    <h3 id="could-you-provide-me-another-code-to-list-the-canvas-gradebook-using-an-api">Could you provide me another code to list the canvas gradebook using an api?</h3>
    <p><img src="/assets/images/posts/grades-weighted-automatically_and_ChatGPT/en/ChatGPT-002-001.png" alt="" /></p>
    <blockquote>
      <p>Student grades were not yet available.</p>
    </blockquote>
  </li>
  <li>
    <h3 id="the-code-fails-with-the-following-message-attributeerror-course-object-has-no-attribute-get_grades-did-you-mean-get_groups-any-idea-what-it-could-be">The code fails with the following message: AttributeError: ‘Course’ object has no attribute ‘get_grades’. Did you mean: ‘get_groups’? Any idea what it could be?</h3>
    <p><img src="/assets/images/posts/grades-weighted-automatically_and_ChatGPT/en/ChatGPT-003-001.png" alt="" /></p>
    <blockquote>
      <p>It was verified that this was not the problem, since it did have the latest version of the library, so it was attempted without a library.</p>
    </blockquote>
  </li>
  <li>
    <h3 id="i-have-the-latest-version-of-canvasapi-but-the-error-persists-any-ideas-to-use-the-api-directly-without-a-library">I have the latest version of canvasapi, but the error persists, any ideas to use the api directly without a library.</h3>
    <p><img src="/assets/images/posts/grades-weighted-automatically_and_ChatGPT/en/ChatGPT-004-001.png" alt="" /></p>
  </li>
  <li>
    <h3 id="the-error-still-persists-will-it-be-possible-to-get-the-grades-using-the-user-or-student">The error still persists, will it be possible to get the grades using the user or student?</h3>
    <p><img src="/assets/images/posts/grades-weighted-automatically_and_ChatGPT/en/ChatGPT-005-001.png" alt="" /></p>
  </li>
  <li>
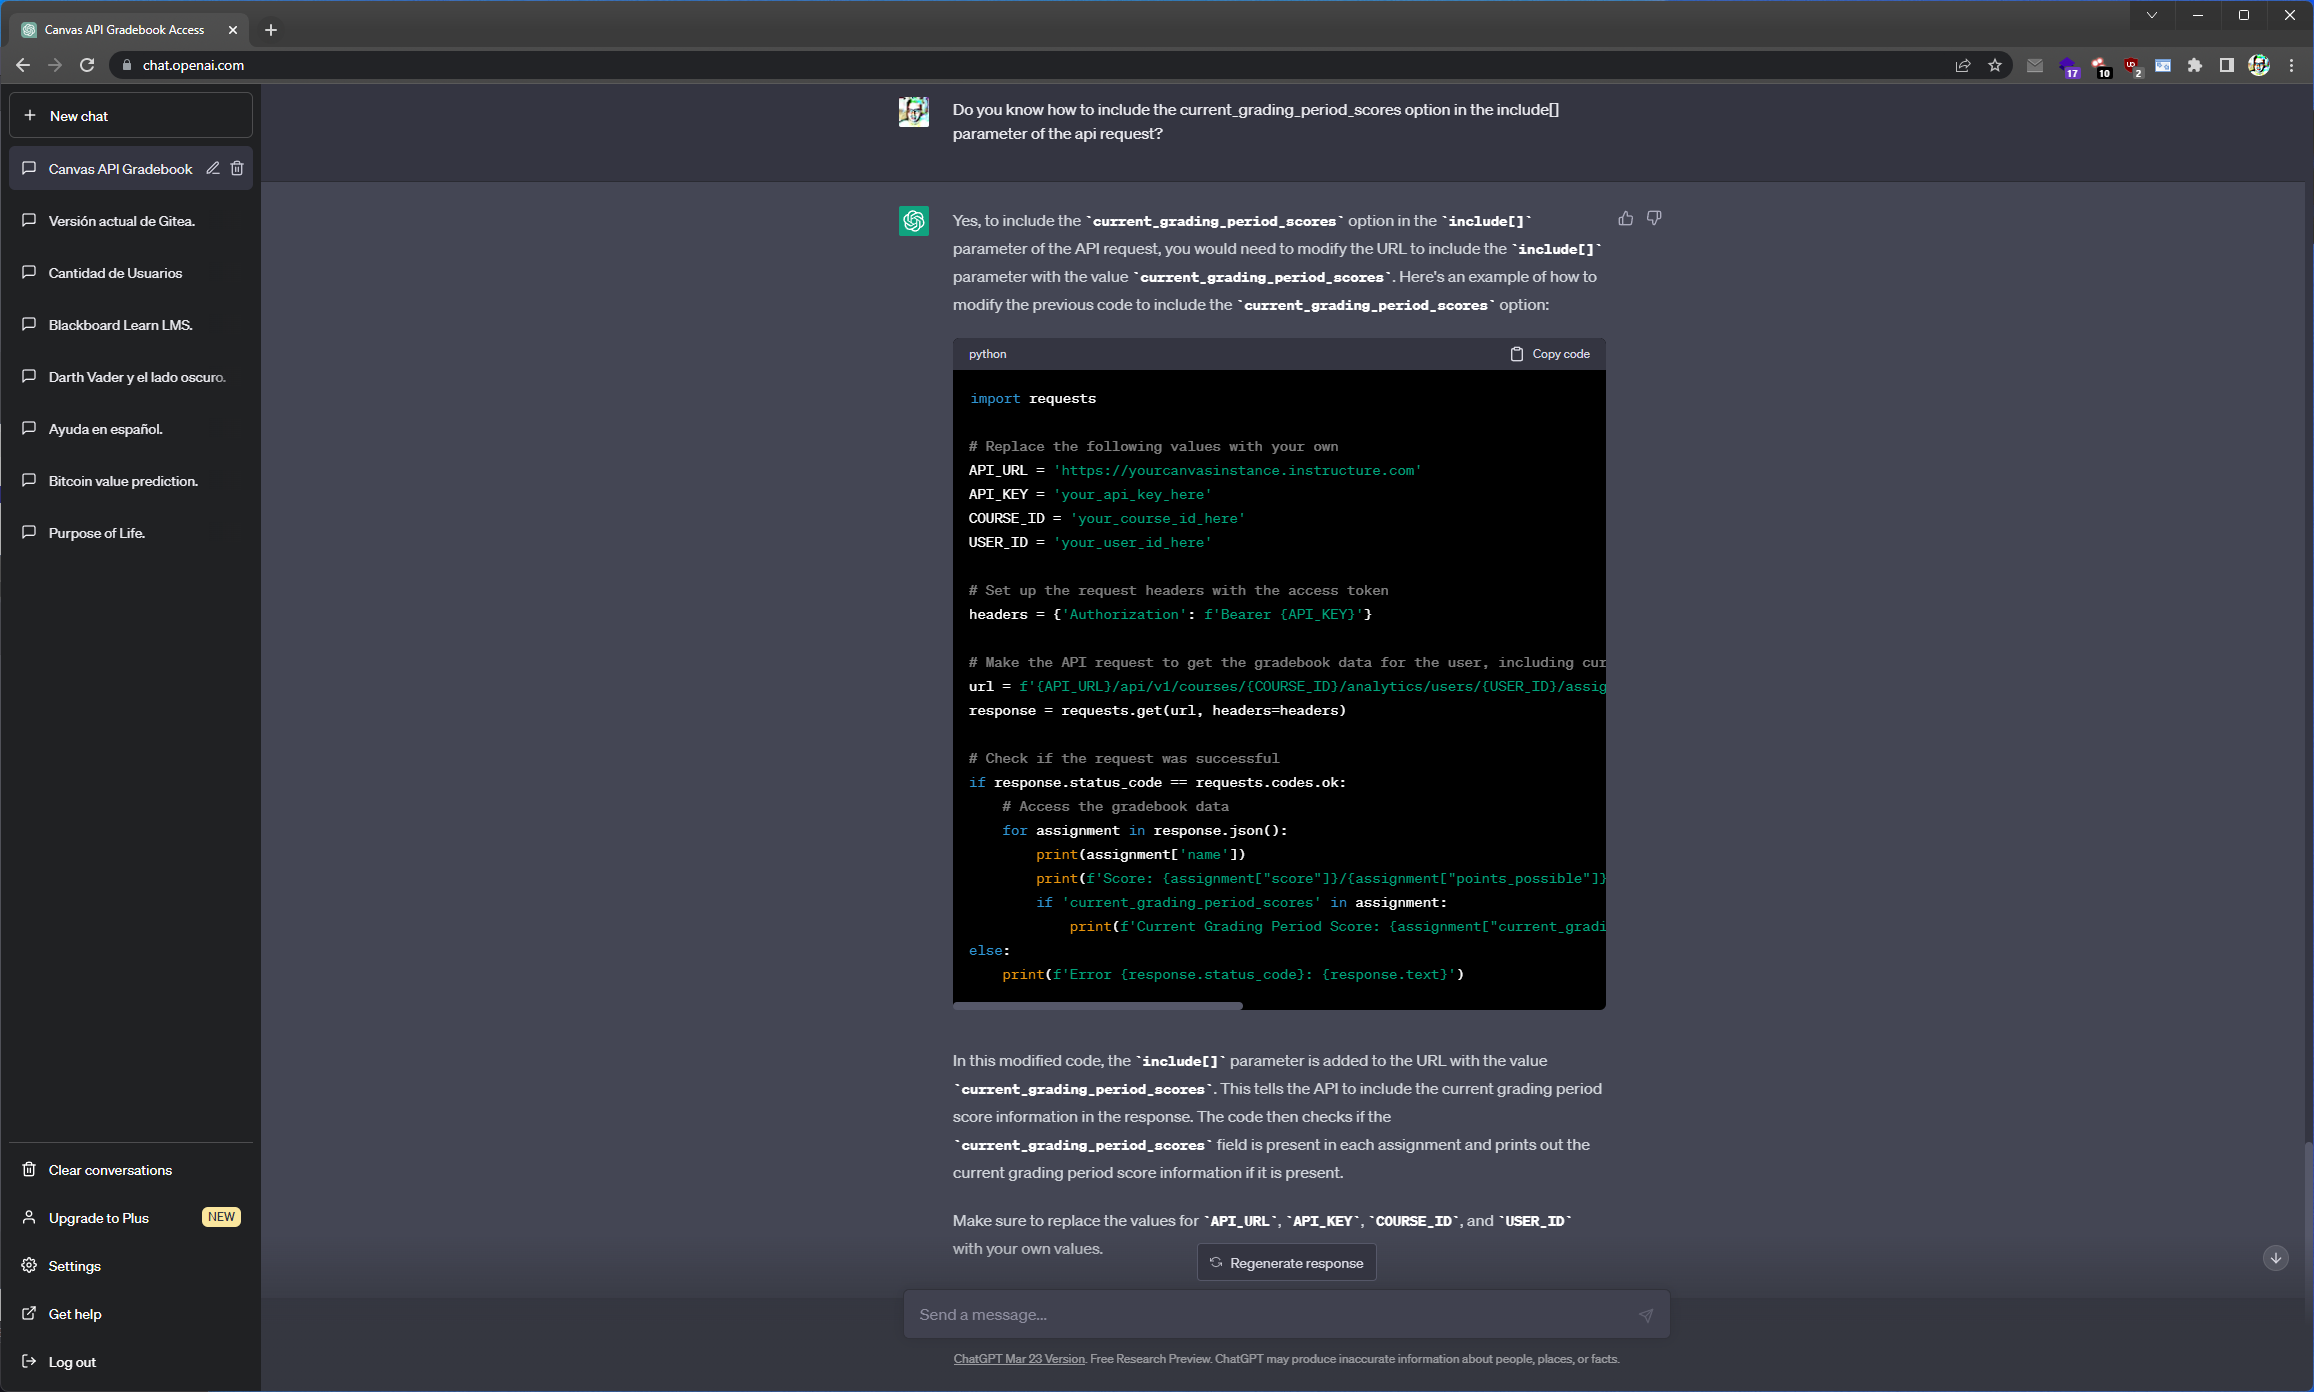
    <h3 id="do-you-know-how-to-include-the-current_grading_period_scores-option-in-the-include-parameter-of-the-api-request">Do you know how to include the current_grading_period_scores option in the include[] parameter of the api request?</h3>
    <p><img src="/assets/images/posts/grades-weighted-automatically_and_ChatGPT/en/ChatGPT-006-001.png" alt="" /></p>
  </li>
  <li>
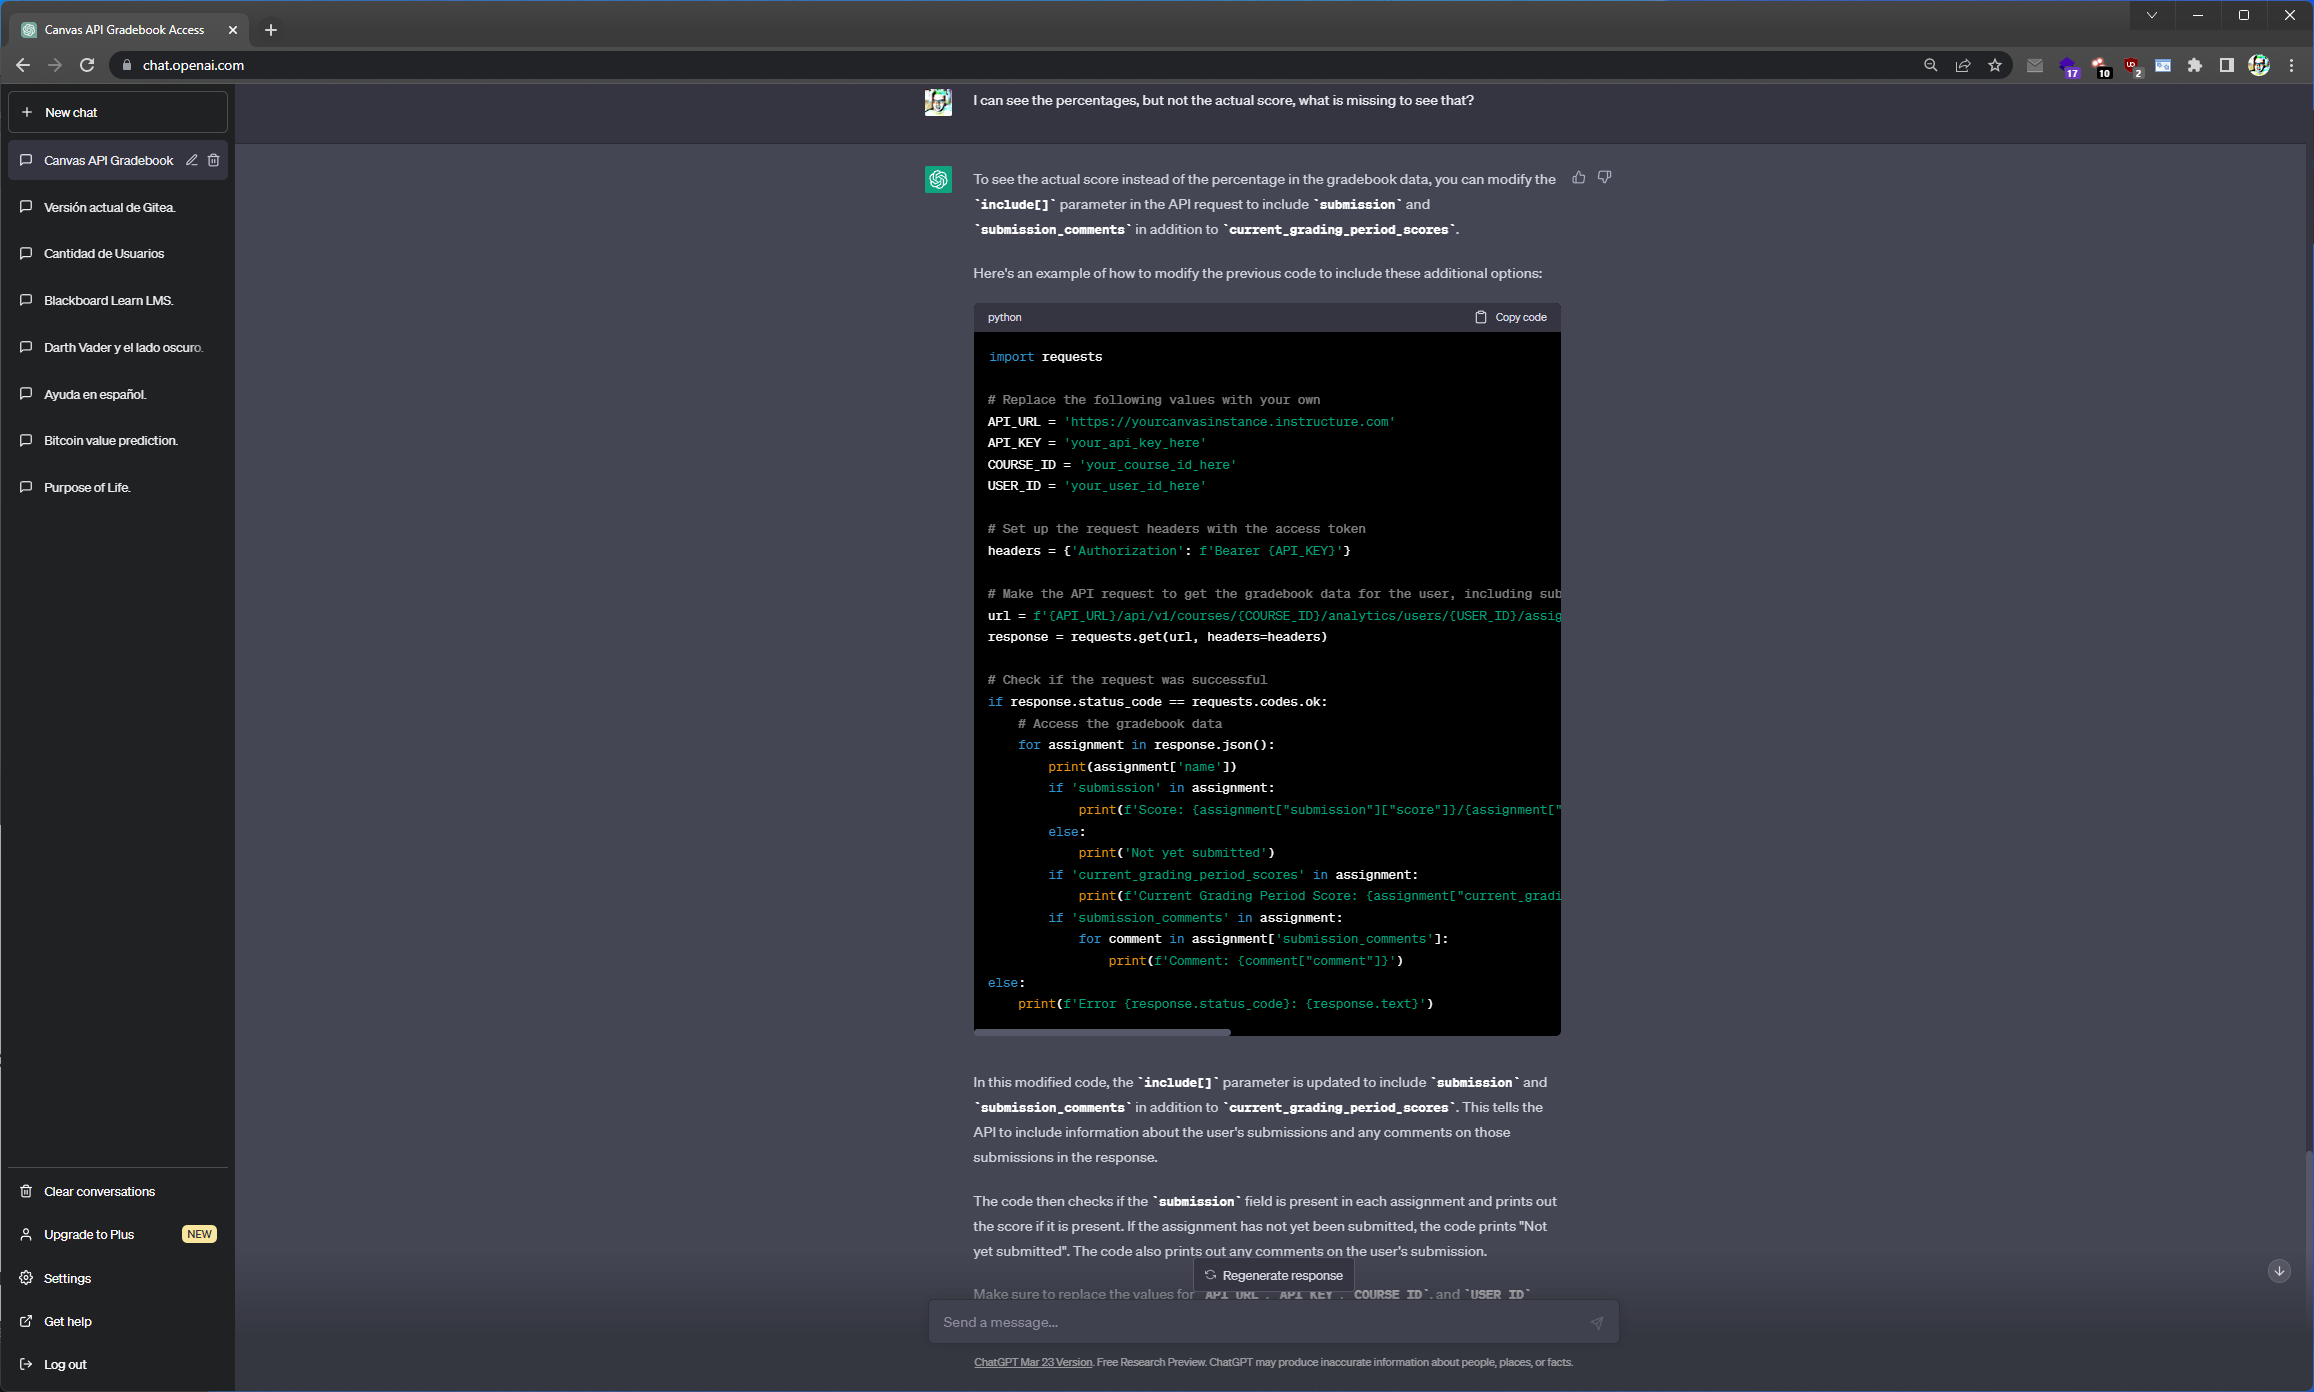
    <h3 id="i-can-see-the-percentages-but-not-the-actual-score-what-is-missing-to-see-that">I can see the percentages, but not the actual score, what is missing to see that?</h3>
    <p><img src="/assets/images/posts/grades-weighted-automatically_and_ChatGPT/en/ChatGPT-007-001.png" alt="" /></p>
  </li>
  <li>
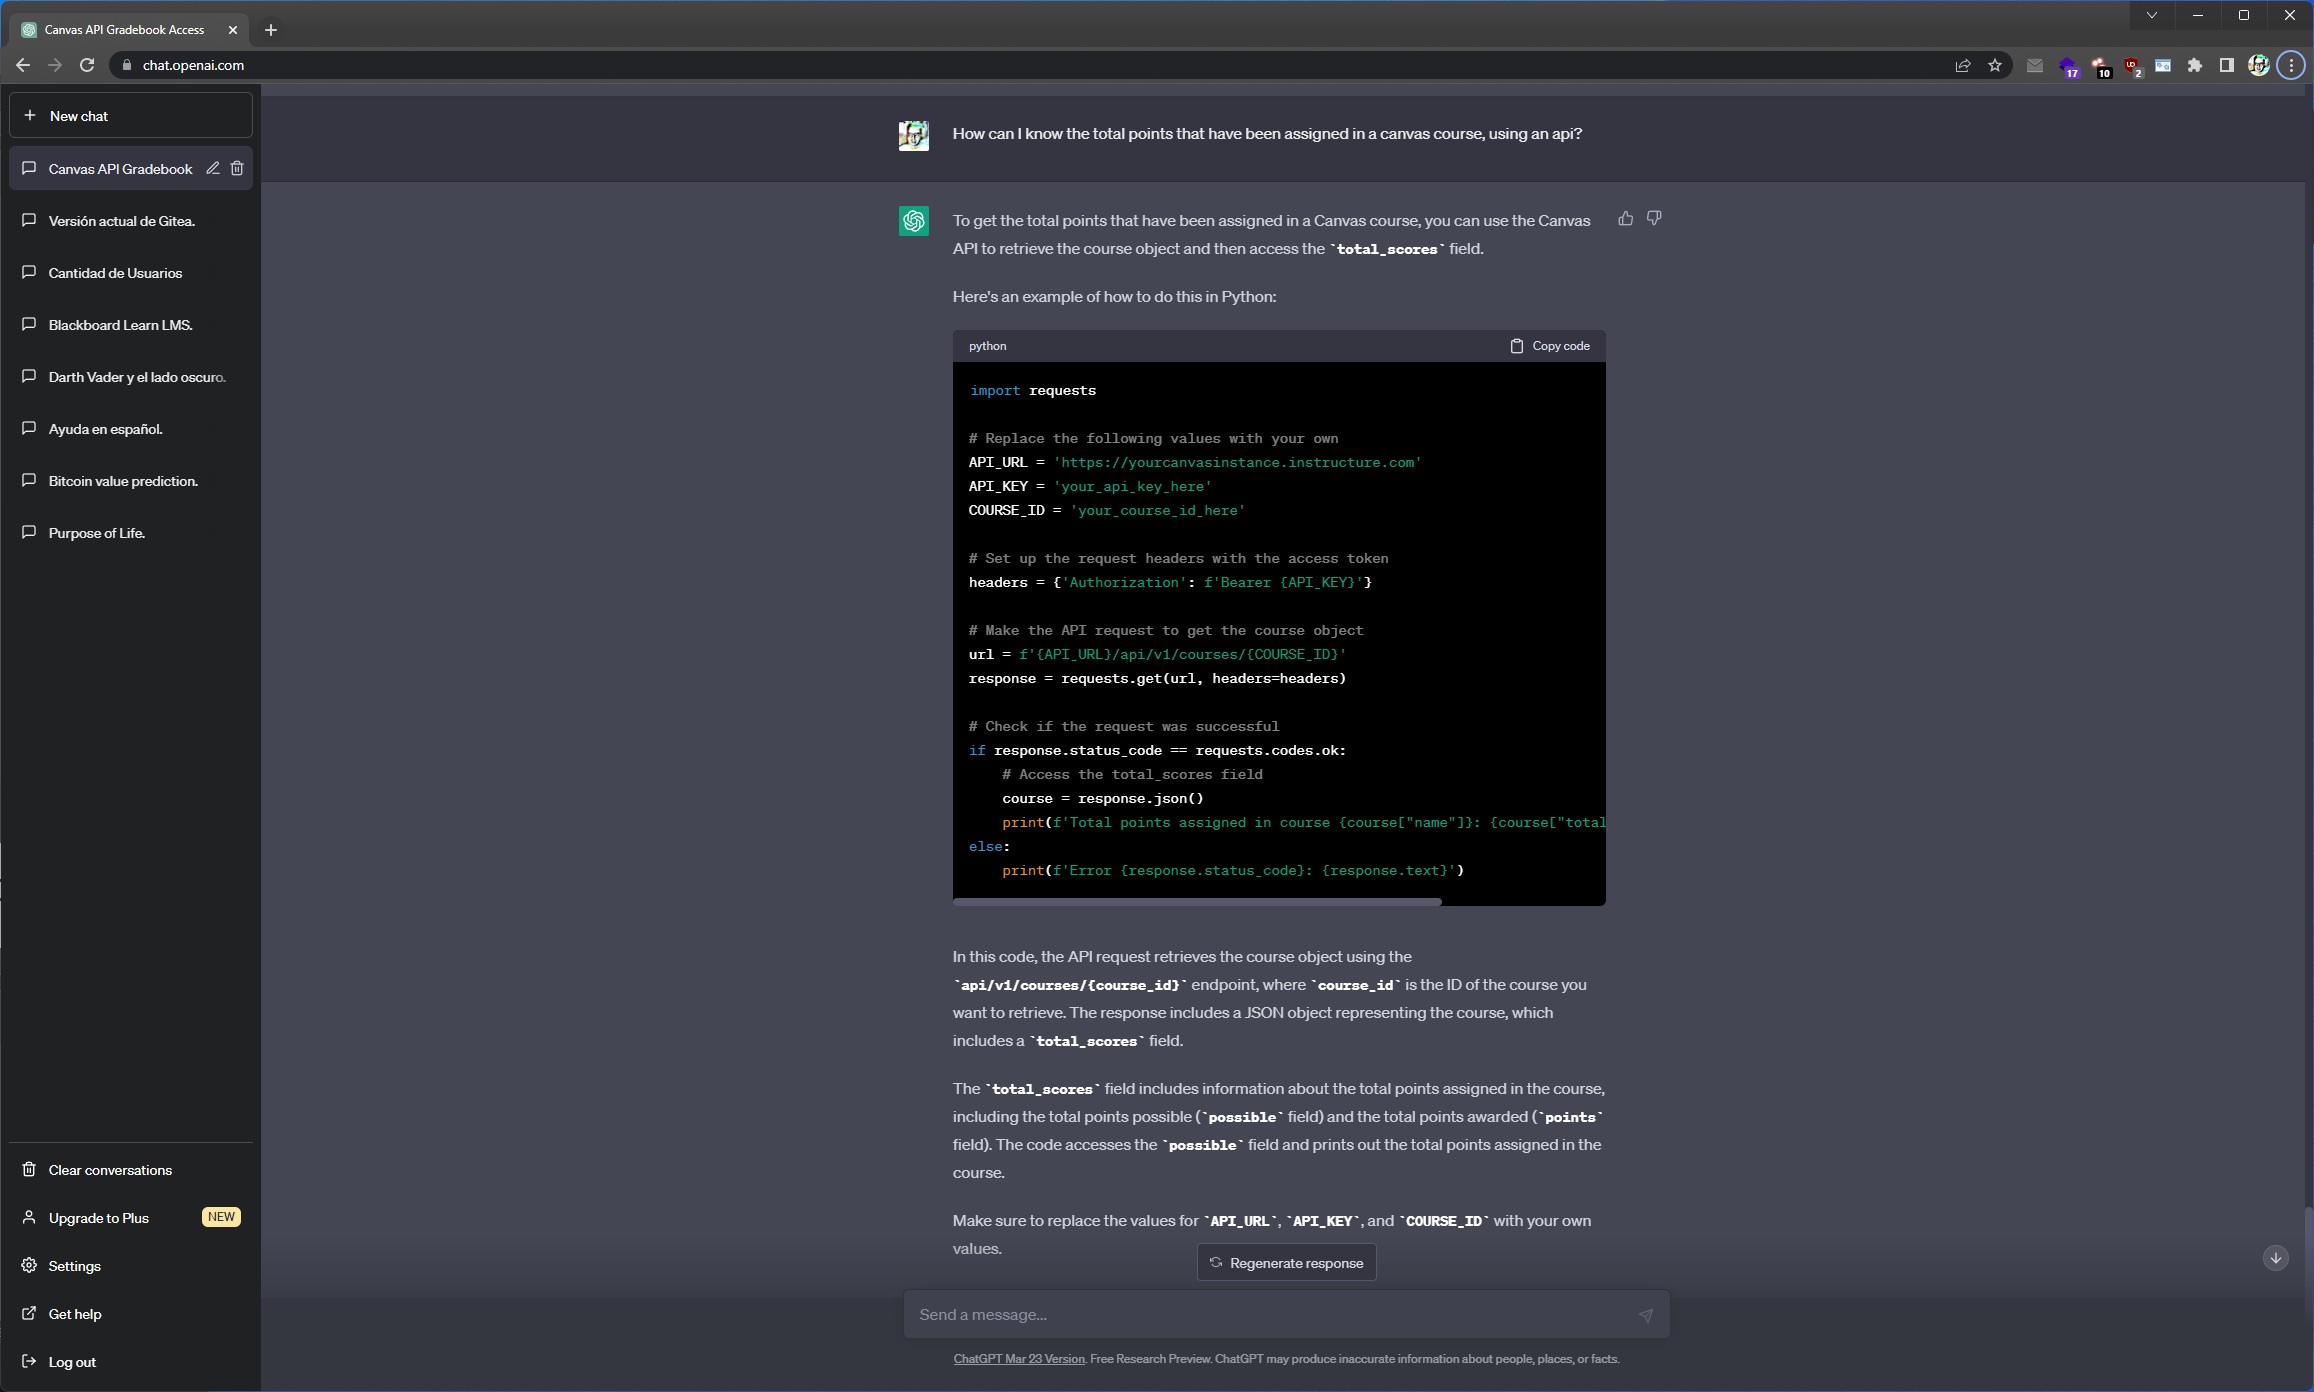
    <h3 id="how-can-i-know-the-total-points-that-have-been-assigned-in-a-canvas-course-using-an-api">How can I know the total points that have been assigned in a canvas course, using an api?</h3>
    <p><img src="/assets/images/posts/grades-weighted-automatically_and_ChatGPT/en/ChatGPT-008-001.png" alt="" /></p>
  </li>
  <li>
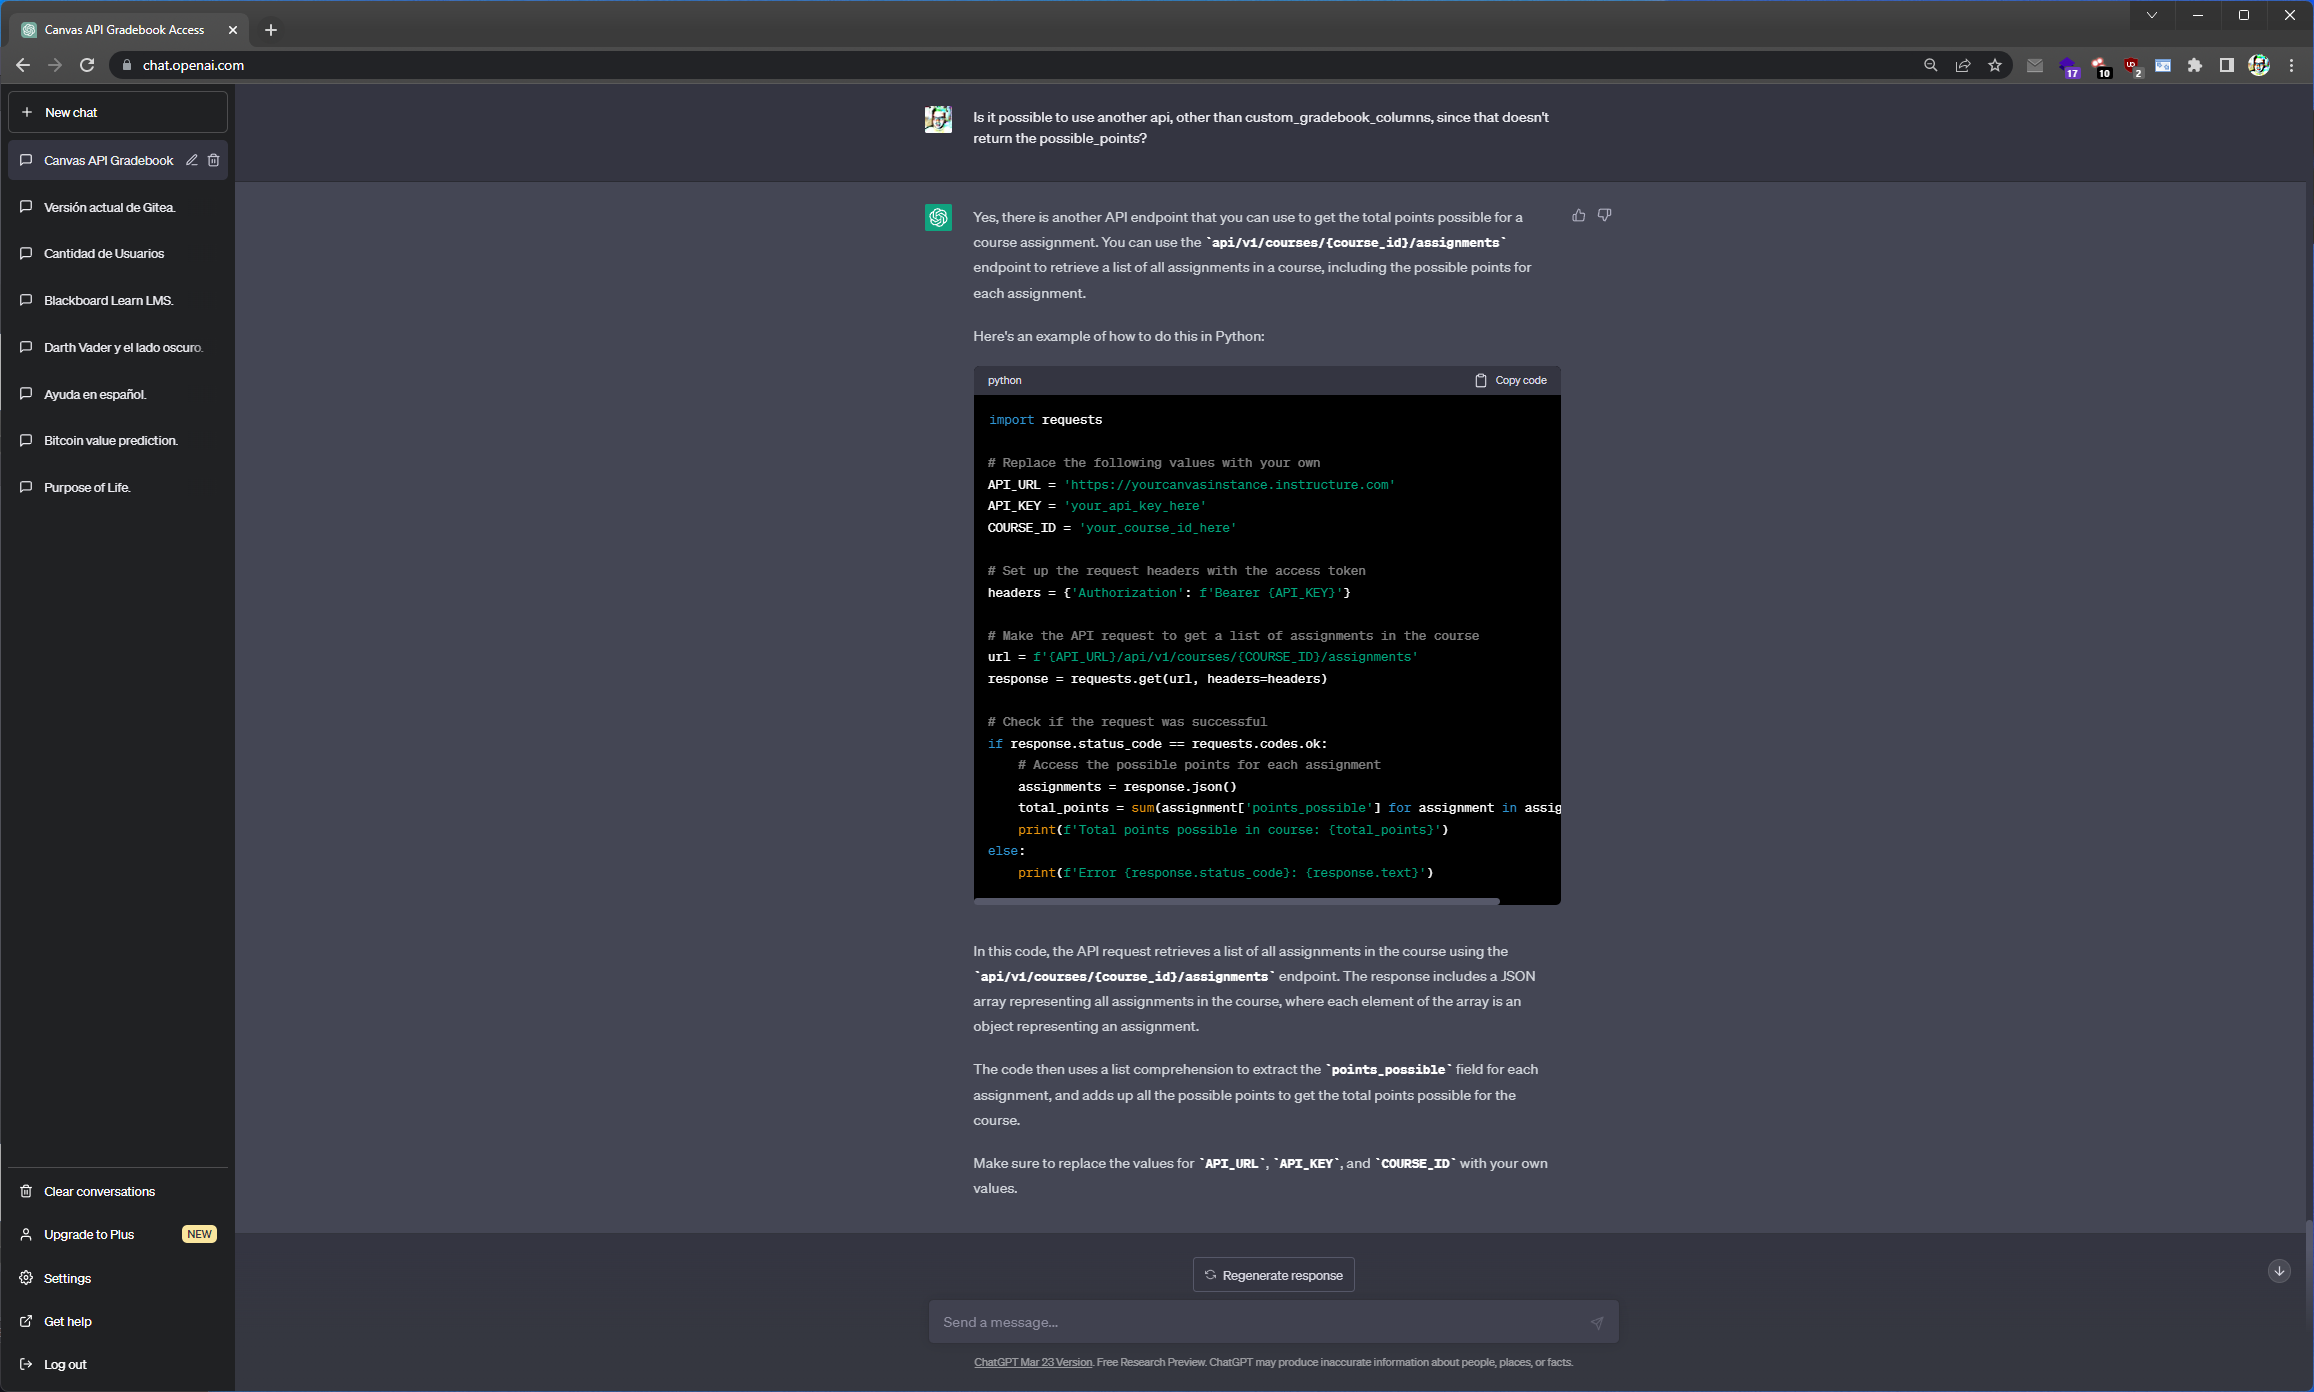
    <h3 id="is-it-possible-to-use-another-api-other-than-custom_gradebook_columns-since-that-doesnt-return-the-possible_points">Is it possible to use another api, other than custom_gradebook_columns, since that doesn’t return the possible_points?</h3>
    <p><img src="/assets/images/posts/grades-weighted-automatically_and_ChatGPT/en/ChatGPT-009-001.png" alt="" /></p>
  </li>
  <li>
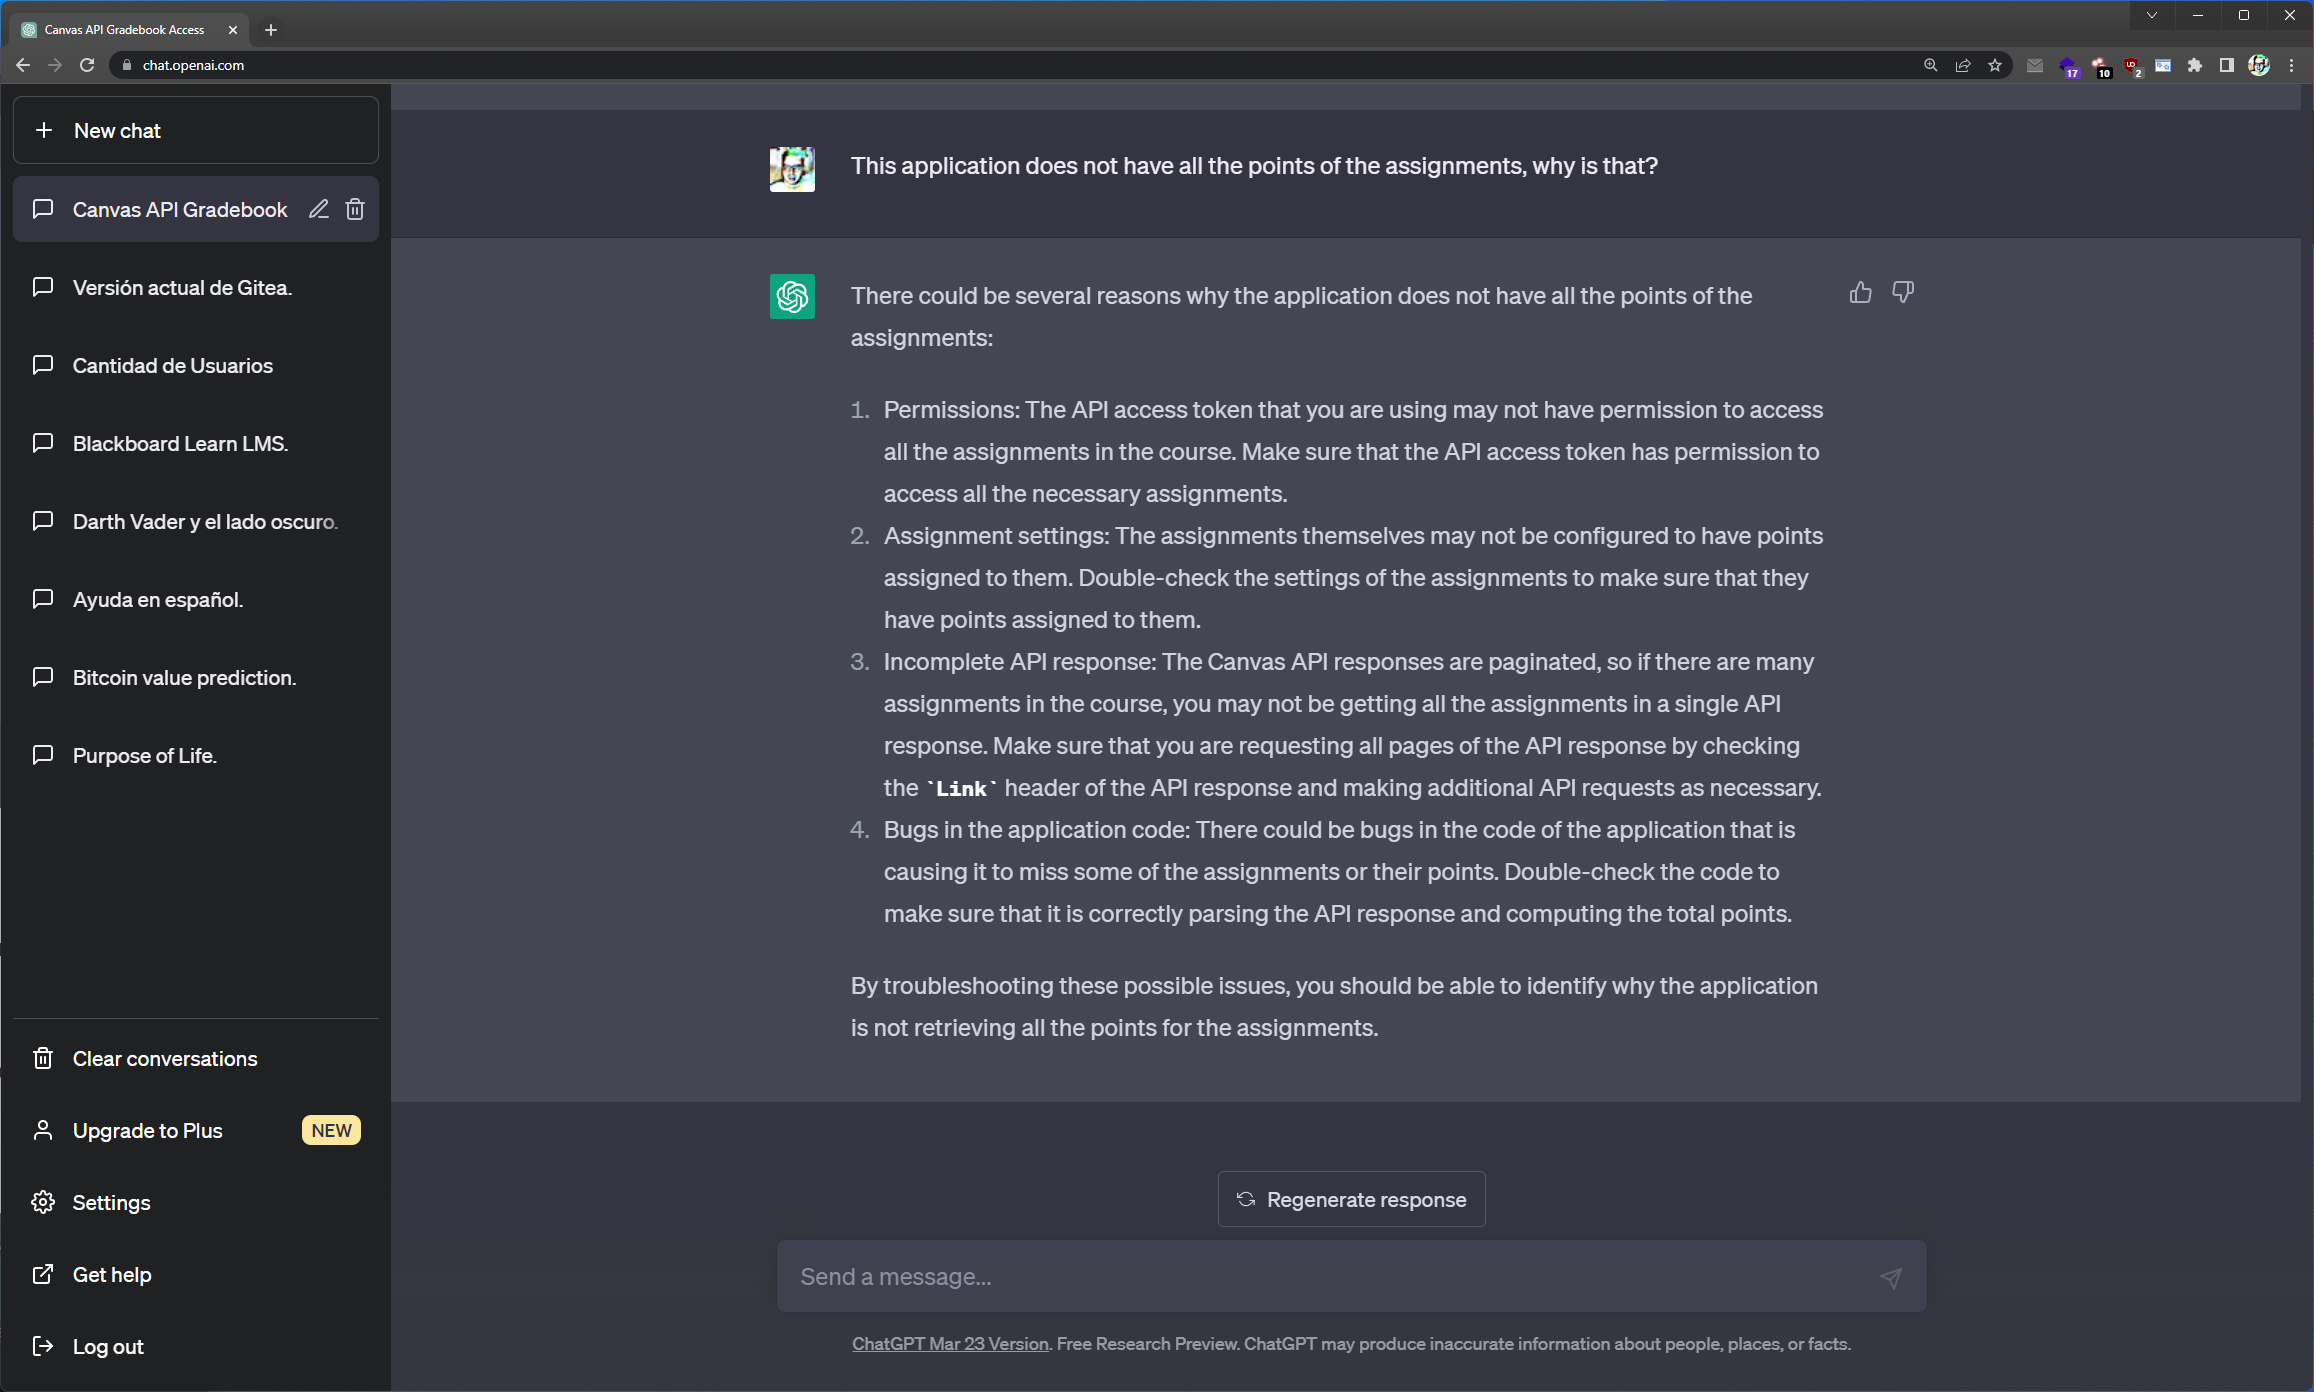
    <h3 id="this-application-does-not-have-all-the-points-of-the-assignments-why-is-that">This application does not have all the points of the assignments, why is that?</h3>
    <p><img src="/assets/images/posts/grades-weighted-automatically_and_ChatGPT/en/ChatGPT-010-001.png" alt="" /></p>
  </li>
  <li>
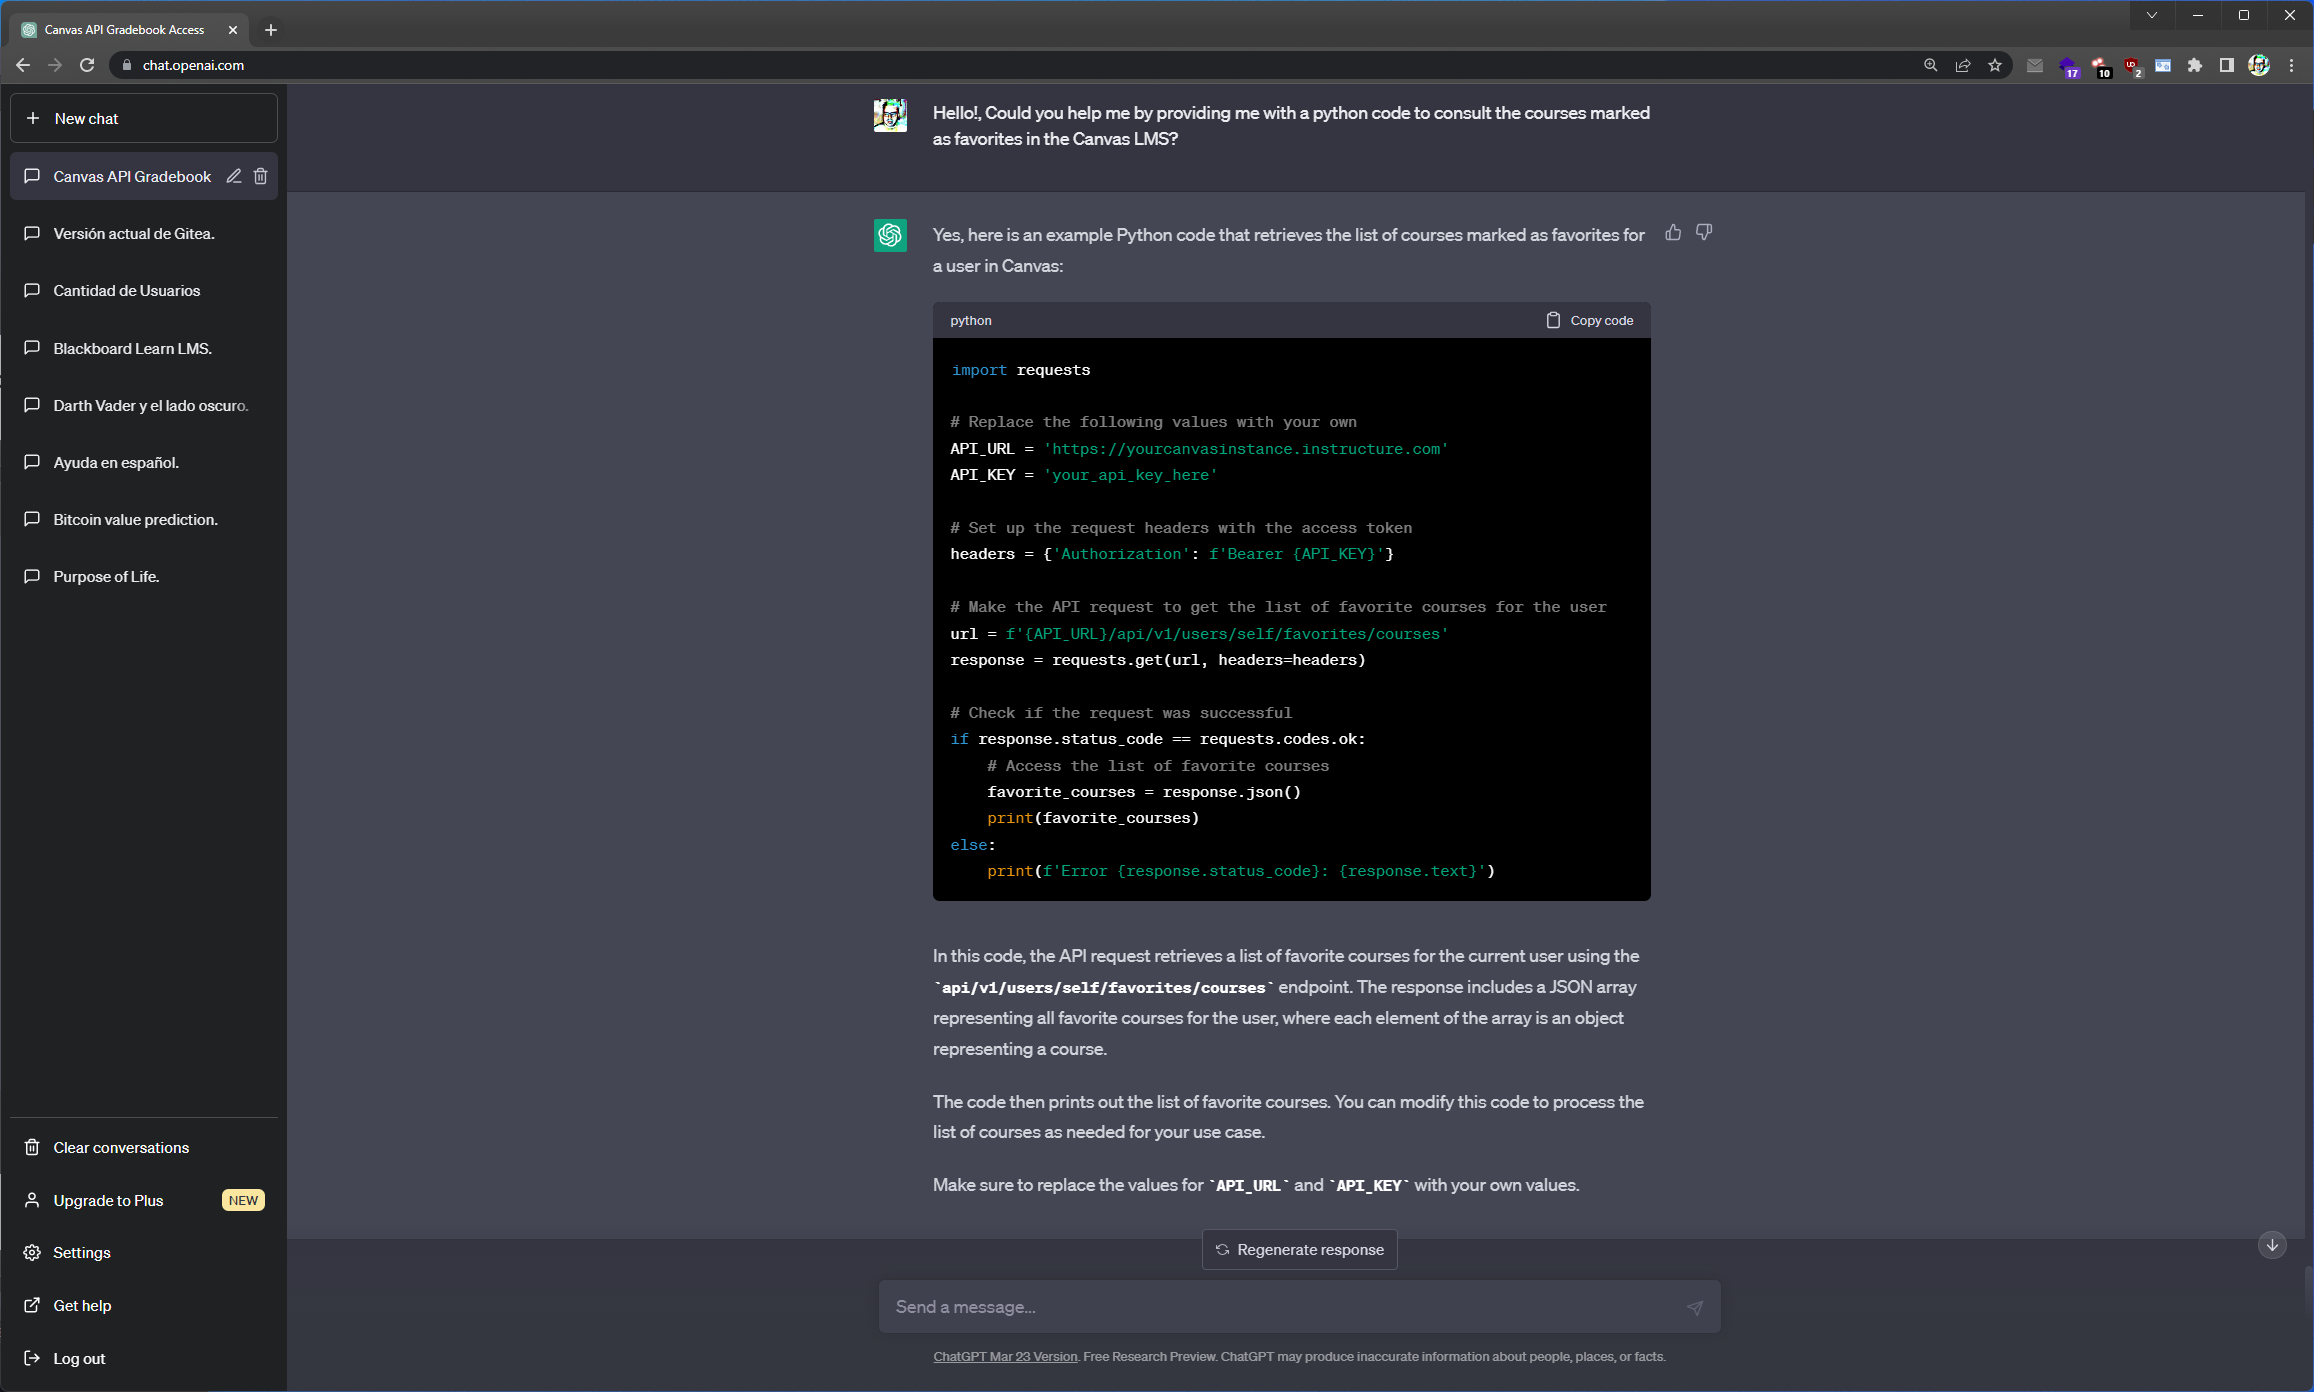
    <h3 id="hello-could-you-help-me-by-providing-me-with-a-python-code-to-consult-the-courses-marked-as-favorites-in-the-canvas-lms">Hello!, Could you help me by providing me with a python code to consult the courses marked as favorites in the Canvas LMS?</h3>
    <p><img src="/assets/images/posts/grades-weighted-automatically_and_ChatGPT/en/ChatGPT-011-001.png" alt="" /></p>
  </li>
  <li>
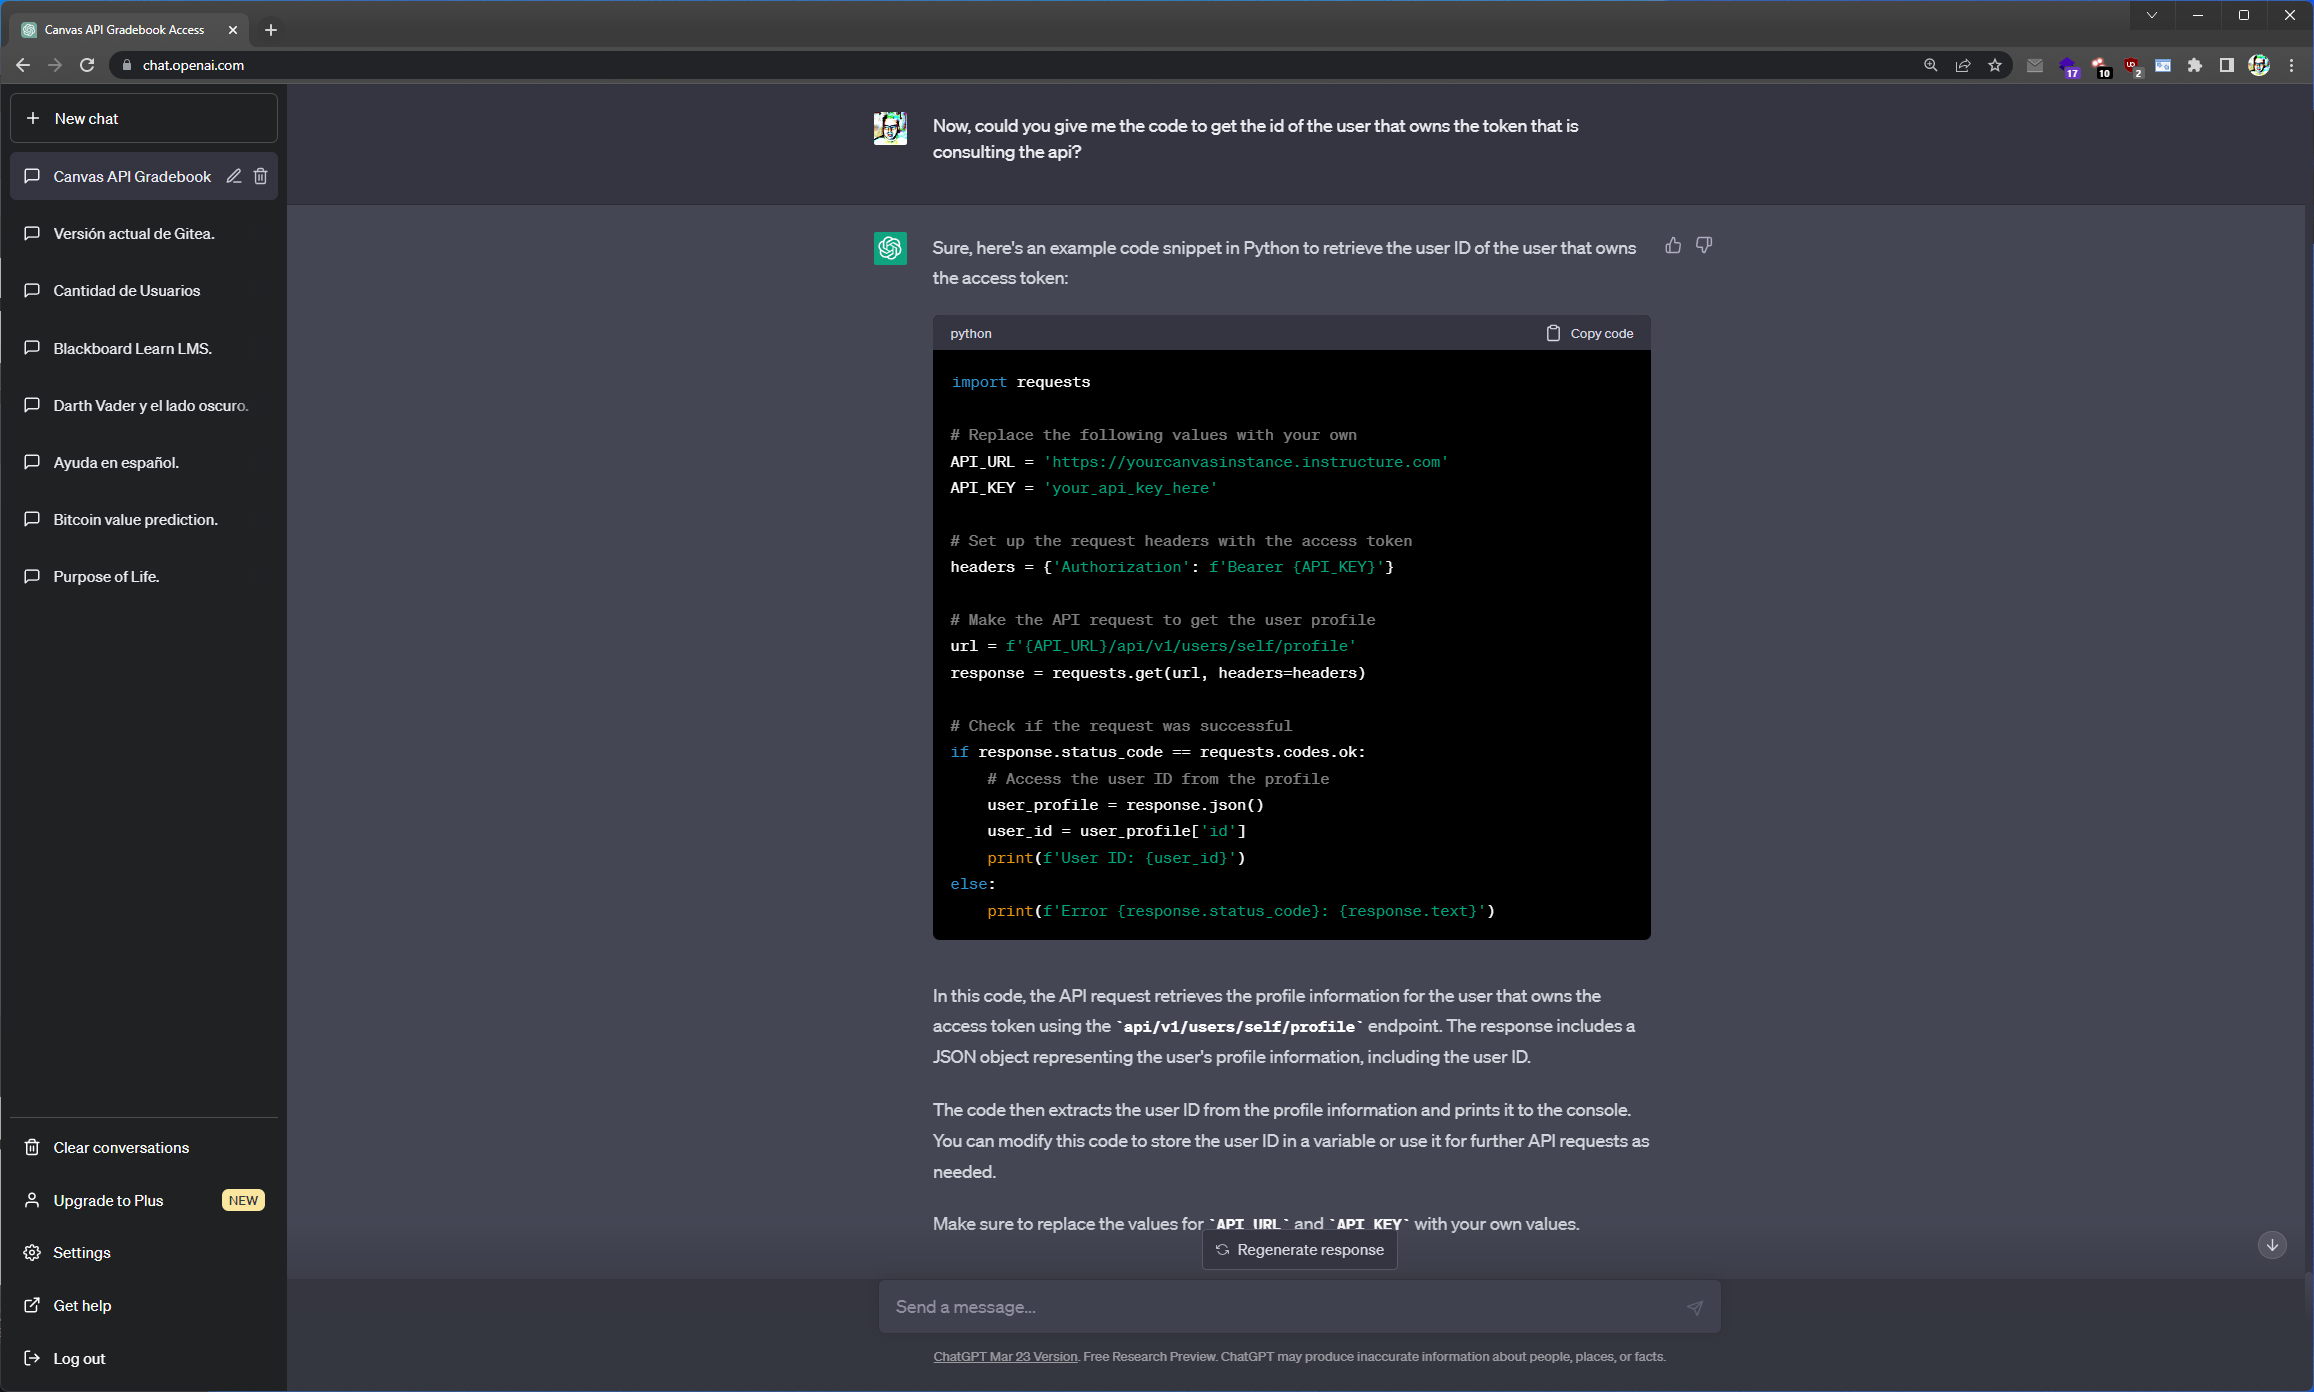
    <h3 id="now-could-you-give-me-the-code-to-get-the-id-of-the-user-that-owns-the-token-that-is-consulting-the-api">Now, could you give me the code to get the id of the user that owns the token that is consulting the api?</h3>
    <p><img src="/assets/images/posts/grades-weighted-automatically_and_ChatGPT/en/ChatGPT-012-001.png" alt="" /></p>
  </li>
</ol>

<h2 id="canvas-api-documentation-help"><a href="https://canvas.instructure.com/doc/api/favorites.html">Canvas API Documentation</a> Help</h2>

<p><img src="/assets/images/posts/grades-weighted-automatically_and_ChatGPT/Canvas_LMS_REST_API_and_Extenions_Documentation_001.png" alt="" /></p>

<h2 id="solution-iii">Solution III</h2>

<p><img src="/assets/images/posts/grades-weighted-automatically_and_ChatGPT/tutorial-preview-large.png" alt="" /></p>

<p>This <a href="https://github.com/nelbren/grades-weighted-automatically">third solution</a> has the advantage of using the API directly, so it can be used without doing CSV file exports, and generates the weighted grades . 😎</p>

<p><img src="/assets/images/posts/grades-weighted-automatically_and_ChatGPT/grades-weighted-automatically.jpg" alt="" /></p>

<hr />

<h2 id="conclusions">Conclusions</h2>

<ul>
  <li>
    <h3 id="compliance">Compliance</h3>
    <p><img src="/assets/images/posts/grades-weighted-automatically_and_ChatGPT/AI.png" alt="" /></p>
    <ul>
      <li>
        <h4 id="the-conversation-with-chatgpt-managed-to-realize">The conversation with <strong>ChatGPT</strong> managed to realize:</h4>
        <ul>
          <li>The possibility of working with the <strong>API</strong>.</li>
          <li>The way to send options to the <strong>include[]</strong> parameter</li>
          <li>The way to generate the <strong>possible points</strong>.</li>
          <li>The existence of the parameter <strong>page_number</strong></li>
          <li>The way to get <strong><em>favourite courses</em></strong></li>
        </ul>
      </li>
    </ul>
  </li>
  <li>
    <h3 id="purpose">Purpose</h3>
    <p><img src="/assets/images/posts/grades-weighted-automatically_and_ChatGPT/Persona.png" alt="" /></p>
    <ul>
      <li>
        <h4 id="keeping-in-mind-the-purpose-we-focused-on-finding-an-answer-with-the-data-that-was-obtained">Keeping in mind the purpose, we focused on finding an answer with the data that was obtained.</h4>
      </li>
    </ul>
  </li>
</ul>

<h2 id="references">References</h2>

<ul>
  <li><a href="https://chat.openai.com/chat">ChatGTP</a></li>
  <li><a href="https://canvas.instructure.com/doc/api/index.html">Welcome to the Canvas LMS API Documentation</a></li>
  <li><a href="https://www.youtube.com/watch?v=8LB_GKZhhf4">Which companies will grow with Artificial Intelligence (and which will not)</a></li>
  <li><a href="https://www.youtube.com/watch?v=D0Y-8LS-7gY">Is AI a threat to humanity? Should we ban it?</a></li>
</ul>]]></content><author><name>Martin Nelbren Cuellar</name></author><category term="en" /><category term="blackboard" /><category term="canvas" /><category term="chatgpt" /><category term="blackboard" /><category term="canvas" /><category term="chatgpt" /><category term="api" /><summary type="html"><![CDATA[Automatically weighted grades and ChatGPT]]></summary></entry><entry><title type="html">Calificaciones ponderadas automáticamente y ChatGPT</title><link href="https://nelbren.com/es/blackboard/canvas/chatgpt/grades-weighted-automatically_and_ChatGPT/" rel="alternate" type="text/html" title="Calificaciones ponderadas automáticamente y ChatGPT" /><published>2023-04-02T00:00:00-06:00</published><updated>2023-04-18T03:30:00-06:00</updated><id>https://nelbren.com/es/blackboard/canvas/chatgpt/grades-weighted-automatically_and_ChatGPT</id><content type="html" xml:base="https://nelbren.com/es/blackboard/canvas/chatgpt/grades-weighted-automatically_and_ChatGPT/"><![CDATA[<h1 id="calificaciones-ponderadas-automáticamente-y-chatgpt">Calificaciones ponderadas automáticamente y ChatGPT</h1>

<h2 id="introducción">Introducción</h2>

<p><img src="/assets/images/posts/grades-weighted-automatically_and_ChatGPT/examenes-memes-2490761.jpg" alt="" /></p>

<p>Una de las actividades que se realiza cuando se trabaja con sistemas de gestión de aprendizaje (LMS por sus siglas en inglés) es el de gestionar las calificaciones obtenidas por los estudiantes, ya sea para reportarles sobre su desempeño; esto les permite que puedan ver sus calificaciones en cada actividad y la calificación final del curso.</p>

<p>No obstante, en ocasiones es necesario reportar las calificaciones a otros sistemas externos, por lo cual esto crea una oportunidad de desarrollar una solución que realice este proceso.</p>

<hr />

<h2 id="qué-es-blackboard">¿Qué es Blackboard?</h2>

<p><img src="/assets/images/posts/grades-weighted-automatically_and_ChatGPT/Blackboard.png" alt="" /></p>

<p>El primer LMS utilizado es <a href="https://www.blackboard.com/">Blackboard Learn</a>; mismo que es una plataforma en línea que permite a los profesores crear y administrar cursos en línea, y a los estudiantes acceder a estos cursos, interactuar con el material de enseñanza, y realizar actividades y evaluaciones en línea.</p>

<p>Hasta aquí, todo bien con el uso del LMS 👍, no obstante, se identificó un problema, ya que era necesario trasladar la nota final de <strong>forma ponderada</strong> a otro sistema de administración de las calificaciones.</p>

<hr />

<h2 id="sistema-de-calificaciones">Sistema de Calificaciones</h2>

<p><img src="/assets/images/posts/grades-weighted-automatically_and_ChatGPT/Calificaciones.jpg" alt="" /></p>

<p>En este sistema se necesita realizar una <strong>ponderación</strong> de la calificación máxima de cada examen (un total de 3) más un acumulativo. Por lo que esto se realizaba de forma manual, donde muchas veces funcionaba sin problemas, pero en algunos casos, que la notas eran mayores que la ponderación, debía de distribuirse. Esto último, creo una oportunidad de mejora a fin de crear una solución que permita distribuir la nota final, en las ponderaciones que se necesiten y que se calcule de forma más precisa usando decimales, ya que cuando se hace con la intervención humana normalmente se generan errores en los cálculos.</p>

<hr />

<h2 id="solución-i">Solución I</h2>

<p><img src="/assets/images/posts/grades-weighted-automatically_and_ChatGPT/6133884.png" alt="" /></p>

<p>Esta primera solución es muy simple, ya que lo único que se busca es generar las calificaciones ponderadas. El sistema de <strong>LMS Blackboard</strong> permite exportar a un archivo CSV con las calificaciones, por lo que se desarrolló un programa llamado <a href="https://github.com/nelbren/grades-weighted-automatically/tree/0a93a42a4e6e5df494d7e03378f52e70030e92f2">grades-weighted-automatically</a>; que leía el o los archivos generados, obteniendo el resultado deseado. Esta solución fue funcional por un tiempo.</p>

<hr />

<h2 id="cambio-de-lms">Cambio de LMS</h2>

<p><img src="/assets/images/posts/grades-weighted-automatically_and_ChatGPT/Cambio.png" alt="" /></p>

<p>La entidad educativa realizó un cambio de <strong>LMS</strong>, pasando de <strong>Blackboard</strong> a <strong>Canvas</strong>.</p>

<hr />

<h2 id="qué-es-canvas">¿Qué es Canvas?</h2>

<p><img src="/assets/images/posts/grades-weighted-automatically_and_ChatGPT/Canvas_Stacked_ByInstructure_Color_RGB.png" alt="" /></p>

<p><a href="https://www.instructure.com/lms-learning-management-system">Canvas</a> es un sistema de gestión de aprendizaje en línea que ofrece una amplia gama de herramientas y funciones para la enseñanza y el aprendizaje en línea, con un enfoque en la facilidad de uso y la experiencia del usuario.</p>

<hr />

<h2 id="solución-ii">Solución II</h2>

<p><img src="/assets/images/posts/grades-weighted-automatically_and_ChatGPT/6133884.png" alt="" /></p>

<p>Esta segunda solución también mantiene su sencillez, ya que de nuevo lo único que se busca es generar las calificaciones ponderadas. El sistema de <strong>LMS Canvas</strong> permite exportar a un archivo CSV con las calificaciones, por lo que se modifica el programa <a href="https://github.com/nelbren/grades-weighted-automatically/tree/7af1b12381ec6e6af18f0519a4e00b5d3f2a2c42">grades-weighted-automatically</a>; manteniendo el esquema de leer los archivos generados, obteniendo el resultado deseado.</p>

<p>Finalizando la migración al uso del nuevo LMS, este servidor, pensó: ¿será posible que se pueda eliminar el paso de exportación y consultar directamente al LMS usando un <strong>API</strong>?; por lo que se procedió a hacer la consulta a <strong>ChatGPT</strong>.</p>

<hr />

<h2 id="qué-es-chatgpt">¿Qué es ChatGPT?</h2>

<p><img src="/assets/images/posts/grades-weighted-automatically_and_ChatGPT/ChatGPT.png" alt="" /></p>

<p><strong>Estamos viviendo en un momento emocionante en cuanto a la tecnología AI, ya que los avances en la investigación y el desarrollo de la IA están permitiendo aplicaciones más sofisticadas y complejas en una variedad de campos.</strong></p>

<p>En particular, la IA ha sido cada vez más utilizada en áreas como la medicina, la educación, la investigación científica, el transporte y la manufactura. Esto ha permitido avances significativos en la eficiencia, la precisión y la productividad en estos campos.</p>

<p>Un modelo de lenguaje AI conocido como <a href="https://chat.openai.com/chat">ChatGTP</a> esta ayudando a impulsar la tecnología hacia un futuro más sofisticado e inteligente. Esta herramienta que ella misma, reconoce que su impacto es limitado en comparación con la creatividad y la innovación humana, expresa que está aquí para ayudar y que espera poder seguir haciéndolo en el futuro. (Está introducción es generada por ChatGPT, con pequeñas modificaciones)</p>

<h2 id="qué-es-una-api">¿Qué es una API?</h2>

<p><img src="/assets/images/posts/grades-weighted-automatically_and_ChatGPT/API-EN-1.png" alt="" /></p>

<p>Una API (Interfaz de programación de aplicaciones) ​es una pieza de código que permite a diferentes aplicaciones comunicarse entre sí y compartir información y funcionalidades. Una API es un intermediario entre dos sistemas, que permite que una aplicación se comunique con otra y pida datos o acciones específicas.</p>

<h2 id="ayuda-de-chatgtp">Ayuda de ChatGTP</h2>

<p>A continuación, se presentan las consultas, ayuda y soporte recibido por parte de la inteligencia artificial.</p>

<ol>
  <li>
    <h3 id="cual-seria-el-código-para-conectarse-a-la-api-de-canvas-y-poder-tener-acceso-al-libro-de-calificaciones">Cual seria el código para conectarse a la API de Canvas y poder tener acceso al libro de calificaciones?</h3>
    <p><img src="/assets/images/posts/grades-weighted-automatically_and_ChatGPT/es/ChatGPT-001-001.png" alt="" />
<img src="/assets/images/posts/grades-weighted-automatically_and_ChatGPT/es/ChatGPT-001-002.png" alt="" /></p>
    <blockquote>
      <p>Se procedió a investigar cómo era el proceso de generación de la llave de acceso a la API, así como probar que el código funcionara. Dicho proceso fue exitoso, por lo que la AI, tenía razón de la factibilidad de llevar a cabo dicha tarea.
Sin embargo, no todo fue color de rosa, ya que, aun no se había logrado el acceso a las calificaciones de los alumnos.</p>
    </blockquote>
  </li>
  <li>
    <h3 id="podrías-proporcionarme-otro-código-para-listar-el-libro-de-calificaciones-de-canvas-usando-una-api">Podrías proporcionarme otro código para listar el libro de calificaciones de canvas usando una api?</h3>
    <p><img src="/assets/images/posts/grades-weighted-automatically_and_ChatGPT/es/ChatGPT-002-001.png" alt="" />
<img src="/assets/images/posts/grades-weighted-automatically_and_ChatGPT/es/ChatGPT-002-002.png" alt="" /></p>
    <blockquote>
      <p>Todavia no se tenía acceso a las calificaciones de los alumnos.</p>
    </blockquote>
  </li>
  <li>
    <h3 id="el-código-falla-con-el-siguiente-mensaje-attributeerror-course-object-has-no-attribute-get_grades-did-you-mean-get_groups-alguna-idea-de-que-puede-ser">El código falla con el siguiente mensaje: AttributeError: ‘Course’ object has no attribute ‘get_grades’. Did you mean: ‘get_groups’? Alguna idea de que puede ser?</h3>
    <p><img src="/assets/images/posts/grades-weighted-automatically_and_ChatGPT/es/ChatGPT-003-001.png" alt="" /></p>
    <blockquote>
      <p>Se verifico que no era ese el problema, ya que sí se contaba con la ultima version de la libreria, por lo que se intento sin libreria.</p>
    </blockquote>
  </li>
  <li>
    <h3 id="tengo-la-ultima-versión-de-canvasapi-pero-el-error-persiste-alguna-idea-para-usar-el-api-directamente-sin-una-librería">Tengo la ultima versión de canvasapi, pero el error persiste, alguna idea para usar el api directamente sin una librería.</h3>
    <p><img src="/assets/images/posts/grades-weighted-automatically_and_ChatGPT/es/ChatGPT-004-001.png" alt="" /></p>
  </li>
  <li>
    <h3 id="todavía-sigue-el-error-será-posible-conseguir-las-notas-usando-el-usuario-o-estudiante">Todavía sigue el error, será posible conseguir las notas usando el usuario o estudiante?</h3>
    <p><img src="/assets/images/posts/grades-weighted-automatically_and_ChatGPT/es/ChatGPT-005-001.png" alt="" />
<img src="/assets/images/posts/grades-weighted-automatically_and_ChatGPT/es/ChatGPT-005-002.png" alt="" /></p>
  </li>
  <li>
    <h3 id="sabes-como-incluir-la-opción-current_grading_period_scores-en-el-parámetro-include-de-la-solicitud-del-api">Sabes como incluir la opción current_grading_period_scores en el parámetro include[] de la solicitud del api?</h3>
    <p><img src="/assets/images/posts/grades-weighted-automatically_and_ChatGPT/es/ChatGPT-006-001.png" alt="" /></p>
  </li>
  <li>
    <h3 id="puedo-ver-los-porcentajes-pero-no-el-puntaje-real-que-faltara-para-ver-eso">Puedo ver los porcentajes, pero no el puntaje real, que faltara para ver eso?</h3>
    <p><img src="/assets/images/posts/grades-weighted-automatically_and_ChatGPT/es/ChatGPT-007-001.png" alt="" /></p>
  </li>
  <li>
    <h3 id="como-puedo-saber-el-total-de-puntos-que-se-ha-asignado-en-un-curso-en-canvas-usando-una-api">Como puedo saber el total de puntos que se ha asignado en un curso en canvas, usando una api?</h3>
    <p><img src="/assets/images/posts/grades-weighted-automatically_and_ChatGPT/es/ChatGPT-008-001.png" alt="" /></p>
  </li>
  <li>
    <h3 id="es-posible-usar-otra-api-que-no-sea-la-de-custom_gradebook_columns-ya-que-esa-no-regresa-los-puntos_posibles">Es posible usar otra api, que no sea la de custom_gradebook_columns, ya que esa no regresa los puntos_posibles?</h3>
    <p><img src="/assets/images/posts/grades-weighted-automatically_and_ChatGPT/es/ChatGPT-009-001.png" alt="" /></p>
  </li>
  <li>
    <h3 id="esta-solicitud-no-tiene-todos-los-puntos-de-las-asignaciones-a-que-se-deberá-eso">Esta solicitud no tiene todos los puntos de las asignaciones, a que se deberá eso?</h3>
    <p><img src="/assets/images/posts/grades-weighted-automatically_and_ChatGPT/es/ChatGPT-010-001.png" alt="" /></p>
  </li>
  <li>
    <h3 id="hola-podrías-ayudarme-en-brindarme-un-código-de-python-para-consultar-los-cursos-marcados-como-favoritos-en-el-lms-de-canvas">Hola!, podrías ayudarme en brindarme un código de python para consultar los cursos marcados como favoritos en el LMS de Canvas?</h3>
    <p><img src="/assets/images/posts/grades-weighted-automatically_and_ChatGPT/es/ChatGPT-011-001.png" alt="" /></p>
  </li>
  <li>
    <h3 id="ahora-podrías-brindarme-el-código-para-obtener-el-id-del-usuario-propietario-de-token-que-esta-consultando-la-api">Ahora, podrías brindarme el código para obtener el id del usuario propietario de token que esta consultando la api?</h3>
    <p><img src="/assets/images/posts/grades-weighted-automatically_and_ChatGPT/es/ChatGPT-012-001.png" alt="" /></p>
  </li>
</ol>

<h2 id="ayuda-de-la-documentación-del-api-de-canvas">Ayuda de la <a href="https://canvas.instructure.com/doc/api/favorites.html">documentación del API de Canvas</a></h2>

<p><img src="/assets/images/posts/grades-weighted-automatically_and_ChatGPT/Canvas_LMS_REST_API_and_Extenions_Documentation_001.png" alt="" /></p>

<h2 id="solución-iii">Solución III</h2>

<p><img src="/assets/images/posts/grades-weighted-automatically_and_ChatGPT/tutorial-preview-large.png" alt="" /></p>

<p>Esta <a href="https://github.com/nelbren/grades-weighted-automatically">tercera solución</a> tiene la ventaja de usar la API directamente, por lo que puede ser utilizada sin realizar las exportaciones de archivos CSV, y genera las calificaciones ponderadas. 😎</p>

<p><img src="/assets/images/posts/grades-weighted-automatically_and_ChatGPT/grades-weighted-automatically.jpg" alt="" /></p>

<hr />

<h2 id="conclusiones">Conclusiones</h2>

<ul>
  <li>
    <h3 id="cumplimiento">Cumplimiento</h3>
    <p><img src="/assets/images/posts/grades-weighted-automatically_and_ChatGPT/AI.png" alt="" /></p>
    <ul>
      <li>
        <h4 id="la-conversación-con-chatgpt-logro-darnos-cuenta-de">La conversación con <strong>ChatGPT</strong> logro darnos cuenta de:</h4>
        <ul>
          <li>La posibilidad de trabajar con la <strong>API</strong>.</li>
          <li>La manera de enviar opciones al parametro <strong>include[]</strong></li>
          <li>La forma de generar los <strong>puntos posibles</strong>.</li>
          <li>La existencia del parametro <strong>page_number</strong></li>
          <li>El modo de conseguir <strong><em>los cursos favoritos”</em></strong></li>
        </ul>
      </li>
    </ul>
  </li>
  <li>
    <h3 id="propósito">Propósito</h3>
    <p><img src="/assets/images/posts/grades-weighted-automatically_and_ChatGPT/Persona.png" alt="" /></p>
    <ul>
      <li>
        <h4 id="teniendo-en-cuenta-el-propósito-nos-enfocamos-en-encontrar-una-respuesta-con-los-datos-que-se-lograron-obtener">Teniendo en cuenta el propósito, nos enfocamos en encontrar una respuesta con los datos que se lograron obtener.</h4>
      </li>
    </ul>
  </li>
</ul>

<h2 id="referencias">Referencias</h2>

<ul>
  <li><a href="https://chat.openai.com/chat">ChatGTP</a></li>
  <li><a href="https://canvas.instructure.com/doc/api/index.html">Welcome to the Canvas LMS API Documentation</a></li>
  <li><a href="https://www.youtube.com/watch?v=8LB_GKZhhf4">Qué empresas crecerán con Inteligencia Artificial (y cuáles no)</a></li>
  <li><a href="https://www.youtube.com/watch?v=D0Y-8LS-7gY">¿La IA es una amenaza para la humanidad? ¿Debemos prohibirla?</a></li>
</ul>]]></content><author><name>Martin Nelbren Cuellar</name></author><category term="es" /><category term="blackboard" /><category term="canvas" /><category term="chatgpt" /><category term="blackboard" /><category term="canvas" /><category term="chatgpt" /><category term="api" /><summary type="html"><![CDATA[Calificaciones ponderadas automáticamente y ChatGPT]]></summary></entry><entry><title type="html">Documentación con Markdown, Marp y AsciiDoctor</title><link href="https://nelbren.com/es/documentation/Documentation_with_Markdown_Marp_and_AsciiDoctor/" rel="alternate" type="text/html" title="Documentación con Markdown, Marp y AsciiDoctor" /><published>2021-05-27T00:00:00-06:00</published><updated>2021-05-27T02:51:00-06:00</updated><id>https://nelbren.com/es/documentation/Documentation_with_Markdown_Marp_and_AsciiDoctor</id><content type="html" xml:base="https://nelbren.com/es/documentation/Documentation_with_Markdown_Marp_and_AsciiDoctor/"><![CDATA[<h2 id="-documentación"><i class="fas fa-book"></i> Documentación</h2>

<p>Aprender sobre:</p>

<ul>
  <li>
    <p><i class="fas fa-hashtag"></i> <strong>Markdown</strong></p>

    <p><i class="fa fa-quote-left" aria-hidden="true"></i>
<em>Markdown es un lenguaje de marcado ligero que trata de conseguir la máxima legibilidad y facilidad de publicación tanto en su forma de entrada como de salida, inspirándose en muchas convenciones existentes para marcar mensajes de correo electrónico usando texto plano.</em>
<i class="fa fa-quote-right" aria-hidden="true"></i>
<br /></p>
    <ul>
      <li><i class="fab fa-html5"></i> <a href="/assets/Doc/Markdown.html">Código (Markdown.html)</a></li>
      <li><i class="fas fa-file-code"></i> <a href="/assets/Doc/Markdown.md">Código (Markdown.md)</a></li>
    </ul>
  </li>
</ul>

<hr />

<ul>
  <li>
    <p><i class="fas fa-desktop"></i> <strong>Marp</strong></p>

    <p><i class="fa fa-quote-left" aria-hidden="true"></i>
<em>Marp, Markdown Presentation Ecosystem, proporciona la gran experiencia para crear una hermosa plataforma de diapositivas. Solo tienes que concentrarte en escribir tu historia en el documento Markdown.</em>
<i class="fa fa-quote-right" aria-hidden="true"></i>
<br />
<i class="fas fa-external-link-square-alt"></i></p>
    <ul>
      <li><i class="fab fa-html5"></i> <a href="/assets/Doc/Marp.html">Código (Marp.html)</a></li>
      <li><i class="fas fa-file-pdf"></i> <a href="/assets/Doc/Marp.pdf">Código (Marp.pdf)</a></li>
      <li><i class="fas fa-file-code"></i> <a href="/assets/Doc/Marp.md.txt">Código (Marp.md)</a></li>
    </ul>
  </li>
</ul>

<hr />

<ul>
  <li>
    <p><i class="fas fa-bookmark"></i> <strong>AsciiDoctor</strong></p>

    <p><i class="fa fa-quote-left" aria-hidden="true"></i>
<em>Asciidoctor es un rápido procesador de texto de código abierto y una cadena de herramientas de publicación para convertir contenido AsciiDoc a HTML5, DocBook, PDF y otros formatos. Asciidoctor está escrito en Ruby y se ejecuta en todos los principales sistemas operativos.</em>
<i class="fa fa-quote-right" aria-hidden="true"></i>
<br /></p>
    <ul>
      <li><i class="fab fa-html5"></i> <a href="/assets/Doc/AsciiDoctor.html">Código (AsciiDoctor.html)</a></li>
      <li><i class="fas fa-file-code"></i> <a href="/assets/Doc/AsciiDoctor.asc">Código (AsciiDoctor.asc)</a></li>
    </ul>
  </li>
</ul>]]></content><author><name>Martin Nelbren Cuellar</name></author><category term="es" /><category term="documentation" /><category term="documentation" /><category term="markdown" /><category term="marp" /><category term="asciidoctor" /><summary type="html"><![CDATA[Documentación con Markdown, Marp y AsciiDoctor]]></summary></entry><entry><title type="html">Python - Solo lo básico</title><link href="https://nelbren.com/es/python/Python_Cheat_Sheet_just_the_basics/" rel="alternate" type="text/html" title="Python - Solo lo básico" /><published>2020-07-23T00:00:00-06:00</published><updated>2020-07-23T22:00:00-06:00</updated><id>https://nelbren.com/es/python/Python_Cheat_Sheet_just_the_basics</id><content type="html" xml:base="https://nelbren.com/es/python/Python_Cheat_Sheet_just_the_basics/"><![CDATA[<table>
  <thead>
    <tr>
      <th style="text-align: center">Hoja de referencia</th>
      <th style="text-align: center">Presentación</th>
    </tr>
  </thead>
  <tbody>
    <tr>
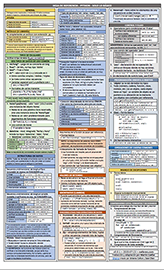
      <td style="text-align: center"><a href="https://nelbren.com/assets/Hoja_de_referencia_-_Python_-_Solo_lo_basico.pdf"><img src="/assets/images/posts/python/Hoja_de_referencia_-_Python_-_Solo_lo_basico.png" alt="Referencia" /></a></td>
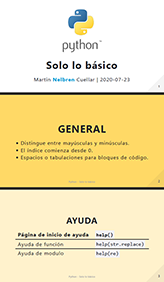
      <td style="text-align: center"><a href="https://nelbren.com/assets/Presentacion_de_referencia_-_Python_-_Solo_lo_basico.pdf"><img src="/assets/images/posts/python/Presentacion_de_referencia_-_Python_-_Solo_lo_basico.png" alt="Presentación" /></a></td>
    </tr>
  </tbody>
</table>]]></content><author><name>Martin Nelbren Cuellar</name></author><category term="es" /><category term="python" /><category term="python" /><category term="guía rápida" /><category term="presentación" /><summary type="html"><![CDATA[Python - Hoja de referencia y Presentación]]></summary></entry><entry><title type="html">Arduino Mega, everything you need to know</title><link href="https://nelbren.com/en/arduino/Arduino_Mega_2560_everythin_you_need_to_know/" rel="alternate" type="text/html" title="Arduino Mega, everything you need to know" /><published>2020-05-26T00:00:00-06:00</published><updated>2020-05-26T02:53:00-06:00</updated><id>https://nelbren.com/en/arduino/Arduino_Mega_2560_everythin_you_need_to_know</id><content type="html" xml:base="https://nelbren.com/en/arduino/Arduino_Mega_2560_everythin_you_need_to_know/"><![CDATA[<h1 id="arduino-mega-2560-everything-you-need-to-know">Arduino Mega 2560, everything you need to know</h1>

<h2 id="introduction">Introduction</h2>

<p>A few days ago I was talking with a friend that I did not see for months, he is passionate about the <strong>Internet of Things</strong> and that last time we spoke he told me that he was working on a project for a <strong>Weather Station</strong> He shared that he was using an <strong>Arduino UNO</strong> as the brain to which all the sensors were connected. To my surprise, at this moment it already has 32 Meteorological Stations strategically scattered in order to obtain statistical data that provides it with information to carry out <strong>artificial intelligence</strong>, <strong>trend analysis</strong>, among others. One of the details that he explained to me was the fact that now the project had two Arduino components, one was an <strong>Arduino Mega</strong> as the brain and control of all the sensors and the other an <strong>Arduino UNO</strong> as a watchdog of the brain (Arduino Mega). So I am curious to learn more about the capabilities of the Arduino Mega and compare it to the Arduino Uno; document my observations and share these findings in this tutorial.</p>

<p>The first thing we should know is the basics, that is, the first question you can ask yourself is:</p>

<h2 id="what-is-arduino-mega">What is Arduino Mega?</h2>

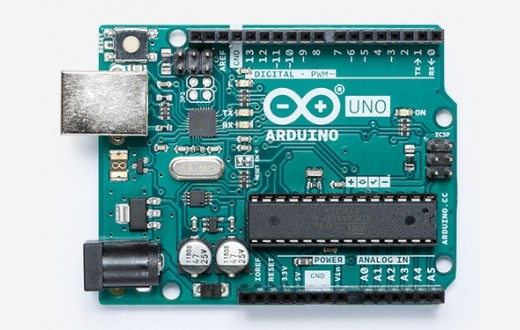
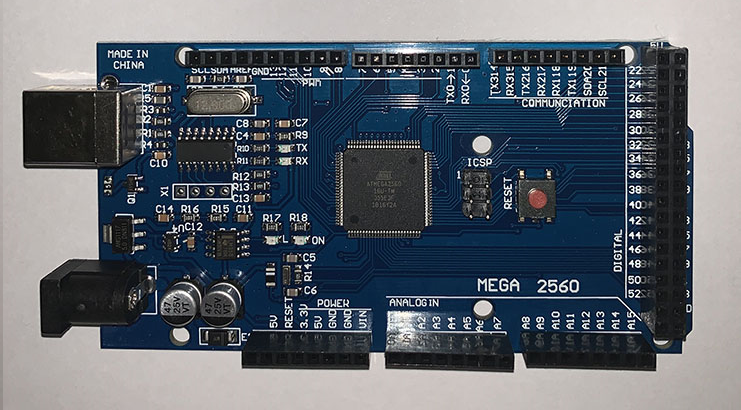
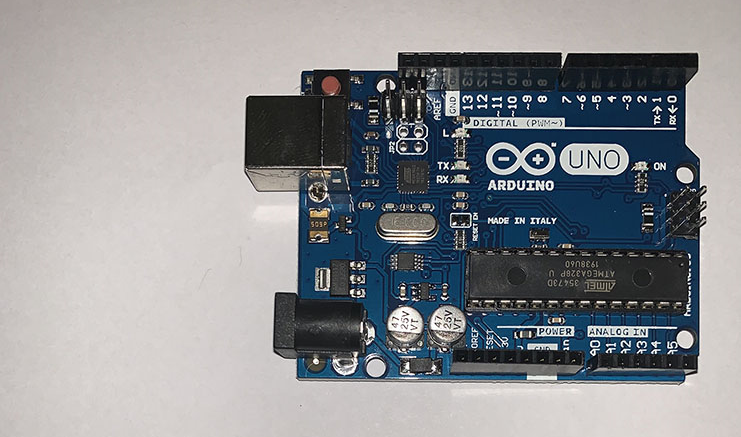
<p><strong>Arduino Mega 2560 R3</strong> is a much more powerful development board than the <strong>Arduino UNO</strong>. As we name the board is indistinct, <strong>“Arduino Mega”</strong>, <strong>“Arduino Mega 2560”</strong> or <strong>“Arduino Mega 2560 R3”</strong>, in this tutorial we will call it <strong>“Arduino Mega”</strong>.</p>

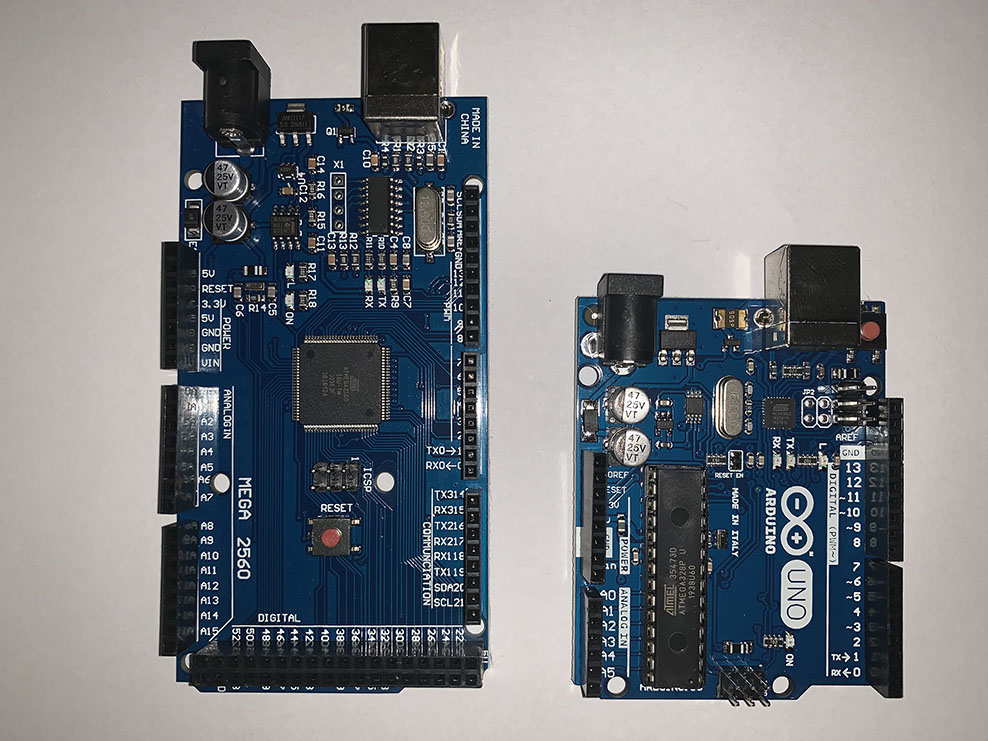
<h3 id="physical-comparison-between-arduino-mega-and-arduino-uno">Physical comparison between Arduino Mega and Arduino UNO</h3>

<p><img src="/assets/images/posts/Mega2560/arduino_mega_y_arduino_uno.jpg" alt="Arduino Mega" /></p>

<p>But in <strong>what is more powerful?</strong>, for this we have to see how they differ:</p>

<h2 id="difference-between-arduino-mega-and-arduino-uno">Difference between Arduino Mega and Arduino UNO</h2>

<p>The most significant differences between the <strong>Arduino Mega</strong> and the <strong>Arduino UNO</strong> is the <strong>board size</strong>, <strong>the capacity of the flash memory</strong>, as well as the <strong>number of pins digital and analog</strong>.
However, the boards have the same characteristics regarding <strong>voltage</strong>, <strong>pin current</strong>, <strong>clock speed</strong> and <strong>built-in led</strong>.
Below, you can see these differences in more detail and also the similarities between the two plates.</p>

<h2 id="technical-characteristics">Technical characteristics</h2>

<table>
  <thead>
    <tr>
      <th style="text-align: right">Characteristic</th>
      <th style="text-align: left">Arduino Mega 2560</th>
      <th style="text-align: left">Arduino UNO</th>
    </tr>
  </thead>
  <tbody>
    <tr>
      <td style="text-align: right">Microcontroller</td>
      <td style="text-align: left">ATmega2560</td>
      <td style="text-align: left">ATmega328P</td>
    </tr>
    <tr>
      <td style="text-align: right">Operating Voltage</td>
      <td style="text-align: left">5V</td>
      <td style="text-align: left">5V</td>
    </tr>
    <tr>
      <td style="text-align: right">Input voltage (recommended)</td>
      <td style="text-align: left">7-12V</td>
      <td style="text-align: left">7-12V</td>
    </tr>
    <tr>
      <td style="text-align: right">Input voltage (limit)</td>
      <td style="text-align: left">6-20V</td>
      <td style="text-align: left">6-20V</td>
    </tr>
    <tr>
      <td style="text-align: right">Digital input/output pins</td>
      <td style="text-align: left"><strong>54 (15 PWM outputs)</strong></td>
      <td style="text-align: left">14 (6 PWM outputs)</td>
    </tr>
    <tr>
      <td style="text-align: right">Analog input pins</td>
      <td style="text-align: left"><strong>16</strong></td>
      <td style="text-align: left">6</td>
    </tr>
    <tr>
      <td style="text-align: right">Current per input/output pins</td>
      <td style="text-align: left">20mA</td>
      <td style="text-align: left">20mA</td>
    </tr>
    <tr>
      <td style="text-align: right">Current for 3.3V pin</td>
      <td style="text-align: left">50mA</td>
      <td style="text-align: left">50mA</td>
    </tr>
    <tr>
      <td style="text-align: right">Flash memory</td>
      <td style="text-align: left"><strong>256KB (8KB bootloader)</strong></td>
      <td style="text-align: left">32KB (0.5KB bootloader)</td>
    </tr>
    <tr>
      <td style="text-align: right">SRAM memory</td>
      <td style="text-align: left"><strong>8KB</strong></td>
      <td style="text-align: left">2KB</td>
    </tr>
    <tr>
      <td style="text-align: right">EEPROM memory</td>
      <td style="text-align: left"><strong>4KB</strong></td>
      <td style="text-align: left">1KB</td>
    </tr>
    <tr>
      <td style="text-align: right">Clock Speed</td>
      <td style="text-align: left">16Mhz</td>
      <td style="text-align: left">16Mhz</td>
    </tr>
    <tr>
      <td style="text-align: right">Built-in led</td>
      <td style="text-align: left">13</td>
      <td style="text-align: left">13</td>
    </tr>
    <tr>
      <td style="text-align: right">Length</td>
      <td style="text-align: left"><strong>101.52mm</strong></td>
      <td style="text-align: left">68.6mm</td>
    </tr>
    <tr>
      <td style="text-align: right">Width</td>
      <td style="text-align: left"><strong>52.3mm</strong></td>
      <td style="text-align: left">53.4mm</td>
    </tr>
    <tr>
      <td style="text-align: right">Weight</td>
      <td style="text-align: left"><strong>37g</strong></td>
      <td style="text-align: left">25g</td>
    </tr>
  </tbody>
</table>

<hr />

<h2 id="where-to-buy">Where to buy</h2>

<h3 id="in-the-arduino-store">In the <a href="https://store.arduino.cc/">Arduino</a> Store</h3>

<p><img src="/assets/images/posts/Mega2560/Arduino_Logo.svg" alt="Arduino" /></p>

<ul>
  <li>
    <p><a href="https://store.arduino.cc/usa/mega-2560-r3">ARDUINO MEGA 2560 REV3</a></p>

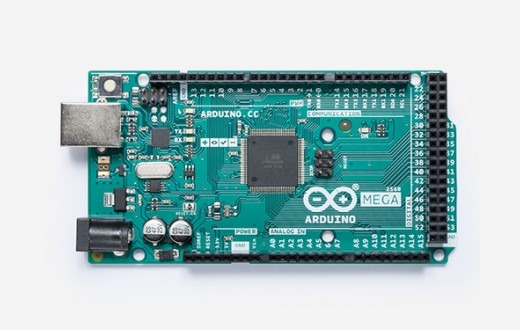
    <p><img src="/assets/images/posts/Mega2560/a000067_featured_1_.jpg" alt="Arduino Mega" /></p>
  </li>
  <li>
    <p><a href="https://store.arduino.cc/usa/arduino-uno-rev3">ARDUINO UNO REV3</a></p>

    <p><img src="/assets/images/posts/Mega2560/a000066_featured_5.jpg" alt="Arduino UNO" /></p>
  </li>
</ul>

<h3 id="in-the-cd-technologia-store">In the <a href="http://cdtechnologia.net">C&amp;D Technologia</a> Store</h3>

<p><img src="/assets/images/posts/Mega2560/circuitos-y-desarrollo-en-tecnologia-cd-technologia-logo-1589751414.jpg" alt="C&amp;D Technologia" /></p>

<ul>
  <li>
    <p><a href="https://cdtechnologia.net/arduino/47-arduino-mega-2560.html">Arduino Mega 2560</a></p>

    <p><img src="/assets/images/posts/Mega2560/arduino_mega.png" alt="Arduino Mega" /></p>
  </li>
  <li>
    <p><a href="https://cdtechnologia.net/arduino/46-arduino-uno-generico-2.html">Arduino Uno Rev3</a></p>

    <p><img src="/assets/images/posts/Mega2560/arduino_uno.png" alt="Arduino Mega" /></p>
  </li>
</ul>

<h3 id="in-the-amazon-store">In the <a href="https://amazon.com">Amazon</a> Store</h3>

<p><img src="/assets/images/posts/Mega2560/640px-Amazon_logo.svg.png" alt="Amazon" /></p>

<ul>
  <li>
    <p><a href="https://www.amazon.com/s?k=arduino+mega+2560+r3&amp;ref=nb_sb_noss_1">Arduino Mega 2560</a></p>

    <p><img src="/assets/images/posts/Mega2560/arduino_mega.png" alt="Arduino Mega" /></p>
  </li>
  <li>
    <p><a href="https://www.amazon.com/s?k=Arduino+Uno+Rev3&amp;ref=nb_sb_noss_2">Arduino Uno Rev3</a></p>

    <p><img src="/assets/images/posts/Mega2560/arduino_uno.png" alt="Arduino Mega" /></p>
  </li>
</ul>

<h2 id="differences-between-original-plates-and-copies">Differences between original plates and copies</h2>

<p>Actually, all boards use the same microcontroller depending on the model. Therefore, an Arduino copy and an original Arduino are programmed the same. The difference is in where it is made and in the components, and that is where the problem lies. If you want to know more details about acquiring an original board or a copy, I invite you to see the article on <a href="https://programarfacil.com/blog/comprar-una-placa-original-o-una-placa-copia-de-arduino/">Buy original Arduino or Arduino copy, you choose</a></p>

<hr />

<h2 id="how-to-program-the-arduino-mega">How to program the Arduino Mega</h2>

<p>To program the <strong>Arduino Mega</strong>, the <strong>Arduino IDE v1.8.12</strong> software was used, the board was connected through the USB cable to the computer, and the following elements were defined to make the connection:</p>

<table>
  <thead>
    <tr>
      <th style="text-align: right">Type</th>
      <th style="text-align: left">Value</th>
    </tr>
  </thead>
  <tbody>
    <tr>
      <td style="text-align: right">Board</td>
      <td style="text-align: left"><strong>“Arduino Mega or Mega 2560”</strong></td>
    </tr>
    <tr>
      <td style="text-align: right">Processor</td>
      <td style="text-align: left"><strong>ATmega 2560 (Mega 2560)</strong></td>
    </tr>
    <tr>
      <td style="text-align: right">Port</td>
      <td style="text-align: left"><strong>COM3</strong> (Depends on your configuration)</td>
    </tr>
  </tbody>
</table>

<h3 id="the-simplest-and-fastest-test-use-of-the-built-in-led">The simplest and fastest test, use of the built-in led</h3>

<ol>
  <li>
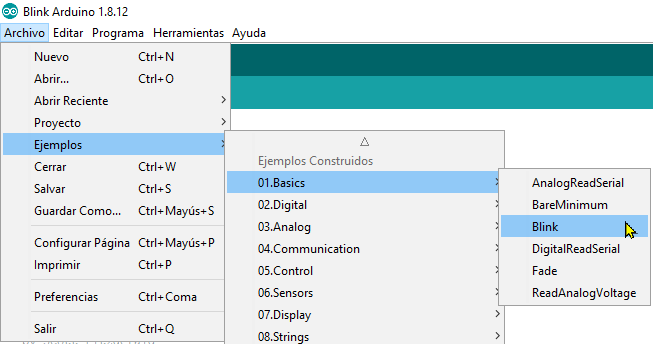
    <p>Select the project <strong>Blink</strong> that comes in the <em>Examples</em> of <em>01.Basics</em></p>

    <p><img src="/assets/images/posts/Mega2560/blink_1_mega_o_uno.png" alt="Blink_1" /></p>
  </li>
  <li>
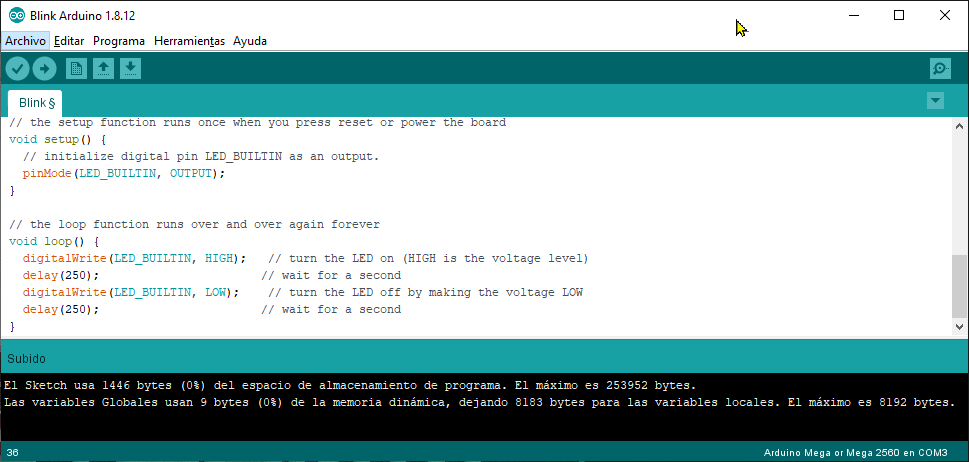
    <p>Modify the <strong>milliseconds</strong> of the two <code class="language-plaintext highlighter-rouge">delay</code> instructions so that the “<strong>blink</strong>” of the <em>LED incorporated in the board</em> is more noticeable.</p>

    <div class="language-plaintext highlighter-rouge"><div class="highlight"><pre class="highlight"><code>delay(250);
</code></pre></div>    </div>
  </li>
  <li>
    <p>Upload the program.</p>

    <p><img src="/assets/images/posts/Mega2560/blink_2_mega.png" alt="Blink_2" /></p>
  </li>
  <li>
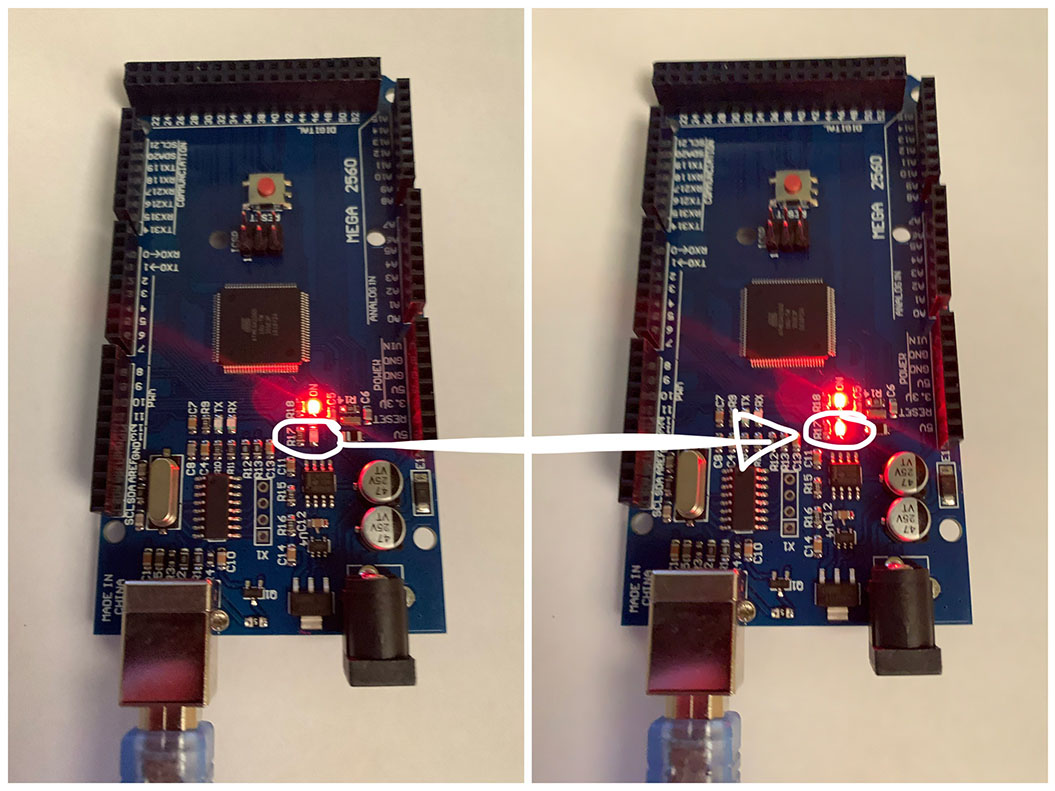
    <p>Check the <strong>off</strong> and <strong>on</strong> of the <em>led incorporated in the board</em>.</p>

    <p><img src="/assets/images/posts/Mega2560/blink_3_mega.jpg" alt="Blink_3" /></p>
  </li>
</ol>

<h3 id="example-of-using-hc-sr04-ultrasonic-sensor">Example of using HC-SR04 ultrasonic sensor</h3>

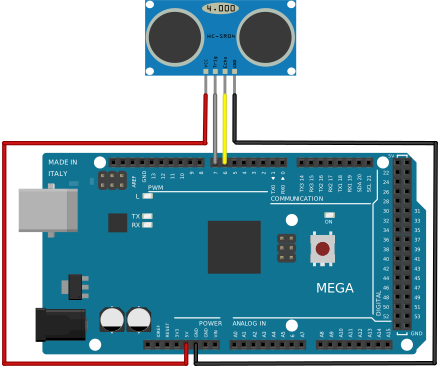
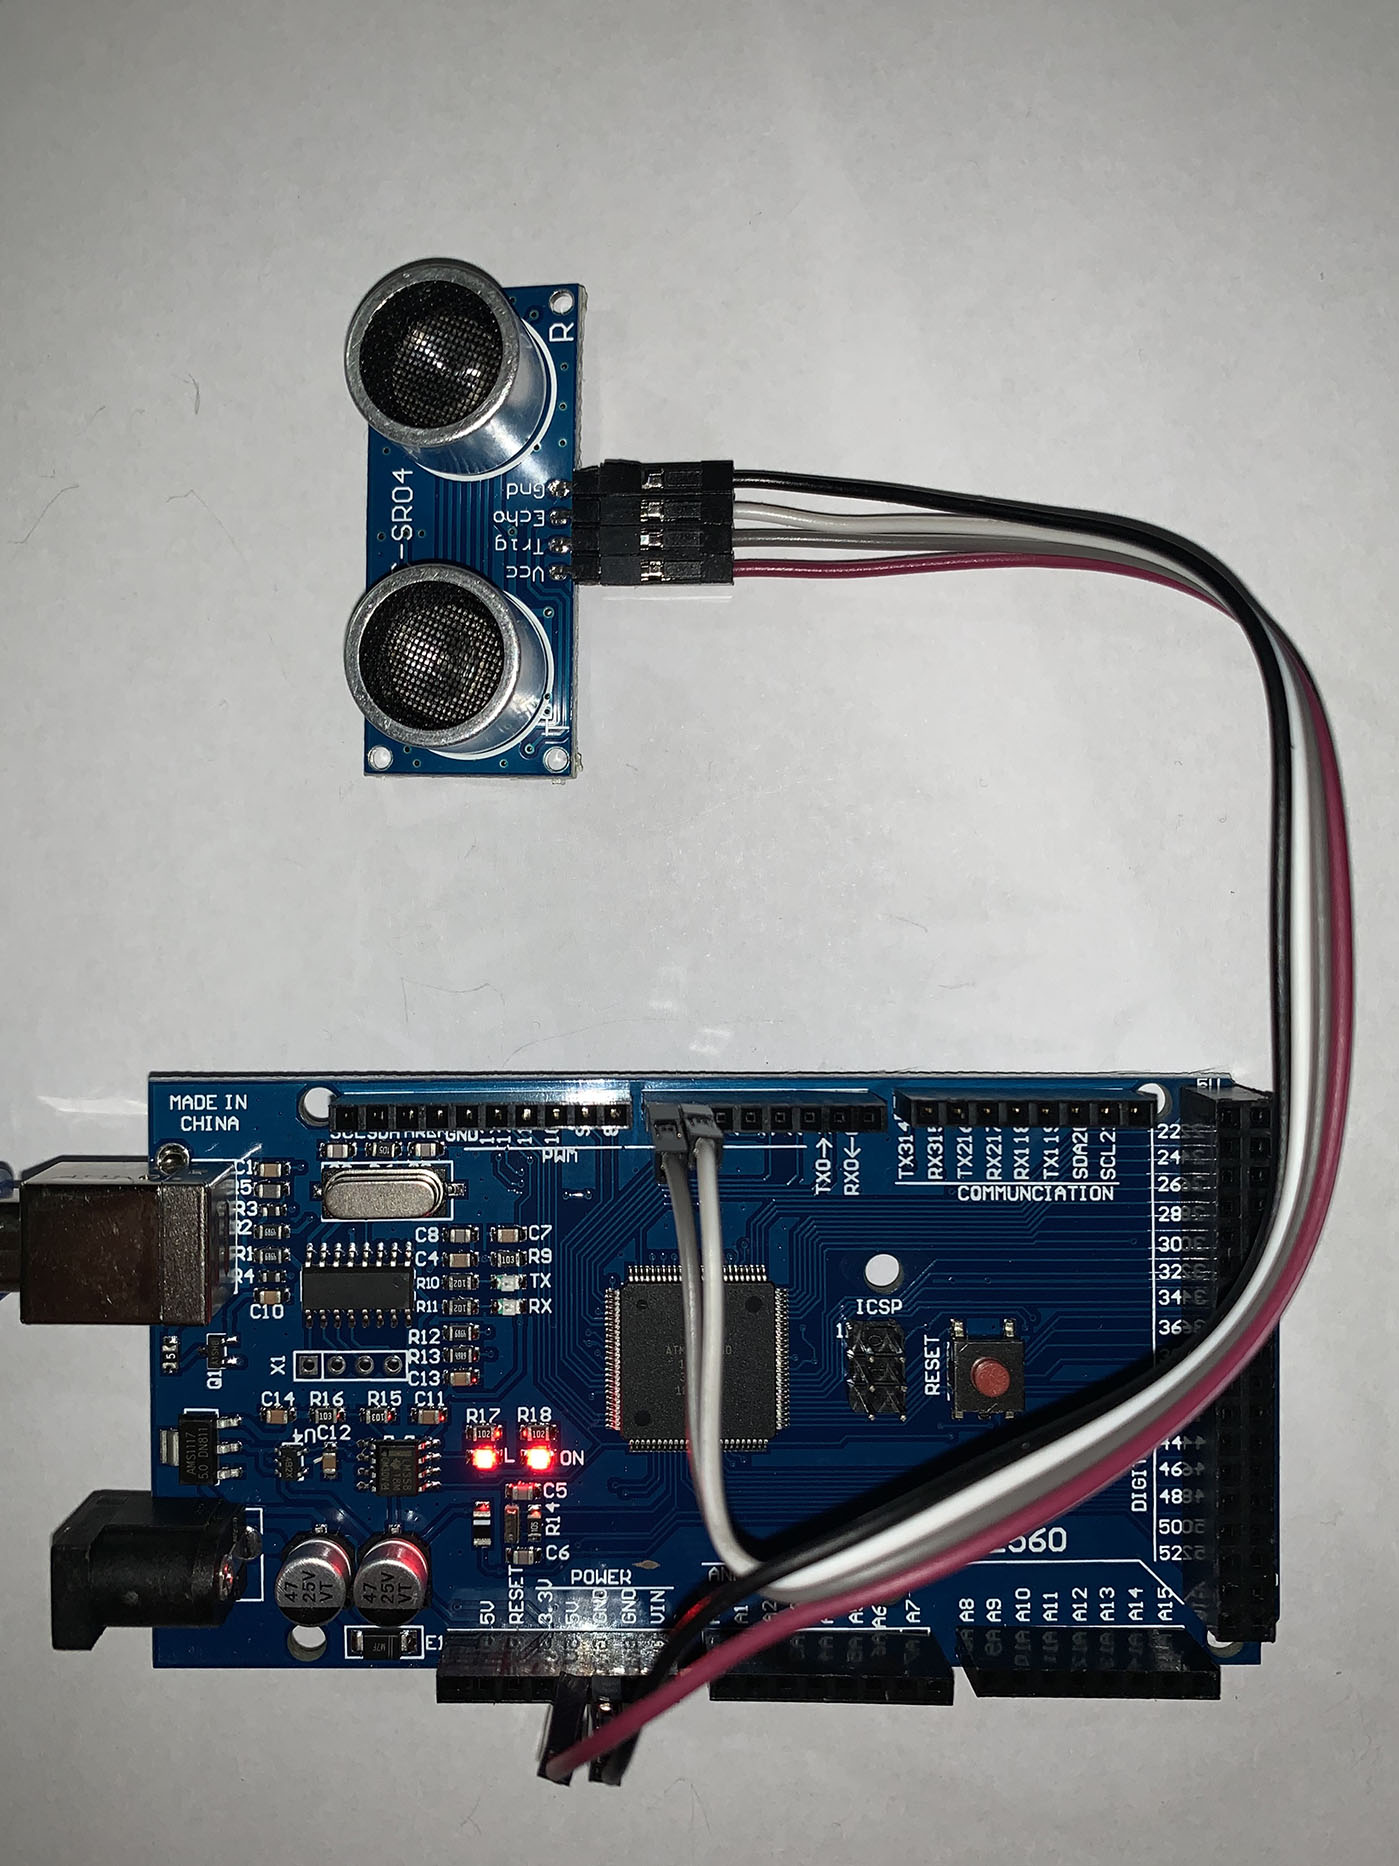
<p>We are going to use the same sensor from the article <a href="https://programarfacil.com/blog/arduino-blog/sensor-de-nivel-de-agua-con-arduino/">Water level sensor with Arduino</a>, in order to demonstrate how to program the <strong>Arduino Mega</strong>; checking that said programming is 100% compatible with the <strong>Arduino UNO</strong>.</p>

<table>
  <thead>
    <tr>
      <th style="text-align: right">Arduino Mega</th>
      <th style="text-align: left">HC-SR04</th>
    </tr>
  </thead>
  <tbody>
    <tr>
      <td style="text-align: right"><strong>GND</strong></td>
      <td style="text-align: left"><strong>Gnd</strong></td>
    </tr>
    <tr>
      <td style="text-align: right"><strong>5V</strong></td>
      <td style="text-align: left"><strong>Vcc</strong></td>
    </tr>
    <tr>
      <td style="text-align: right">Pin 6</td>
      <td style="text-align: left">Echo</td>
    </tr>
    <tr>
      <td style="text-align: right">Pin 7</td>
      <td style="text-align: left">Trig</td>
    </tr>
  </tbody>
</table>

<h4 id="wiring-diagram">Wiring diagram</h4>

<center>
  <img src="/assets/images/posts/Mega2560/arduino_mega_con_hc-sr04_bb.svg" height="600px" />
</center>

<h4 id="connections-image">Connections image</h4>
<p><img src="/assets/images/posts/Mega2560/arduino_mega_con_hc-sr04.jpg" alt="Arduino_Mega_con_hc-src04" /></p>

<hr />

<h2 id="how-to-program-the-arduino-uno">How to program the Arduino UNO</h2>

<p>To program the <strong>Arduino UNO</strong> the software <strong>Arduino IDE v1.8.12</strong> was used, the board was connected by means of the USB cable to the computer, and the following elements were defined to make the connection:</p>

<table>
  <thead>
    <tr>
      <th style="text-align: right">Type</th>
      <th style="text-align: left">Value</th>
    </tr>
  </thead>
  <tbody>
    <tr>
      <td style="text-align: right">Board</td>
      <td style="text-align: left"><strong>“Arduino Uno”</strong></td>
    </tr>
    <tr>
      <td style="text-align: right">Port</td>
      <td style="text-align: left"><strong>COM4</strong> (Depends on your configuration)</td>
    </tr>
  </tbody>
</table>

<h3 id="the-simplest-and-fastest-test-use-of-the-built-in-led-1">The simplest and fastest test, use of the built-in led</h3>

<ol>
  <li>
    <p>Select the project <strong>Blink</strong> that comes in the <em>Examples</em> of <em>01.Basics</em></p>

    <p><img src="/assets/images/posts/Mega2560/blink_1_mega_o_uno.png" alt="Blink_1" /></p>
  </li>
  <li>
    <p>Modify the <strong>milliseconds</strong> of the two <code class="language-plaintext highlighter-rouge">delay</code> instructions so that the “<strong>blink</strong>” of the <em>LED incorporated in the board</em> is more noticeable.</p>

    <div class="language-plaintext highlighter-rouge"><div class="highlight"><pre class="highlight"><code>delay(250);
</code></pre></div>    </div>
  </li>
  <li>
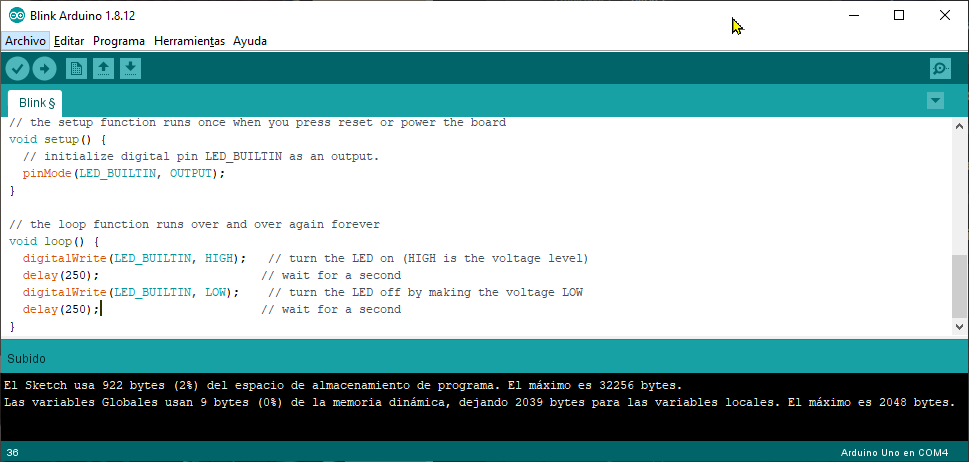
    <p>Upload the program.</p>

    <p><img src="/assets/images/posts/Mega2560/blink_2_uno.png" alt="Arduino UNO" /></p>
  </li>
  <li>
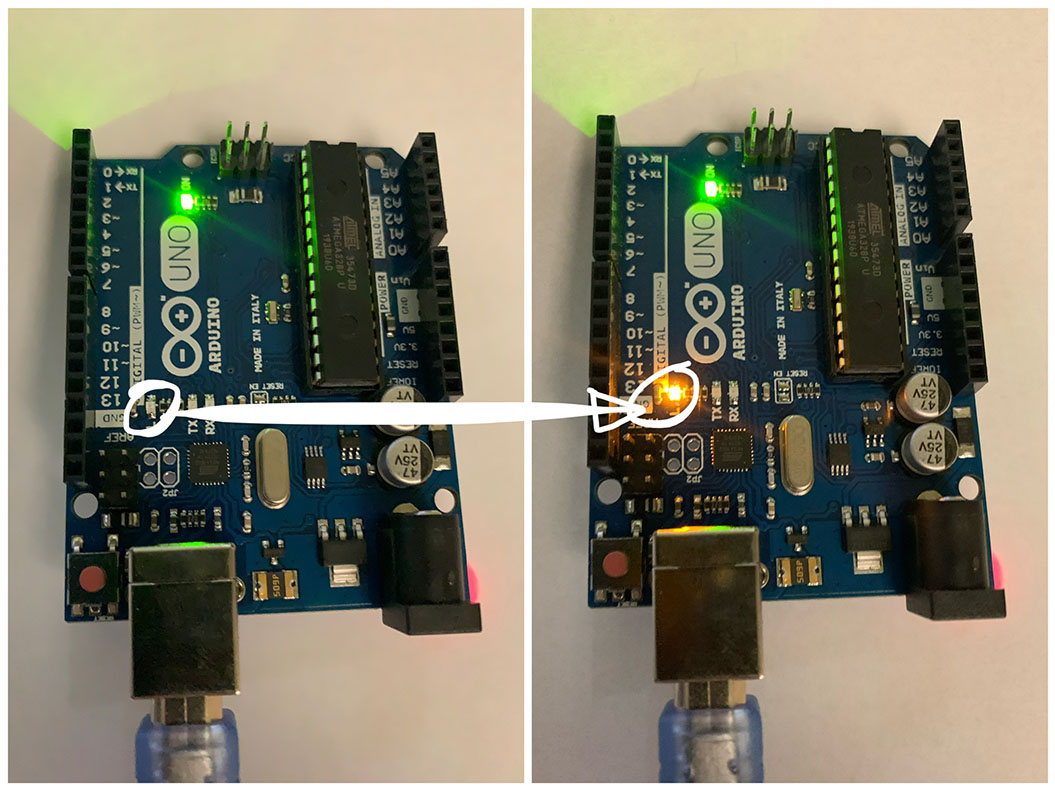
    <p>Check the <strong>off</strong> and <strong>on</strong> of the <em>led incorporated in the board</em>.</p>

    <p><img src="/assets/images/posts/Mega2560/blink_3_uno.jpg" alt="Arduino UNO" /></p>
  </li>
</ol>

<h3 id="example-of-using-hc-sr04-ultrasonic-sensor-1">Example of using HC-SR04 ultrasonic sensor</h3>

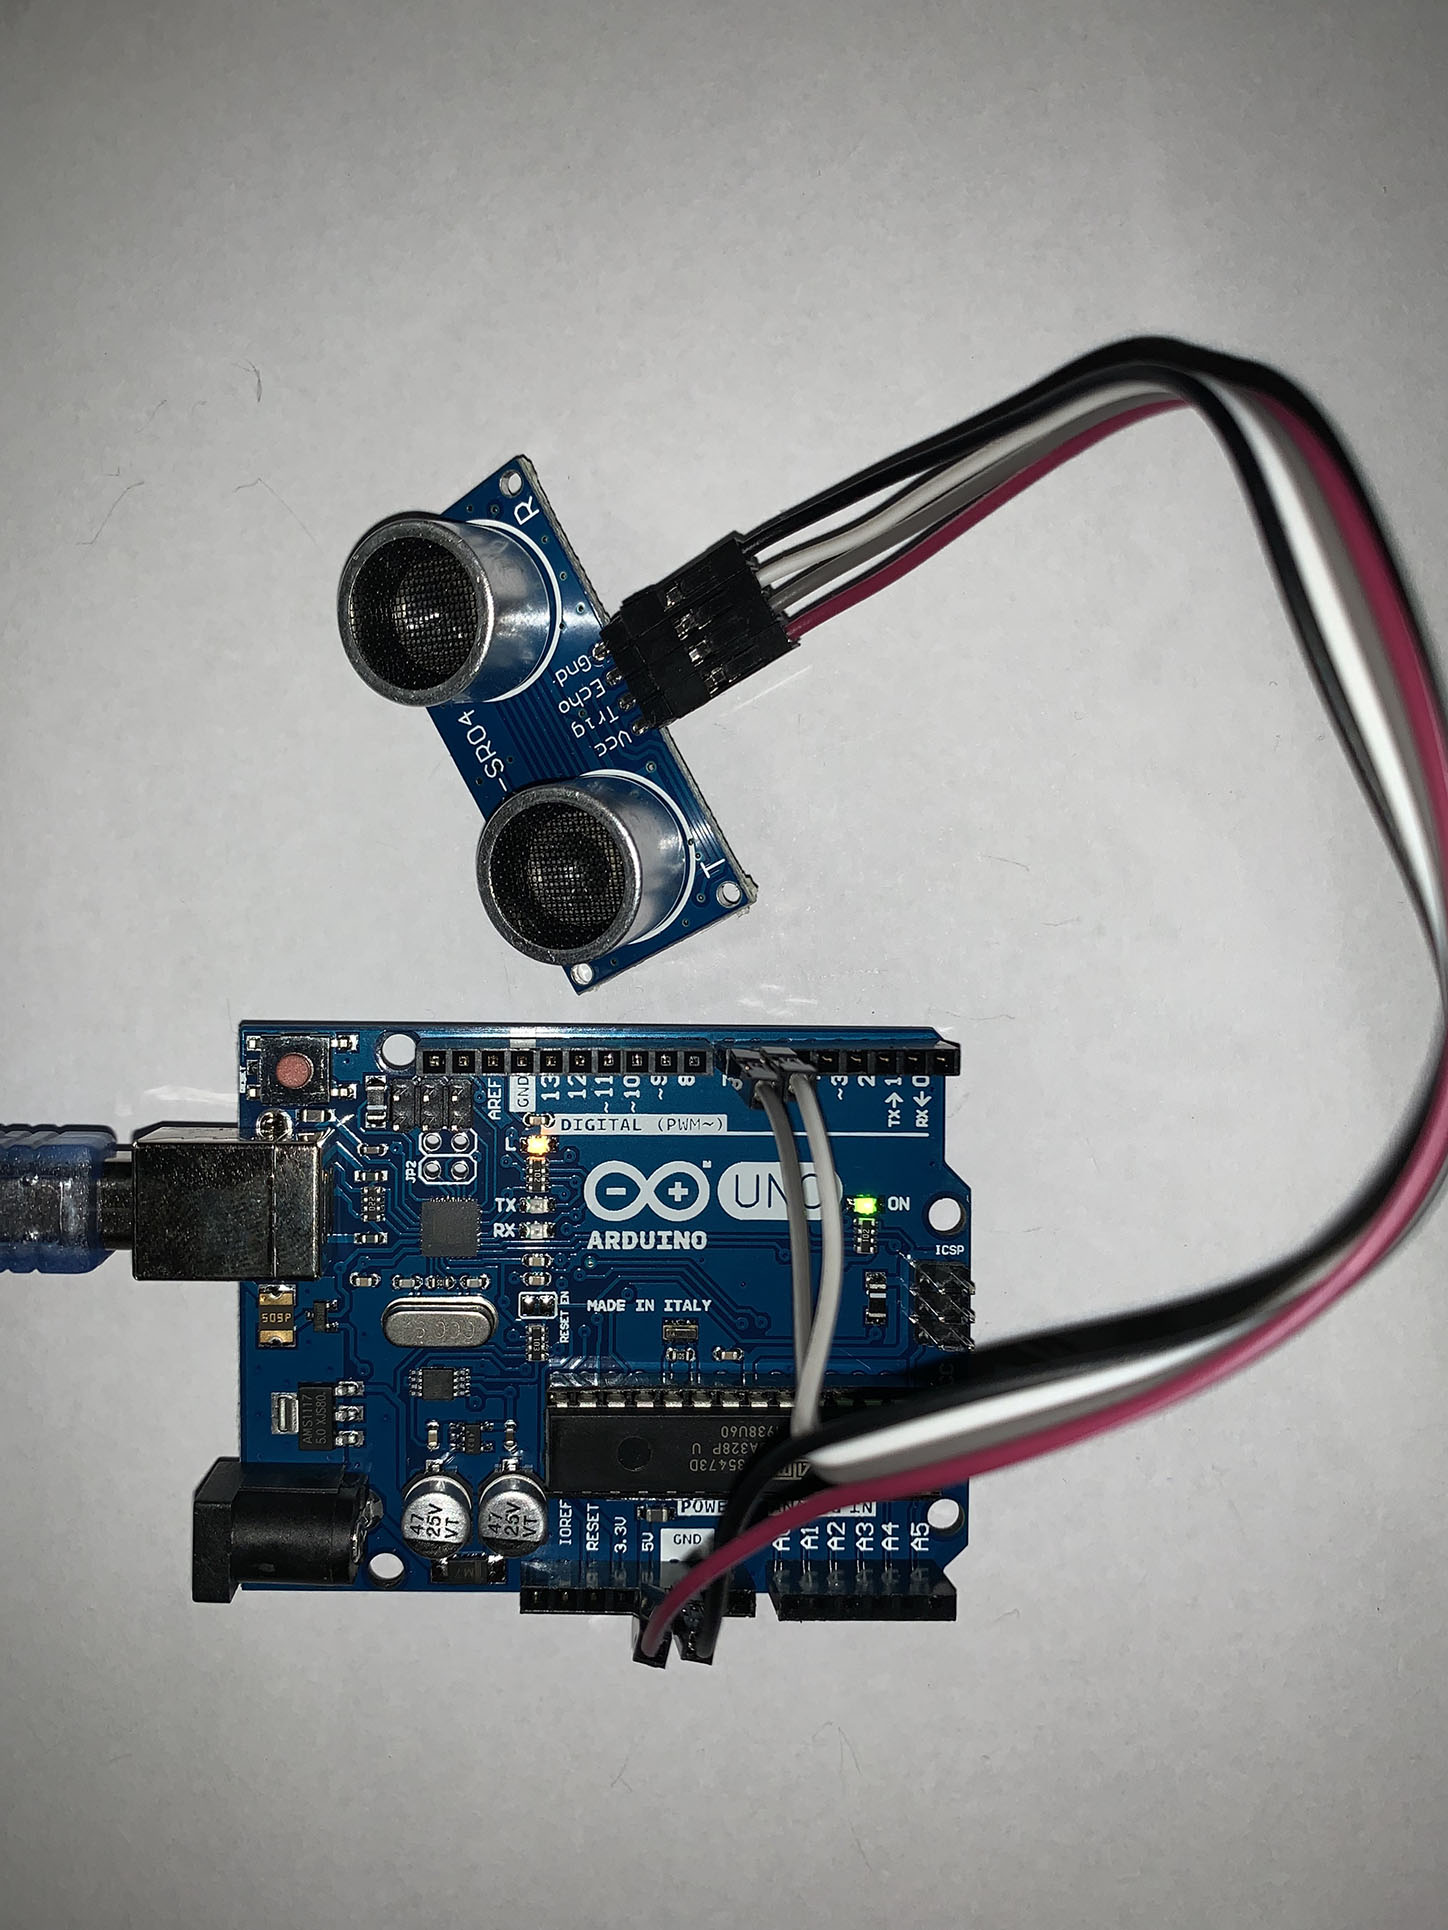
<p>We are going to use the same sensor from the article <a href="https://programarfacil.com/blog/arduino-blog/sensor-de-nivel-de-agua-con-arduino/">Water level sensor with Arduino</a>, in order to demonstrate how to program the <strong>Arduino UNO</strong>; checking that said programming is 100% compatible with the <strong>Arduino Mega</strong>.</p>

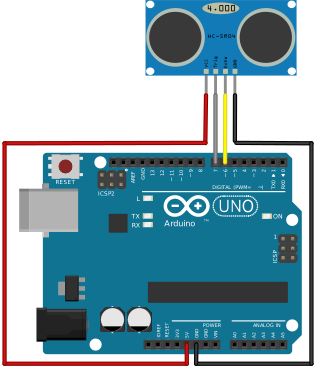
<table>
  <thead>
    <tr>
      <th style="text-align: right">Arduino UNO</th>
      <th style="text-align: left">HC-SR04</th>
    </tr>
  </thead>
  <tbody>
    <tr>
      <td style="text-align: right"><strong>GND</strong></td>
      <td style="text-align: left"><strong>Gnd</strong></td>
    </tr>
    <tr>
      <td style="text-align: right"><strong>5V</strong></td>
      <td style="text-align: left"><strong>Vcc</strong></td>
    </tr>
    <tr>
      <td style="text-align: right">Pin 6</td>
      <td style="text-align: left">Echo</td>
    </tr>
    <tr>
      <td style="text-align: right">Pin 7</td>
      <td style="text-align: left">Trig</td>
    </tr>
  </tbody>
</table>

<h4 id="wiring-diagram-1">Wiring diagram</h4>

<center>
  <img src="/assets/images/posts/Mega2560/arduino_uno_con_hc-sr04_bb.svg" height="600px" />
</center>

<h4 id="connections-image-1">Connections image</h4>

<p><img src="/assets/images/posts/Mega2560/arduino_uno_con_hc-sr04.jpg" alt="Arduino_UNO_con_hc-src04" /></p>

<hr />

<h2 id="conclusions">Conclusions</h2>

<p>At this time, when we already know the <strong>Arduino Mega</strong> board, its characteristics, its differences and similarities, with respect to the <strong>Arduino UNO</strong>, validating that both are <strong>100% compatible in its programming</strong>, we We find the faculty to understand what when you need to carry out a project, where you will have many sensors or actuators, as in the case of my friend, that his project of <strong>“Solar Meteorological Station 9 in 1”</strong>, which consists of sensors wind speed, wind direction, luminosity, soil moisture, temperature, relative humidity, rain precipitation (rain gauge) and GSM transmission systems, data storage, RF transmission and solar energy. This number of sensors and systems cannot be managed by a <strong>Arduino UNO</strong>, so it is necessary and mandatory for a team such as the <strong>Arduino Mega</strong> to carry out this task. However, in projects with few sensors the <strong>Arduino Mega</strong> would be completely underused, in this case the best option would be an <strong>Arduino UNO</strong>. Therefore, the use of one plate or the other will depend on your project.</p>]]></content><author><name>Martin Nelbren Cuellar</name></author><category term="en" /><category term="arduino" /><category term="arduino" /><category term="led" /><summary type="html"><![CDATA[Comparison of Arduino Mega 2560 and Arduino UNO]]></summary></entry><entry><title type="html">Arduino Mega, todo lo que necesitas saber</title><link href="https://nelbren.com/es/arduino/Arduino_Mega_2560_everythin_you_need_to_know/" rel="alternate" type="text/html" title="Arduino Mega, todo lo que necesitas saber" /><published>2020-05-26T00:00:00-06:00</published><updated>2020-05-26T02:53:00-06:00</updated><id>https://nelbren.com/es/arduino/Arduino_Mega_2560_everythin_you_need_to_know</id><content type="html" xml:base="https://nelbren.com/es/arduino/Arduino_Mega_2560_everythin_you_need_to_know/"><![CDATA[<h1 id="arduino-mega-2560-todo-lo-que-necesitas-saber">Arduino Mega 2560, todo lo que necesitas saber</h1>

<h2 id="introducción">Introducción</h2>

<p>Hace algunos unos días estuve conversando con un amigo que no veía hace meses, él es un apasionado del <strong>Internet de las Cosas</strong> y esa última vez que hablamos me comentaba que estaba trabajando en un proyecto de una <strong>Estación Meteorológica</strong>, me compartió que estaba usando un <strong>Arduino UNO</strong> como cerebro al cual se conectaban todos los sensores. Para mi sorpresa, en este momento ya cuenta con 32 Estaciones Meteorológicas diseminadas estratégicamente con el fin de obtener datos estadísticos que le proporcionen información para poder realizar <strong>inteligencia artificial</strong>, <strong>análisis de tendencias</strong>, entre otros. Uno de los detalles que me explicaba era el hecho de que ahora el proyecto tenía dos componentes de Arduino, uno era un <strong>Arduino Mega</strong> como cerebro y control de todos los sensores y el otro un <strong>Arduino UNO</strong> como vigilante del cerebro (Arduino Mega). Por lo que me entro la curiosidad de conocer más sobre las capacidades del Arduino Mega y compararlo con el Arduino Uno; documentar mis observaciones y compartir estos hallazgos en este tutorial.</p>

<p>Lo primero que debemos saber es lo básico, o sea la primer interrogante, que te puedes plantear es:</p>

<h2 id="qué-es-arduino-mega">¿Qué es Arduino Mega?</h2>

<p><strong>Arduino Mega 2560 R3</strong> es una tarjeta de desarrollo mucho más potente que el <strong>Arduino UNO</strong>. Como nombremos la placa es indistinto, <strong>“Arduino Mega”</strong>, <strong>“Arduino Mega 2560”</strong> o <strong>“Arduino Mega 2560 R3”</strong>, en este tutorial la llamaremos <strong>“Arduino Mega”</strong>.</p>

<h3 id="comparación-física-entre-arduino-mega-y-arduino-uno">Comparación física entre Arduino Mega y Arduino UNO</h3>

<p><img src="/assets/images/posts/Mega2560/arduino_mega_y_arduino_uno.jpg" alt="Arduino Mega" /></p>

<p>Pero en <strong>¿qué es más potente?</strong>, para ello tenemos que ver en que difieren:</p>

<h2 id="diferencia-entre-arduino-mega-y-arduino-uno">Diferencia entre Arduino Mega y Arduino UNO</h2>

<p>Las diferencias más significativas entre el <strong>Arduino Mega</strong> y el <strong>Arduino UNO</strong> es el <strong>tamaño de la placa</strong>, <strong>la capacidad de la memoria flash</strong>, así como el <strong>número de pines digitales y analógicos</strong>. 
No obstante, las placas tienen las mismas características respecto al <strong>voltaje</strong>, <strong>la corriente de los pines</strong>, <strong>la velocidad de reloj</strong> y el <strong>led incorporado</strong>. 
A continuación, puedes observar con más en detalle dichas diferencias y además las similitudes entre ambas placas.</p>

<h2 id="características-técnicas">Características técnicas</h2>

<table>
  <thead>
    <tr>
      <th style="text-align: right">Característica</th>
      <th style="text-align: left">Arduino Mega 2560</th>
      <th style="text-align: left">Arduino UNO</th>
    </tr>
  </thead>
  <tbody>
    <tr>
      <td style="text-align: right">Revisión</td>
      <td style="text-align: left">3</td>
      <td style="text-align: left">3</td>
    </tr>
    <tr>
      <td style="text-align: right">Microcontrolador</td>
      <td style="text-align: left">ATmega2560</td>
      <td style="text-align: left">ATmega328P</td>
    </tr>
    <tr>
      <td style="text-align: right">Voltaje de Operación</td>
      <td style="text-align: left">5V</td>
      <td style="text-align: left">5V</td>
    </tr>
    <tr>
      <td style="text-align: right">Voltaje de entrada (recomendado)</td>
      <td style="text-align: left">7-12V</td>
      <td style="text-align: left">7-12V</td>
    </tr>
    <tr>
      <td style="text-align: right">Voltaje de entrada (limite)</td>
      <td style="text-align: left">6-20V</td>
      <td style="text-align: left">6-20V</td>
    </tr>
    <tr>
      <td style="text-align: right">Pines digitales de entrada/salida</td>
      <td style="text-align: left"><strong>54 (15 salidas PWM)</strong></td>
      <td style="text-align: left">14 (6 salidas PWM)</td>
    </tr>
    <tr>
      <td style="text-align: right">Pines analógicos de entrada</td>
      <td style="text-align: left"><strong>16</strong></td>
      <td style="text-align: left">6</td>
    </tr>
    <tr>
      <td style="text-align: right">Corriente por pines de entrada/salida</td>
      <td style="text-align: left">20mA</td>
      <td style="text-align: left">20mA</td>
    </tr>
    <tr>
      <td style="text-align: right">Corriente para pin 3.3V</td>
      <td style="text-align: left">50mA</td>
      <td style="text-align: left">50mA</td>
    </tr>
    <tr>
      <td style="text-align: right">Memoria Flash</td>
      <td style="text-align: left"><strong>256KB (8KB bootloader)</strong></td>
      <td style="text-align: left">32KB (0.5KB bootloader)</td>
    </tr>
    <tr>
      <td style="text-align: right">Memoria SRAM</td>
      <td style="text-align: left"><strong>8KB</strong></td>
      <td style="text-align: left">2KB</td>
    </tr>
    <tr>
      <td style="text-align: right">Memoria EEPROM</td>
      <td style="text-align: left"><strong>4KB</strong></td>
      <td style="text-align: left">1KB</td>
    </tr>
    <tr>
      <td style="text-align: right">Velocidad de reloj</td>
      <td style="text-align: left">16Mhz</td>
      <td style="text-align: left">16Mhz</td>
    </tr>
    <tr>
      <td style="text-align: right">Led incorporado</td>
      <td style="text-align: left">13</td>
      <td style="text-align: left">13</td>
    </tr>
    <tr>
      <td style="text-align: right">Longitud</td>
      <td style="text-align: left"><strong>101.52mm</strong></td>
      <td style="text-align: left">68.6mm</td>
    </tr>
    <tr>
      <td style="text-align: right">Ancho</td>
      <td style="text-align: left"><strong>52.3mm</strong></td>
      <td style="text-align: left">53.4mm</td>
    </tr>
    <tr>
      <td style="text-align: right">Peso</td>
      <td style="text-align: left"><strong>37g</strong></td>
      <td style="text-align: left">25g</td>
    </tr>
  </tbody>
</table>

<hr />

<h2 id="dónde-comprar">Dónde comprar</h2>

<h3 id="en-la-tienda-de-arduino">En la tienda de <a href="https://store.arduino.cc/">Arduino</a></h3>

<p><img src="/assets/images/posts/Mega2560/Arduino_Logo.svg" alt="Arduino" /></p>

<ul>
  <li>
    <p><a href="https://store.arduino.cc/usa/mega-2560-r3">ARDUINO MEGA 2560 REV3</a></p>

    <p><img src="/assets/images/posts/Mega2560/a000067_featured_1_.jpg" alt="Arduino Mega" /></p>
  </li>
  <li>
    <p><a href="https://store.arduino.cc/usa/arduino-uno-rev3">ARDUINO UNO REV3</a></p>

    <p><img src="/assets/images/posts/Mega2560/a000066_featured_5.jpg" alt="Arduino UNO" /></p>
  </li>
</ul>

<h3 id="en-la-tienda-de-cd-technologia">En la tienda de <a href="http://cdtechnologia.net">C&amp;D Technologia</a></h3>

<p><img src="/assets/images/posts/Mega2560/circuitos-y-desarrollo-en-tecnologia-cd-technologia-logo-1589751414.jpg" alt="C&amp;D Technologia" /></p>

<ul>
  <li>
    <p><a href="https://cdtechnologia.net/arduino/47-arduino-mega-2560.html">Arduino Mega 2560</a></p>

    <p><img src="/assets/images/posts/Mega2560/arduino_mega.png" alt="Arduino Mega" /></p>
  </li>
  <li>
    <p><a href="https://cdtechnologia.net/arduino/46-arduino-uno-generico-2.html">Arduino Uno Rev3</a></p>

    <p><img src="/assets/images/posts/Mega2560/arduino_uno.png" alt="Arduino Mega" /></p>
  </li>
</ul>

<h3 id="en-la-tienda-de-amazon">En la tienda de <a href="https://amazon.com">Amazon</a></h3>

<p><img src="/assets/images/posts/Mega2560/640px-Amazon_logo.svg.png" alt="Amazon" /></p>

<ul>
  <li>
    <p><a href="https://www.amazon.com/s?k=arduino+mega+2560+r3&amp;ref=nb_sb_noss_1">Arduino Mega 2560</a></p>

    <p><img src="/assets/images/posts/Mega2560/arduino_mega.png" alt="Arduino Mega" /></p>
  </li>
  <li>
    <p><a href="https://www.amazon.com/s?k=Arduino+Uno+Rev3&amp;ref=nb_sb_noss_2">Arduino Uno Rev3</a></p>

    <p><img src="/assets/images/posts/Mega2560/arduino_uno.png" alt="Arduino Mega" /></p>
  </li>
</ul>

<h2 id="diferencias-entre-placas-originales-y-copias">Diferencias entre placas originales y copias</h2>

<p>En realidad, todas las placas utilizan el mismo microcontrolador dependiendo del modelo. Por lo tanto, un Arduino copia y un Arduino original se programan igual. La diferencia está en dónde se fabrica y en los componentes, y ahí es donde radica el problema. Sí deseas saber más detalles acerca de adquirir una placa original o una copia te invito a que veas el artículo sobre <a href="https://programarfacil.com/blog/comprar-una-placa-original-o-una-placa-copia-de-arduino/">Comprar Arduino original o Arduino copia, tu eliges</a></p>

<hr />

<h2 id="cómo-programar-el-arduino-mega">Cómo programar el Arduino Mega</h2>

<p>Para programar el <strong>Arduino Mega</strong> se utilizó el software <strong>Arduino IDE v1.8.12</strong>, se conectó la placa por medio del cable USB a la computadora, y definieron los siguientes elementos para hacer la conexión:</p>

<table>
  <thead>
    <tr>
      <th style="text-align: right">Tipo</th>
      <th style="text-align: left">Valor</th>
    </tr>
  </thead>
  <tbody>
    <tr>
      <td style="text-align: right">Placa</td>
      <td style="text-align: left"><strong>“Arduino Mega o Mega 2560”</strong></td>
    </tr>
    <tr>
      <td style="text-align: right">Procesador</td>
      <td style="text-align: left"><strong>ATmega 2560 (Mega 2560)</strong></td>
    </tr>
    <tr>
      <td style="text-align: right">Puerto</td>
      <td style="text-align: left"><strong>COM3</strong> (Dependerá de su configuración)</td>
    </tr>
  </tbody>
</table>

<h3 id="la-prueba-más-sencilla-y-rápida-uso-del-led-incorporado">La prueba más sencilla y rápida, uso del led incorporado</h3>

<ol>
  <li>
    <p>Seleccionar el proyecto <strong>Blink</strong> que viene en los <em>Ejemplos</em> de <em>01.Basics</em></p>

    <p><img src="/assets/images/posts/Mega2560/blink_1_mega_o_uno.png" alt="Blink_1" /></p>
  </li>
  <li>
    <p>Modificar los <strong>milisegundos</strong> de las dos instrucciones de <code class="language-plaintext highlighter-rouge">delay</code> para que sea más notorio el “<strong>parpadeo</strong>” del <em>led incorporado en la placa</em>.</p>

    <div class="language-plaintext highlighter-rouge"><div class="highlight"><pre class="highlight"><code>delay(250);
</code></pre></div>    </div>
  </li>
  <li>
    <p>Subir el programa.</p>

    <p><img src="/assets/images/posts/Mega2560/blink_2_mega.png" alt="Blink_2" /></p>
  </li>
  <li>
    <p>Verificar el <strong>apagado</strong> y <strong>encendido</strong> del <em>led incorporado en la placa</em>.</p>

    <p><img src="/assets/images/posts/Mega2560/blink_3_mega.jpg" alt="Blink_3" /></p>
  </li>
</ol>

<h3 id="ejemplo-de-uso-de-sensor-ultrasónico-hc-sr04">Ejemplo de uso de sensor ultrasónico HC-SR04</h3>

<p>Vamos a utilizar el mismo sensor del artículo <a href="https://programarfacil.com/blog/arduino-blog/sensor-de-nivel-de-agua-con-arduino/">Sensor de nivel de agua con Arduino</a>, a fin de demostrar cómo programar el <strong>Arduino Mega</strong>; comprobando que dicha programación es 100% compatible con el <strong>Arduino UNO</strong>.</p>

<table>
  <thead>
    <tr>
      <th style="text-align: right">Arduino Mega</th>
      <th style="text-align: left">HC-SR04</th>
    </tr>
  </thead>
  <tbody>
    <tr>
      <td style="text-align: right"><strong>GND</strong></td>
      <td style="text-align: left"><strong>Gnd</strong></td>
    </tr>
    <tr>
      <td style="text-align: right"><strong>5V</strong></td>
      <td style="text-align: left"><strong>Vcc</strong></td>
    </tr>
    <tr>
      <td style="text-align: right">Pin 6</td>
      <td style="text-align: left">Echo</td>
    </tr>
    <tr>
      <td style="text-align: right">Pin 7</td>
      <td style="text-align: left">Trig</td>
    </tr>
  </tbody>
</table>

<h4 id="esquema-de-conexiones">Esquema de conexiones</h4>

<center>
  <img src="/assets/images/posts/Mega2560/arduino_mega_con_hc-sr04_bb.svg" height="600px" />
</center>

<h4 id="imagen-de-conexiones">Imagen de conexiones</h4>
<p><img src="/assets/images/posts/Mega2560/arduino_mega_con_hc-sr04.jpg" alt="Arduino_Mega_con_hc-src04" /></p>

<hr />

<h2 id="cómo-programar-el-arduino-uno">Cómo programar el Arduino UNO</h2>

<p>Para programar el <strong>Arduino UNO</strong> se utilizó el software <strong>Arduino IDE v1.8.12</strong>, se conectó la placa por medio del cable USB a la computadora, y definieron los siguientes elementos para hacer la conexión:</p>

<table>
  <thead>
    <tr>
      <th style="text-align: right">Tipo</th>
      <th style="text-align: left">Valor</th>
    </tr>
  </thead>
  <tbody>
    <tr>
      <td style="text-align: right">Placa</td>
      <td style="text-align: left"><strong>“Arduino Uno”</strong></td>
    </tr>
    <tr>
      <td style="text-align: right">Puerto</td>
      <td style="text-align: left"><strong>COM4</strong> (Dependerá de su configuración)</td>
    </tr>
  </tbody>
</table>

<h3 id="la-prueba-más-sencilla-y-rápida-uso-del-led-incorporado-1">La prueba más sencilla y rápida, uso del led incorporado</h3>

<ol>
  <li>
    <p>Seleccionar el proyecto <strong>Blink</strong> que viene en los <em>Ejemplos</em> de <em>01.Basics</em></p>

    <p><img src="/assets/images/posts/Mega2560/blink_1_mega_o_uno.png" alt="Blink_1" /></p>
  </li>
  <li>
    <p>Modificar los <strong>milisegundos</strong> de las dos instrucciones de <code class="language-plaintext highlighter-rouge">delay</code> para que sea más notorio el “<strong>parpadeo</strong>” del <em>led incorporado en la placa</em>.</p>

    <div class="language-plaintext highlighter-rouge"><div class="highlight"><pre class="highlight"><code>delay(250);
</code></pre></div>    </div>
  </li>
  <li>
    <p>Subir el programa.</p>

    <p><img src="/assets/images/posts/Mega2560/blink_2_uno.png" alt="Arduino UNO" /></p>
  </li>
  <li>
    <p>Verificar el <strong>apagado</strong> y <strong>encendido</strong> del <em>led incorporado en la placa</em>.</p>

    <p><img src="/assets/images/posts/Mega2560/blink_3_uno.jpg" alt="Arduino UNO" /></p>
  </li>
</ol>

<h3 id="ejemplo-de-uso-de-sensor-ultrasónico-hc-sr04-1">Ejemplo de uso de sensor ultrasónico HC-SR04</h3>

<p>Vamos a utilizar el mismo sensor del artículo <a href="https://programarfacil.com/blog/arduino-blog/sensor-de-nivel-de-agua-con-arduino/">Sensor de nivel de agua con Arduino</a>, a fin de demostrar cómo programar el <strong>Arduino UNO</strong>; comprobando que dicha programación es 100% compatible con el <strong>Arduino Mega</strong>.</p>

<table>
  <thead>
    <tr>
      <th style="text-align: right">Arduino UNO</th>
      <th style="text-align: left">HC-SR04</th>
    </tr>
  </thead>
  <tbody>
    <tr>
      <td style="text-align: right"><strong>GND</strong></td>
      <td style="text-align: left"><strong>Gnd</strong></td>
    </tr>
    <tr>
      <td style="text-align: right"><strong>5V</strong></td>
      <td style="text-align: left"><strong>Vcc</strong></td>
    </tr>
    <tr>
      <td style="text-align: right">Pin 6</td>
      <td style="text-align: left">Echo</td>
    </tr>
    <tr>
      <td style="text-align: right">Pin 7</td>
      <td style="text-align: left">Trig</td>
    </tr>
  </tbody>
</table>

<h4 id="esquema-de-conexiones-1">Esquema de conexiones</h4>

<center>
  <img src="/assets/images/posts/Mega2560/arduino_uno_con_hc-sr04_bb.svg" height="600px" />
</center>

<h4 id="imagen-de-conexiones-1">Imagen de conexiones</h4>

<p><img src="/assets/images/posts/Mega2560/arduino_uno_con_hc-sr04.jpg" alt="Arduino_UNO_con_hc-src04" /></p>

<hr />

<h2 id="conclusiones">Conclusiones</h2>

<p>En este momento, cuando ya conocemos la placa <strong>Arduino Mega</strong>, sus características, sus diferencias y similitudes, con respecto al <strong>Arduino UNO</strong>, validando que ambas son <strong>100% compatibles en su programación</strong>, nos encontramos con la facultad para entender qué cuando necesitas realizar un proyecto, en donde tendrás muchos sensores o actuadores, como el caso de mi amigo, que su proyecto de <strong>“Estación Meteorológica Solar 9 en 1”</strong>, el cual consta de sensores de velocidad de viento, dirección del viento, luminosidad, humedad del suelo, temperatura, humedad relativa ambiental, precipitación de lluvia (pluviómetro) y sistemas de transmisión GSM, almacenamiento de datos, transmisión RF y de energía solar. Está cantidad de sensores y sistemas no pueden ser manejados por un <strong>Arduino UNO</strong>, por lo que es necesario y obligatorio un equipo como el <strong>Arduino Mega</strong> para llevar a cabo dicha tarea. Sin embargo, en proyectos con pocos sensores el <strong>Arduino Mega</strong> seria completamente subutilizado, en este caso la mejor opción sería un <strong>Arduino UNO</strong>. Por lo tanto, dependerá de tu proyecto el uso de una placa o la otra.</p>]]></content><author><name>Martin Nelbren Cuellar</name></author><category term="es" /><category term="arduino" /><category term="arduino" /><category term="led" /><summary type="html"><![CDATA[Comparación de Arduino Mega 2560 y Arduino UNO]]></summary></entry><entry><title type="html">Use of Java and Git in the Command Line</title><link href="https://nelbren.com/en/develop/Use_Java_and_Git_in_Command_Line/" rel="alternate" type="text/html" title="Use of Java and Git in the Command Line" /><published>2019-04-20T00:00:00-06:00</published><updated>2019-03-20T20:19:00-06:00</updated><id>https://nelbren.com/en/develop/Use_Java_and_Git_in_Command_Line</id><content type="html" xml:base="https://nelbren.com/en/develop/Use_Java_and_Git_in_Command_Line/"><![CDATA[<h2 id="-objective"><i class="fas fa-bullseye"></i> Objective</h2>

<p>Learn to use:</p>

<ul>
  <li>
    <p><i class="fab fa-java"></i> <strong>Java</strong></p>

    <p><i class="fa fa-quote-left" aria-hidden="true"></i> 
<em>Is a general-purpose programming language that is class-based, object-oriented and designed to have as few implementation dependencies as possible.</em> 
<i class="fa fa-quote-right" aria-hidden="true"></i>
<br />
<i class="fab fa-wikipedia-w"></i>
<a href="https://en.wikipedia.org/wiki/Java_(programming_language)">Wikipedia</a> 
<i class="fas fa-external-link-square-alt"></i></p>
  </li>
  <li>
    <p><i class="fas fa-code-branch"></i> <strong>Git</strong></p>

    <p><i class="fa fa-quote-left" aria-hidden="true"></i> 
<em>Is a distributed version-control system for tracking changes in source code during software development.</em> 
<i class="fa fa-quote-right" aria-hidden="true"></i>
<br />
<i class="fab fa-wikipedia-w"></i>
<a href="https://en.wikipedia.org/wiki/Git">Wikipedia</a> 
<i class="fas fa-external-link-square-alt"></i></p>
  </li>
  <li>
    <p><i class="fas fa-terminal"></i> <strong>Command Line</strong></p>

    <p><i class="fa fa-quote-left" aria-hidden="true"></i> 
<em>A command-line interface or command language interpreter (CLI), also known as command-line user interface, console user interface and character user interface (CUI), is a means of interacting with a computer program where the user (or client) issues commands to the program in the form of successive lines of text (command lines).</em> 
<i class="fa fa-quote-right" aria-hidden="true"></i>
<br />
<i class="fab fa-wikipedia-w"></i>
<a href="https://en.wikipedia.org/wiki/Command-line_interface">Wikipedia</a> 
<i class="fas fa-external-link-square-alt"></i></p>
  </li>
</ul>

<h2 id="-downloads"><i class="fa fa-arrow-circle-down" aria-hidden="true"></i> Downloads</h2>

<p class="notice--danger"><strong>Links of updated programs to 2019-04-20.</strong></p>

<ul>
  <li>
    <p><i class="fab fa-java"></i> <a href="https://www.java.com/es/download/">Java</a></p>

    <ul>
      <li><i class="fab fa-windows"></i> <a href="https://download.oracle.com/otn/java/jdk/8u211-b12/478a62b7d4e34b78b671c754eaaf38ab/jdk-8u211-windows-x64.exe">Windows</a></li>
      <li><i class="fab fa-apple"></i> <a href="https://download.oracle.com/otn/java/jdk/8u211-b12/478a62b7d4e34b78b671c754eaaf38ab/jdk-8u211-macosx-x64.dmg">Mac</a></li>
      <li><i class="fab fa-linux"></i> <a href="https://download.oracle.com/otn/java/jdk/8u211-b12/478a62b7d4e34b78b671c754eaaf38ab/jdk-8u211-linux-x64.tar.gz">Linux</a>
        <ul>
          <li>
            <p><i class="fas fa-terminal"></i> <strong>Command</strong></p>

            <div class="language-bash highlighter-rouge"><div class="highlight"><pre class="highlight"><code><span class="nb">sudo </span>apt <span class="nb">install </span>openjdk-8-jdk
</code></pre></div>            </div>
          </li>
        </ul>
      </li>
    </ul>
  </li>
  <li>
    <p><i class="fas fa-code-branch"></i> <a href="https://git-scm.com/downloads">Git</a></p>

    <ul>
      <li><i class="fab fa-windows"></i> <a href="https://github.com/git-for-windows/git/releases/download/v2.21.0.windows.1/Git-2.21.0-64-bit.exe">Windows</a></li>
      <li><i class="fab fa-apple"></i> <a href="https://sourceforge.net/projects/git-osx-installer/files/git-2.21.0-intel-universal-mavericks.dmg/download?use_mirror=autoselect">Mac</a></li>
      <li><i class="fab fa-linux"></i> <a href="https://git-scm.com/download/linux">Linux</a>
        <ul>
          <li>
            <p><i class="fas fa-terminal"></i> <strong>Command</strong></p>

            <div class="language-bash highlighter-rouge"><div class="highlight"><pre class="highlight"><code><span class="nb">sudo </span>apt-get <span class="nb">install </span>git
</code></pre></div>            </div>
          </li>
        </ul>
      </li>
    </ul>
  </li>
  <li>
    <p><i class="fas fa-terminal"></i> Command Line</p>

    <ul>
      <li>
        <p><i class="fab fa-windows"></i> <strong>Windows</strong></p>

        <ol>
          <li>Keys: <strong>Windows + R</strong></li>
          <li>
            <p><i class="fas fa-terminal"></i> <strong>Command</strong></p>

            <div class="language-bash highlighter-rouge"><div class="highlight"><pre class="highlight"><code>Cmd
</code></pre></div>            </div>
          </li>
        </ol>
      </li>
      <li>
        <p><i class="fab fa-apple"></i> <strong>Mac</strong></p>

        <ol>
          <li>Keys: <strong>Shift + Cmd + U</strong></li>
          <li>
            <p><i class="fas fa-terminal"></i> <strong>Command</strong></p>

            <div class="language-bash highlighter-rouge"><div class="highlight"><pre class="highlight"><code>Terminal
</code></pre></div>            </div>
          </li>
        </ol>
      </li>
      <li>
        <p><i class="fab fa-linux"></i> <strong>Linux</strong></p>

        <ul>
          <li>Locally:
            <ul>
              <li>Keys: <strong>Alt+F1~7</strong><br />
or</li>
              <li>
                <p><i class="fas fa-terminal"></i> <strong>Command</strong></p>

                <div class="language-bash highlighter-rouge"><div class="highlight"><pre class="highlight"><code>Terminal
</code></pre></div>                </div>
              </li>
            </ul>
          </li>
          <li>Remotely:
            <ul>
              <li>
                <p><i class="fas fa-terminal"></i> <strong>Command</strong></p>

                <div class="language-bash highlighter-rouge"><div class="highlight"><pre class="highlight"><code>ssh ip-address
</code></pre></div>                </div>
                <p>or</p>
                <div class="language-bash highlighter-rouge"><div class="highlight"><pre class="highlight"><code>ssh name-of-system
</code></pre></div>                </div>
              </li>
            </ul>
          </li>
        </ul>
      </li>
    </ul>
  </li>
</ul>

<h2 id="-java"><i class="fab fa-java"></i> Java</h2>

<ul>
  <li>
    <h3 id="-version-validation"><i class="fas fa-code-branch"></i> Version validation</h3>

    <ul>
      <li>
        <p><i class="fas fa-terminal"></i> <strong>Command</strong></p>

        <div class="language-bash highlighter-rouge"><div class="highlight"><pre class="highlight"><code>javac <span class="nt">--version</span>
</code></pre></div>        </div>
      </li>
      <li><i class="fab fa-windows"></i> <strong>Windows</strong>
<img src="/assets/images/posts/javac_version_windows.png" alt="" /></li>
      <li><i class="fab fa-apple"></i> <strong>Mac</strong>
<img src="/assets/images/posts/javac_version_mac.png" alt="" /></li>
      <li><i class="fab fa-linux"></i> <strong>Linux</strong>
<img src="/assets/images/posts/javac_version_linux.png" alt="" /></li>
    </ul>
  </li>
  <li>
    <h3 id="-program-creation"><i class="fas fa-edit"></i> Program creation</h3>

    <ul>
      <li>
        <p><i class="fas fa-code"></i> Code (Principal.java)</p>

        <div class="language-java highlighter-rouge"><div class="highlight"><pre class="highlight"><code><span class="kd">class</span> <span class="nc">Principal</span> <span class="o">{</span>
  <span class="kd">private</span> <span class="kd">static</span> <span class="kt">void</span> <span class="nf">dormir</span><span class="o">()</span> <span class="o">{</span>
    <span class="k">try</span> <span class="o">{</span> <span class="nc">Thread</span><span class="o">.</span><span class="na">sleep</span><span class="o">(</span><span class="mi">5000</span><span class="o">);</span> <span class="o">}</span>
    <span class="k">catch</span> <span class="o">(</span><span class="nc">InterruptedException</span> <span class="n">ex</span><span class="o">)</span> <span class="o">{</span> 
      <span class="nc">Thread</span><span class="o">.</span><span class="na">currentThread</span><span class="o">().</span><span class="na">interrupt</span><span class="o">();</span> 
    <span class="o">}</span>
  <span class="o">}</span>
  <span class="kd">public</span> <span class="kd">static</span> <span class="kt">void</span> <span class="nf">main</span><span class="o">(</span><span class="nc">String</span><span class="o">[]</span> <span class="n">args</span><span class="o">)</span> <span class="o">{</span>
    <span class="nc">System</span><span class="o">.</span><span class="na">out</span><span class="o">.</span><span class="na">println</span><span class="o">(</span><span class="s">"3"</span><span class="o">);</span>
    <span class="n">dormir</span><span class="o">();</span>
    <span class="nc">System</span><span class="o">.</span><span class="na">out</span><span class="o">.</span><span class="na">println</span><span class="o">(</span><span class="s">"2"</span><span class="o">);</span>
    <span class="n">dormir</span><span class="o">();</span>
    <span class="nc">System</span><span class="o">.</span><span class="na">out</span><span class="o">.</span><span class="na">println</span><span class="o">(</span><span class="s">"1"</span><span class="o">);</span>
  <span class="o">}</span>
<span class="o">}</span>
</code></pre></div>        </div>
      </li>
      <li><i class="fab fa-windows"></i> <strong>Windows</strong>
<img src="/assets/images/posts/make_source_windows.png" alt="" /></li>
      <li><i class="fab fa-apple"></i> <strong>Mac</strong>
<img src="/assets/images/posts/make_source_mac.png" alt="" /></li>
      <li><i class="fab fa-linux"></i> <strong>Linux</strong>
<img src="/assets/images/posts/make_source_linux.png" alt="" /></li>
    </ul>
  </li>
  <li>
    <h3 id="-program-display"><i class="fas fa-eye"></i> Program display</h3>

    <ul>
      <li><i class="fab fa-windows"></i> <strong>Windows</strong>
<img src="/assets/images/posts/show_source_windows.png" alt="" /></li>
      <li><i class="fab fa-apple"></i> <strong>Mac</strong>
<img src="/assets/images/posts/show_source_mac.png" alt="" /></li>
      <li><i class="fab fa-linux"></i> <strong>Linux</strong>
<img src="/assets/images/posts/show_source_linux.png" alt="" /></li>
    </ul>
  </li>
  <li>
    <h3 id="-program-modification"><i class="fas fa-edit"></i> Program modification</h3>

    <ul>
      <li><i class="fab fa-windows"></i> <strong>Windows</strong>
        <ul>
          <li>Notepad</li>
        </ul>
      </li>
      <li><i class="fab fa-apple"></i> <strong>Mac</strong>
        <ul>
          <li>vi, vim</li>
          <li>nano</li>
        </ul>
      </li>
      <li><i class="fab fa-linux"></i> <strong>Linux</strong>
        <ul>
          <li>vi, vim</li>
          <li>nano</li>
        </ul>
      </li>
    </ul>
  </li>
  <li>
    <h3 id="-program-compilation"><i class="fas fa-filter"></i> Program compilation</h3>

    <ul>
      <li><i class="fab fa-windows"></i> <strong>Windows</strong>
<img src="/assets/images/posts/compile_windows.png" alt="" /></li>
      <li><i class="fab fa-apple"></i> <strong>Mac</strong>
<img src="/assets/images/posts/compile_mac.png" alt="" /></li>
      <li><i class="fab fa-linux"></i> <strong>Linux</strong>
<img src="/assets/images/posts/compile_linux.png" alt="" /></li>
    </ul>
  </li>
  <li>
    <h3 id="-program-execution"><i class="fas fa-microchip"></i> Program execution</h3>

    <ul>
      <li><i class="fab fa-windows"></i> <strong>Windows</strong>
<img src="/assets/images/posts/run_windows.png" alt="" /></li>
      <li><i class="fab fa-apple"></i> <strong>Mac</strong>
<img src="/assets/images/posts/run_mac.png" alt="" /></li>
      <li><i class="fab fa-linux"></i> <strong>Linux</strong>
<img src="/assets/images/posts/run_linux.png" alt="" /></li>
    </ul>
  </li>
</ul>

<h2 id="-git"><i class="fab fa-git-square" aria-hiddden="true"></i> Git</h2>

<ul>
  <li>
    <h3 id="-version-validation-1"><i class="fas fa-code-branch"></i> Version validation</h3>

    <ul>
      <li>
        <p><i class="fas fa-book"></i> <a href="https://git-scm.com/book/en/v2/Getting-Started-The-Command-Line">The Command Line</a> <i class="fas fa-external-link-square-alt"></i></p>
      </li>
      <li>
        <p><i class="fas fa-terminal"></i> <strong>Command</strong></p>

        <div class="language-bash highlighter-rouge"><div class="highlight"><pre class="highlight"><code>git <span class="nt">--version</span>
</code></pre></div>        </div>
      </li>
      <li><i class="fab fa-windows"></i> <strong>Windows</strong>
<img src="/assets/images/posts/git_version_windows.png" alt="" /></li>
      <li><i class="fab fa-apple"></i> <strong>Mac</strong>
<img src="/assets/images/posts/git_version_mac.png" alt="" /></li>
      <li><i class="fab fa-linux"></i> <strong>Linux</strong>
<img src="/assets/images/posts/git_version_linux.png" alt="" /></li>
    </ul>
  </li>
  <li>
    <h3 id="-repository-initialization"><i class="fas fa-folder"></i> Repository initialization</h3>

    <ul>
      <li>
        <p><i class="fas fa-book"></i> <a href="https://git-scm.com/book/en/v2/Git-Basics-Getting-a-Git-Repository#_getting_a_repo">Getting a Git Repository</a> <i class="fas fa-external-link-square-alt"></i></p>
      </li>
      <li>
        <p><i class="fas fa-terminal"></i> <strong>Command</strong></p>

        <div class="language-bash highlighter-rouge"><div class="highlight"><pre class="highlight"><code>git init
</code></pre></div>        </div>
      </li>
      <li>
        <p><i class="fab fa-windows"></i> <strong>Windows</strong> | <i class="fab fa-apple"></i> <strong>Mac</strong> | <i class="fab fa-linux"></i> <strong>Linux</strong>
<img src="/assets/images/posts/git_init_windows.png" alt="" /></p>
      </li>
    </ul>
  </li>
  <li>
    <h3 id="-ignore-include-bytecode"><i class="fas fa-folder-minus"></i> Ignore include bytecode</h3>

    <ul>
      <li>
        <p><i class="fas fa-book"></i> <a href="https://git-scm.com/book/en/v2/Git-Basics-Recording-Changes-to-the-Repository#_ignoring">Ignoring Files</a> <i class="fas fa-external-link-square-alt"></i></p>
      </li>
      <li>
        <p><i class="fas fa-terminal"></i> <strong>Command</strong></p>

        <div class="language-bash highlighter-rouge"><div class="highlight"><pre class="highlight"><code>.gitignore
</code></pre></div>        </div>
      </li>
      <li>
        <p><i class="fab fa-windows"></i> <strong>Windows</strong> | <i class="fab fa-apple"></i> <strong>Mac</strong> | <i class="fab fa-linux"></i> <strong>Linux</strong>
<img src="/assets/images/posts/gitignore_windows.png" alt="" /></p>
      </li>
    </ul>
  </li>
  <li>
    <h3 id="-adding-files"><i class="fas fa-folder-plus"></i> Adding files</h3>

    <ul>
      <li>
        <p><i class="fas fa-book"></i> <a href="https://git-scm.com/book/en/v2/Git-Basics-Recording-Changes-to-the-Repository#_tracking_files">Tracking New Files</a> <i class="fas fa-external-link-square-alt"></i></p>
      </li>
      <li>
        <p><i class="fas fa-terminal"></i> <strong>Command</strong></p>

        <div class="language-bash highlighter-rouge"><div class="highlight"><pre class="highlight"><code>git add <span class="nb">.</span>
</code></pre></div>        </div>
      </li>
      <li>
        <p><i class="fab fa-windows"></i> <strong>Windows</strong> | <i class="fab fa-apple"></i> <strong>Mac</strong> | <i class="fab fa-linux"></i> <strong>Linux</strong>
<img src="/assets/images/posts/git_add_windows.png" alt="" /></p>
      </li>
    </ul>
  </li>
  <li>
    <h3 id="-git-configuration"><i class="fas fa-toggle-on"></i> Git configuration</h3>

    <ul>
      <li>
        <p><i class="fas fa-book"></i> <a href="https://git-scm.com/book/en/v2/Getting-Started-First-Time-Git-Setup#_your_identity">Your Identity</a> <i class="fas fa-external-link-square-alt"></i></p>
      </li>
      <li>
        <p><i class="fas fa-terminal"></i> <strong>Commands</strong></p>

        <div class="language-bash highlighter-rouge"><div class="highlight"><pre class="highlight"><code>git config <span class="nt">--global</span> user.email <span class="s2">"usuario@correo.com"</span>
git config <span class="nt">--global</span> user.email <span class="s2">"Nombre de Usuario"</span>
</code></pre></div>        </div>
      </li>
      <li>
        <p><i class="fab fa-windows"></i> <strong>Windows</strong> | <i class="fab fa-apple"></i> <strong>Mac</strong> | <i class="fab fa-linux"></i> <strong>Linux</strong>
<img src="/assets/images/posts/git_config_windows.png" alt="" /></p>
      </li>
    </ul>
  </li>
  <li>
    <h3 id="-consolidation-of-changes"><i class="fas fa-database"></i> Consolidation of changes</h3>

    <ul>
      <li>
        <p><i class="fas fa-book"></i> <a href="https://git-scm.com/book/en/v2/Git-Basics-Recording-Changes-to-the-Repository#_committing_changes">Committing Your Changes</a> <i class="fas fa-external-link-square-alt"></i></p>
      </li>
      <li>
        <p><i class="fas fa-terminal"></i> <strong>Command</strong></p>

        <div class="language-bash highlighter-rouge"><div class="highlight"><pre class="highlight"><code>git commit <span class="nt">-m</span> <span class="s2">"Description of the consolidation"</span>
</code></pre></div>        </div>
      </li>
      <li>
        <p><i class="fab fa-windows"></i> <strong>Windows</strong> | <i class="fab fa-apple"></i> <strong>Mac</strong> | <i class="fab fa-linux"></i> <strong>Linux</strong>
<img src="/assets/images/posts/git_commit_windows.png" alt="" /></p>
      </li>
    </ul>
  </li>
  <li>
    <h3 id="-connect-repo-local-to-remote"><i class="fas fa-link"></i> Connect repo-local to remote</h3>

    <ul>
      <li>
        <p><i class="fas fa-info-circle"></i> <strong>NOTE:</strong> The repository must exist. <br />See example of <a href="https://nelbren.com/en/tutorial/Version_Control_of_SoloLearn_in_Github/#2">Create repository on Github</a> <i class="fas fa-external-link-square-alt"></i></p>
      </li>
      <li>
        <p><i class="fas fa-book"></i> <a href="https://git-scm.com/book/en/v2/Git-Basics-Working-with-Remotes#_adding_remote_repositories">Adding Remote Repositories</a> <i class="fas fa-external-link-square-alt"></i></p>
      </li>
      <li>
        <p><i class="fas fa-terminal"></i> <strong>Command</strong>
:w</p>

        <div class="language-bash highlighter-rouge"><div class="highlight"><pre class="highlight"><code>git remote add origin https://github.com/USER/PATH.git
</code></pre></div>        </div>
      </li>
      <li>
        <p><i class="fab fa-windows"></i> <strong>Windows</strong> | <i class="fab fa-apple"></i> <strong>Mac</strong> | <i class="fab fa-linux"></i> <strong>Linux</strong>
<img src="/assets/images/posts/git_remote_windows.png" alt="" /></p>
      </li>
    </ul>
  </li>
  <li>
    <h3 id="-send-changes-to-the-repo-remote"><i class="fas fa-external-link-alt"></i> Send changes to the repo-remote</h3>

    <ul>
      <li>
        <p><i class="fas fa-book"></i> <a href="https://git-scm.com/book/en/v2/Git-Basics-Working-with-Remotes#_pushing_remotes">Pushing to Your Remotes</a> <i class="fas fa-external-link-square-alt"></i></p>
      </li>
      <li>
        <p><i class="fas fa-terminal"></i> <strong>Command</strong></p>

        <div class="language-bash highlighter-rouge"><div class="highlight"><pre class="highlight"><code>git push <span class="nt">-u</span> origin master
</code></pre></div>        </div>
      </li>
      <li>
        <p><i class="fab fa-windows"></i> <strong>Windows</strong> | <i class="fab fa-apple"></i> <strong>Mac</strong> | <i class="fab fa-linux"></i> <strong>Linux</strong>
<img src="/assets/images/posts/git_push_1de2_windows.png" alt="" />
<img src="/assets/images/posts/git_push_2de2_windows.png" alt="" /></p>
      </li>
    </ul>
  </li>
  <li>
    <h3 id="-see-consolidation-in-github"><i class="fa fa-eye"></i> See consolidation in GitHub</h3>

    <ul>
      <li>
        <p><i class="fab fa-github"></i> <a href="https://github.com/nelbren/desplegar_321">Repository in GitHub</a> <i class="fas fa-external-link-square-alt"></i></p>
      </li>
      <li>
        <p><i class="fab fa-windows"></i> <strong>Windows</strong> | <i class="fab fa-apple"></i> <strong>Mac</strong> | <i class="fab fa-linux"></i> <strong>Linux</strong>
<img src="/assets/images/posts/github_result.png" alt="" /></p>
      </li>
    </ul>
  </li>
</ul>

<h2 id="-references"><i class="fas fa-link" aria-hidden="true"></i> References</h2>
<ul>
  <li><i class="fab fa-git-square" aria-hiddden="true"></i> <a href="https://git-scm.com/book/es/v2">Pro Git book</a> <i class="fas fa-external-link-square-alt"></i></li>
  <li><i class="fab fa-java" aria-hiddden="true"></i> <a href="http://mmc.geofisica.unam.mx/cursos/mcst-2007-II/Java/Java%20desde%20Cero.pdf">Java desde Cero</a> <i class="fas fa-external-link-square-alt"></i></li>
  <li><i class="fab fa-git-square" aria-hiddden="true"></i> <a href="http://rogerdudler.github.io/git-guide/index.es.html">git - la guía sencilla</a> <i class="fas fa-external-link-square-alt"></i></li>
  <li><i class="fab fa-java" aria-hiddden="true"></i> <a href="https://introcs.cs.princeton.edu/java/11cheatsheet/">Java Programming Cheatsheet</a> <i class="fas fa-external-link-square-alt"></i></li>
  <li><i class="fab fa-java" aria-hiddden="true"></i> <a href="ftp://soporte.uson.mx/PUBLICO/02_ING.SISTEMAS.DE.INFORMACION/PPI2/Java%20Manual%20de%20Referencia,%207ma%20Edici%F3n%20-%20Herbert%20Schildt-FREELIBROS.ORG.pdf">Java: manual de referencia, 7ma Edición</a> <i class="fas fa-external-link-square-alt"></i></li>
</ul>

<hr class="small" />

<p><img src="/assets/images/posts/origin_and_master_merge.jpg" alt="" /></p>

<hr class="small" />

<p class="text-center notice--success">MADE WITH <i class="fas fa-heart"></i> BY <strong><a href="/en/about/">NELBREN</a></strong></p>]]></content><author><name>Martin Nelbren Cuellar</name></author><category term="en" /><category term="develop" /><category term="git" /><category term="github" /><category term="bash" /><category term="cmd" /><category term="java" /><summary type="html"><![CDATA[A quick guide on how to use Java and Git in the Command Line in Windows, Mac or Linux]]></summary></entry><entry><title type="html">Uso de Java y Git en la Linea de Comando</title><link href="https://nelbren.com/es/develop/Use_Java_and_Git_in_Command_Line/" rel="alternate" type="text/html" title="Uso de Java y Git en la Linea de Comando" /><published>2019-04-20T00:00:00-06:00</published><updated>2019-03-20T20:19:00-06:00</updated><id>https://nelbren.com/es/develop/Use_Java_and_Git_in_Command_Line</id><content type="html" xml:base="https://nelbren.com/es/develop/Use_Java_and_Git_in_Command_Line/"><![CDATA[<h2 id="-objetivo"><i class="fas fa-bullseye"></i> Objetivo</h2>

<p>Aprender a utilizar:</p>

<ul>
  <li>
    <p><i class="fab fa-java"></i> <strong>Java</strong></p>

    <p><i class="fa fa-quote-left" aria-hidden="true"></i> 
<em>Es un lenguaje de programación de propósito general, concurrente, orientado a objetos, que fue diseñado específicamente para tener tan pocas dependencias de implementación como fuera posible.</em> 
<i class="fa fa-quote-right" aria-hidden="true"></i>
<br />
<i class="fab fa-wikipedia-w"></i>
<a href="https://es.wikipedia.org/wiki/Java_(lenguaje_de_programaci%C3%B3n)">Wikipedia</a> 
<i class="fas fa-external-link-square-alt"></i></p>
  </li>
  <li>
    <p><i class="fas fa-code-branch"></i> <strong>Git</strong></p>

    <p><i class="fa fa-quote-left" aria-hidden="true"></i> 
<em>Es un software de control de versiones diseñado por Linus Torvalds, pensando en la eficiencia y la confiabilidad del mantenimiento de versiones de aplicaciones cuando éstas tienen un gran número de archivos de código fuente.</em> 
<i class="fa fa-quote-right" aria-hidden="true"></i>
<br />
<i class="fab fa-wikipedia-w"></i>
<a href="https://es.wikipedia.org/wiki/Git">Wikipedia</a> 
<i class="fas fa-external-link-square-alt"></i></p>
  </li>
  <li>
    <p><i class="fas fa-terminal"></i> <strong>Línea de Comando</strong></p>

    <p><i class="fa fa-quote-left" aria-hidden="true"></i> 
<em>La interfaz de línea de comandos o interfaz de línea de órdenes (en inglés, command-line interface, CLI) es un método que permite a los usuarios dar instrucciones a algún programa informático por medio de una línea de texto simple.</em> 
<i class="fa fa-quote-right" aria-hidden="true"></i>
<br />
<i class="fab fa-wikipedia-w"></i>
<a href="https://es.wikipedia.org/wiki/Interfaz_de_l%C3%ADnea_de_comandos">Wikipedia</a> 
<i class="fas fa-external-link-square-alt"></i></p>
  </li>
</ul>

<h2 id="-descargas"><i class="fa fa-arrow-circle-down" aria-hidden="true"></i> Descargas</h2>

<p class="notice--danger"><strong>Enlaces de programas actualizados al 2019-04-20.</strong></p>

<ul>
  <li>
    <p><i class="fab fa-java"></i> <a href="https://www.java.com/es/download/">Java</a></p>

    <ul>
      <li><i class="fab fa-windows"></i> <a href="https://download.oracle.com/otn/java/jdk/8u211-b12/478a62b7d4e34b78b671c754eaaf38ab/jdk-8u211-windows-x64.exe">Windows</a></li>
      <li><i class="fab fa-apple"></i> <a href="https://download.oracle.com/otn/java/jdk/8u211-b12/478a62b7d4e34b78b671c754eaaf38ab/jdk-8u211-macosx-x64.dmg">Mac</a></li>
      <li><i class="fab fa-linux"></i> <a href="https://download.oracle.com/otn/java/jdk/8u211-b12/478a62b7d4e34b78b671c754eaaf38ab/jdk-8u211-linux-x64.tar.gz">Linux</a>
        <ul>
          <li><i class="fas fa-terminal"></i> <strong>Comando</strong>
            <div class="language-bash highlighter-rouge"><div class="highlight"><pre class="highlight"><code><span class="nb">sudo </span>apt <span class="nb">install </span>openjdk-8-jdk
</code></pre></div>            </div>
          </li>
        </ul>
      </li>
    </ul>
  </li>
  <li>
    <p><i class="fas fa-code-branch"></i> <a href="https://git-scm.com/downloads">Git</a></p>

    <ul>
      <li><i class="fab fa-windows"></i> <a href="https://github.com/git-for-windows/git/releases/download/v2.21.0.windows.1/Git-2.21.0-64-bit.exe">Windows</a></li>
      <li><i class="fab fa-apple"></i> <a href="https://sourceforge.net/projects/git-osx-installer/files/git-2.21.0-intel-universal-mavericks.dmg/download?use_mirror=autoselect">Mac</a></li>
      <li><i class="fab fa-linux"></i> <a href="https://git-scm.com/download/linux">Linux</a>
        <ul>
          <li><i class="fas fa-terminal"></i> <strong>Comando</strong>
            <div class="language-bash highlighter-rouge"><div class="highlight"><pre class="highlight"><code><span class="nb">sudo </span>apt-get <span class="nb">install </span>git
</code></pre></div>            </div>
          </li>
        </ul>
      </li>
    </ul>
  </li>
  <li>
    <p><i class="fas fa-terminal"></i> Linea de Comando</p>

    <ul>
      <li>
        <p><i class="fab fa-windows"></i> <strong>Windows</strong></p>

        <ol>
          <li>Teclas: <strong>Windows + R</strong></li>
          <li>
            <p><i class="fas fa-terminal"></i> <strong>Comando</strong></p>

            <div class="language-bash highlighter-rouge"><div class="highlight"><pre class="highlight"><code>Cmd
</code></pre></div>            </div>
          </li>
        </ol>
      </li>
      <li>
        <p><i class="fab fa-apple"></i> <strong>Mac</strong></p>

        <ol>
          <li>Teclas: <strong>Shift + Cmd + U</strong></li>
          <li>
            <p><i class="fas fa-terminal"></i> <strong>Comando</strong></p>

            <div class="language-bash highlighter-rouge"><div class="highlight"><pre class="highlight"><code>Terminal
</code></pre></div>            </div>
          </li>
        </ol>
      </li>
      <li>
        <p><i class="fab fa-linux"></i> <strong>Linux</strong></p>

        <ul>
          <li>Localmente:
            <ul>
              <li>Teclas: <strong>Alt+F1~7</strong><br />
ó</li>
              <li><i class="fas fa-terminal"></i> <strong>Comando</strong>
                <div class="language-bash highlighter-rouge"><div class="highlight"><pre class="highlight"><code>Terminal
</code></pre></div>                </div>
              </li>
            </ul>
          </li>
          <li>Remotamente:
            <ul>
              <li><i class="fas fa-terminal"></i> <strong>Comando</strong>
                <div class="language-bash highlighter-rouge"><div class="highlight"><pre class="highlight"><code>ssh dirección-ip
</code></pre></div>                </div>
                <p>ó</p>
                <div class="language-bash highlighter-rouge"><div class="highlight"><pre class="highlight"><code>ssh nombre-de-sistema
</code></pre></div>                </div>
              </li>
            </ul>
          </li>
        </ul>
      </li>
    </ul>
  </li>
</ul>

<h2 id="-java"><i class="fab fa-java"></i> Java</h2>

<ul>
  <li>
    <h3 id="-validación-de-versión"><i class="fas fa-code-branch"></i> Validación de versión</h3>

    <ul>
      <li><i class="fas fa-terminal"></i> <strong>Comando</strong>
        <div class="language-bash highlighter-rouge"><div class="highlight"><pre class="highlight"><code>javac <span class="nt">--version</span>
</code></pre></div>        </div>
      </li>
      <li><i class="fab fa-windows"></i> <strong>Windows</strong>
<img src="/assets/images/posts/javac_version_windows.png" alt="" /></li>
      <li><i class="fab fa-apple"></i> <strong>Mac</strong>
<img src="/assets/images/posts/javac_version_mac.png" alt="" /></li>
      <li><i class="fab fa-linux"></i> <strong>Linux</strong>
<img src="/assets/images/posts/javac_version_linux.png" alt="" /></li>
    </ul>
  </li>
  <li>
    <h3 id="-creación-de-programa"><i class="fas fa-edit"></i> Creación de programa</h3>

    <ul>
      <li>
        <p><i class="fas fa-code"></i> Código (Principal.java)</p>

        <div class="language-java highlighter-rouge"><div class="highlight"><pre class="highlight"><code><span class="kd">class</span> <span class="nc">Principal</span> <span class="o">{</span>
  <span class="kd">private</span> <span class="kd">static</span> <span class="kt">void</span> <span class="nf">dormir</span><span class="o">()</span> <span class="o">{</span>
    <span class="k">try</span> <span class="o">{</span> <span class="nc">Thread</span><span class="o">.</span><span class="na">sleep</span><span class="o">(</span><span class="mi">5000</span><span class="o">);</span> <span class="o">}</span>
    <span class="k">catch</span> <span class="o">(</span><span class="nc">InterruptedException</span> <span class="n">ex</span><span class="o">)</span> <span class="o">{</span> 
      <span class="nc">Thread</span><span class="o">.</span><span class="na">currentThread</span><span class="o">().</span><span class="na">interrupt</span><span class="o">();</span> 
    <span class="o">}</span>
  <span class="o">}</span>
  <span class="kd">public</span> <span class="kd">static</span> <span class="kt">void</span> <span class="nf">main</span><span class="o">(</span><span class="nc">String</span><span class="o">[]</span> <span class="n">args</span><span class="o">)</span> <span class="o">{</span>
    <span class="nc">System</span><span class="o">.</span><span class="na">out</span><span class="o">.</span><span class="na">println</span><span class="o">(</span><span class="s">"3"</span><span class="o">);</span>
    <span class="n">dormir</span><span class="o">();</span>
    <span class="nc">System</span><span class="o">.</span><span class="na">out</span><span class="o">.</span><span class="na">println</span><span class="o">(</span><span class="s">"2"</span><span class="o">);</span>
    <span class="n">dormir</span><span class="o">();</span>
    <span class="nc">System</span><span class="o">.</span><span class="na">out</span><span class="o">.</span><span class="na">println</span><span class="o">(</span><span class="s">"1"</span><span class="o">);</span>
  <span class="o">}</span>
<span class="o">}</span>
</code></pre></div>        </div>
      </li>
      <li><i class="fab fa-windows"></i> <strong>Windows</strong>
<img src="/assets/images/posts/make_source_windows.png" alt="" /></li>
      <li><i class="fab fa-apple"></i> <strong>Mac</strong>
<img src="/assets/images/posts/make_source_mac.png" alt="" /></li>
      <li><i class="fab fa-linux"></i> <strong>Linux</strong>
<img src="/assets/images/posts/make_source_linux.png" alt="" /></li>
    </ul>
  </li>
  <li>
    <h3 id="-visualización-de-programa"><i class="fas fa-eye"></i> Visualización de programa</h3>

    <ul>
      <li><i class="fab fa-windows"></i> <strong>Windows</strong>
<img src="/assets/images/posts/show_source_windows.png" alt="" /></li>
      <li><i class="fab fa-apple"></i> <strong>Mac</strong>
<img src="/assets/images/posts/show_source_mac.png" alt="" /></li>
      <li><i class="fab fa-linux"></i> <strong>Linux</strong>
<img src="/assets/images/posts/show_source_linux.png" alt="" /></li>
    </ul>
  </li>
  <li>
    <h3 id="-modificación-de-programa"><i class="fas fa-edit"></i> Modificación de programa</h3>

    <ul>
      <li><i class="fab fa-windows"></i> <strong>Windows</strong>
        <ul>
          <li>Notepad</li>
        </ul>
      </li>
      <li><i class="fab fa-apple"></i> <strong>Mac</strong>
        <ul>
          <li>vi, vim</li>
          <li>nano</li>
        </ul>
      </li>
      <li><i class="fab fa-linux"></i> <strong>Linux</strong>
        <ul>
          <li>vi, vim</li>
          <li>nano</li>
        </ul>
      </li>
    </ul>
  </li>
  <li>
    <h3 id="-compilación-de-programa"><i class="fas fa-filter"></i> Compilación de programa</h3>

    <ul>
      <li><i class="fab fa-windows"></i> <strong>Windows</strong>
<img src="/assets/images/posts/compile_windows.png" alt="" /></li>
      <li><i class="fab fa-apple"></i> <strong>Mac</strong>
<img src="/assets/images/posts/compile_mac.png" alt="" /></li>
      <li><i class="fab fa-linux"></i> <strong>Linux</strong>
<img src="/assets/images/posts/compile_linux.png" alt="" /></li>
    </ul>
  </li>
  <li>
    <h3 id="-ejecución-de-programa"><i class="fas fa-microchip"></i> Ejecución de programa</h3>

    <ul>
      <li><i class="fab fa-windows"></i> <strong>Windows</strong>
<img src="/assets/images/posts/run_windows.png" alt="" /></li>
      <li><i class="fab fa-apple"></i> <strong>Mac</strong>
<img src="/assets/images/posts/run_mac.png" alt="" /></li>
      <li><i class="fab fa-linux"></i> <strong>Linux</strong>
<img src="/assets/images/posts/run_linux.png" alt="" /></li>
    </ul>
  </li>
</ul>

<h2 id="-git"><i class="fab fa-git-square" aria-hiddden="true"></i> Git</h2>

<ul>
  <li>
    <h3 id="-validación-de-versión-1"><i class="fas fa-code-branch"></i> Validación de versión</h3>

    <ul>
      <li>
        <p><i class="fas fa-book"></i> <a href="https://git-scm.com/book/es/v2/Inicio---Sobre-el-Control-de-Versiones-La-L%C3%ADnea-de-Comandos">La Línea de Comandos</a> <i class="fas fa-external-link-square-alt"></i></p>
      </li>
      <li><i class="fas fa-terminal"></i> <strong>Comando</strong>
        <div class="language-bash highlighter-rouge"><div class="highlight"><pre class="highlight"><code>git <span class="nt">--version</span>
</code></pre></div>        </div>
      </li>
      <li><i class="fab fa-windows"></i> <strong>Windows</strong>
<img src="/assets/images/posts/git_version_windows.png" alt="" /></li>
      <li><i class="fab fa-apple"></i> <strong>Mac</strong>
<img src="/assets/images/posts/git_version_mac.png" alt="" /></li>
      <li><i class="fab fa-linux"></i> <strong>Linux</strong>
<img src="/assets/images/posts/git_version_linux.png" alt="" /></li>
    </ul>
  </li>
  <li>
    <h3 id="-inicialización-de-repositorio"><i class="fas fa-folder"></i> Inicialización de repositorio</h3>

    <ul>
      <li>
        <p><i class="fas fa-book"></i> <a href="https://git-scm.com/book/es/v2/Fundamentos-de-Git-Obteniendo-un-repositorio-Git#r_getting_a_repo">Obteniendo un repositorio Git</a> <i class="fas fa-external-link-square-alt"></i></p>
      </li>
      <li><i class="fas fa-terminal"></i> <strong>Comando</strong>
        <div class="language-bash highlighter-rouge"><div class="highlight"><pre class="highlight"><code>git init
</code></pre></div>        </div>
      </li>
      <li><i class="fab fa-windows"></i> <strong>Windows</strong> | <i class="fab fa-apple"></i> <strong>Mac</strong> | <i class="fab fa-linux"></i> <strong>Linux</strong>
<img src="/assets/images/posts/git_init_windows.png" alt="" /></li>
    </ul>
  </li>
  <li>
    <h3 id="-ignorar-incluir-bytecode"><i class="fas fa-folder-minus"></i> Ignorar incluir bytecode</h3>

    <ul>
      <li>
        <p><i class="fas fa-book"></i> <a href="https://git-scm.com/book/es/v2/Fundamentos-de-Git-Guardando-cambios-en-el-Repositorio#r_ignoring">Ignorar archivos</a> <i class="fas fa-external-link-square-alt"></i></p>
      </li>
      <li><i class="fas fa-terminal"></i> <strong>Comando</strong>
        <div class="language-bash highlighter-rouge"><div class="highlight"><pre class="highlight"><code>.gitignore
</code></pre></div>        </div>
      </li>
      <li><i class="fab fa-windows"></i> <strong>Windows</strong> | <i class="fab fa-apple"></i> <strong>Mac</strong> | <i class="fab fa-linux"></i> <strong>Linux</strong>
<img src="/assets/images/posts/gitignore_windows.png" alt="" /></li>
    </ul>
  </li>
  <li>
    <h3 id="-adición-de-archivos"><i class="fas fa-folder-plus"></i> Adición de archivos</h3>

    <ul>
      <li>
        <p><i class="fas fa-book"></i> <a href="https://git-scm.com/book/es/v2/Fundamentos-de-Git-Guardando-cambios-en-el-Repositorio#r_tracking_files">Rastrear Archivos Nuevos</a> <i class="fas fa-external-link-square-alt"></i></p>
      </li>
      <li><i class="fas fa-terminal"></i> <strong>Comando</strong>
        <div class="language-bash highlighter-rouge"><div class="highlight"><pre class="highlight"><code>git add <span class="nb">.</span>
</code></pre></div>        </div>
      </li>
      <li><i class="fab fa-windows"></i> <strong>Windows</strong> | <i class="fab fa-apple"></i> <strong>Mac</strong> | <i class="fab fa-linux"></i> <strong>Linux</strong>
<img src="/assets/images/posts/git_add_windows.png" alt="" /></li>
    </ul>
  </li>
  <li>
    <h3 id="-configuración-de-git"><i class="fas fa-toggle-on"></i> Configuración de git</h3>

    <ul>
      <li>
        <p><i class="fas fa-book"></i> <a href="https://git-scm.com/book/es/v2/Inicio---Sobre-el-Control-de-Versiones-Configurando-Git-por-primera-vez#_tu_identidad">Tu identidad</a> <i class="fas fa-external-link-square-alt"></i></p>
      </li>
      <li><i class="fas fa-terminal"></i> <strong>Comandos</strong>
        <div class="language-bash highlighter-rouge"><div class="highlight"><pre class="highlight"><code>git config <span class="nt">--global</span> user.email <span class="s2">"usuario@correo.com"</span>
git config <span class="nt">--global</span> user.email <span class="s2">"Nombre de Usuario"</span>
</code></pre></div>        </div>
      </li>
      <li><i class="fab fa-windows"></i> <strong>Windows</strong> | <i class="fab fa-apple"></i> <strong>Mac</strong> | <i class="fab fa-linux"></i> <strong>Linux</strong>
<img src="/assets/images/posts/git_config_windows.png" alt="" /></li>
    </ul>
  </li>
  <li>
    <h3 id="-consolidación-de-cambios"><i class="fas fa-database"></i> Consolidación de cambios</h3>

    <ul>
      <li>
        <p><i class="fas fa-book"></i> <a href="https://git-scm.com/book/es/v2/Fundamentos-de-Git-Guardando-cambios-en-el-Repositorio#r_committing_changes">Confirmar tus Cambios</a> <i class="fas fa-external-link-square-alt"></i></p>
      </li>
      <li><i class="fas fa-terminal"></i> <strong>Comando</strong>
        <div class="language-bash highlighter-rouge"><div class="highlight"><pre class="highlight"><code>git commit <span class="nt">-m</span> <span class="s2">"Descripción de la consolidación"</span>
</code></pre></div>        </div>
      </li>
      <li><i class="fab fa-windows"></i> <strong>Windows</strong> | <i class="fab fa-apple"></i> <strong>Mac</strong> | <i class="fab fa-linux"></i> <strong>Linux</strong>
<img src="/assets/images/posts/git_commit_windows.png" alt="" /></li>
    </ul>
  </li>
  <li>
    <h3 id="-conectar-repo-local-a-remoto"><i class="fas fa-link"></i> Conectar repo-local a remoto</h3>

    <ul>
      <li>
        <p><i class="fas fa-info-circle"></i> <strong>NOTA:</strong> El repositorio debe existir. <br />
Ver ejemplo de cómo <a href="https://nelbren.com/es/tutorial/Version_Control_of_SoloLearn_in_Github/#2">Crear repositorio en Gibhub</a> <i class="fas fa-external-link-square-alt"></i></p>
      </li>
      <li>
        <p><i class="fas fa-book"></i> <a href="https://git-scm.com/book/es/v2/Fundamentos-de-Git-Trabajar-con-Remotos#_a%C3%B1adir_repositorios_remotos">Añadir Repositorios Remotos</a> <i class="fas fa-external-link-square-alt"></i></p>
      </li>
      <li><i class="fas fa-terminal"></i> <strong>Comando</strong>
        <div class="language-bash highlighter-rouge"><div class="highlight"><pre class="highlight"><code>git remote add origin https://github.com/USUARIO/RUTA.git
</code></pre></div>        </div>
      </li>
      <li><i class="fab fa-windows"></i> <strong>Windows</strong> | <i class="fab fa-apple"></i> <strong>Mac</strong> | <i class="fab fa-linux"></i> <strong>Linux</strong>
<img src="/assets/images/posts/git_remote_windows.png" alt="" /></li>
    </ul>
  </li>
  <li>
    <h3 id="-enviar-cambios-al-repo-remoto"><i class="fas fa-external-link-alt"></i> Enviar cambios al repo-remoto</h3>

    <ul>
      <li>
        <p><i class="fas fa-book"></i> <a href="https://git-scm.com/book/es/v2/Fundamentos-de-Git-Trabajar-con-Remotos#r_pushing_remotes">Enviar a Tus Remotos</a> <i class="fas fa-external-link-square-alt"></i></p>
      </li>
      <li><i class="fas fa-terminal"></i> <strong>Comando</strong>
        <div class="language-bash highlighter-rouge"><div class="highlight"><pre class="highlight"><code>git push <span class="nt">-u</span> origin master
</code></pre></div>        </div>
      </li>
      <li><i class="fab fa-windows"></i> <strong>Windows</strong> | <i class="fab fa-apple"></i> <strong>Mac</strong> | <i class="fab fa-linux"></i> <strong>Linux</strong>
<img src="/assets/images/posts/git_push_1de2_windows.png" alt="" />
<img src="/assets/images/posts/git_push_2de2_windows.png" alt="" /></li>
    </ul>
  </li>
  <li>
    <h3 id="-ver-consolidación-en-github"><i class="fa fa-eye"></i> Ver consolidación en GitHub</h3>

    <ul>
      <li>
        <p><i class="fab fa-github"></i> <a href="https://github.com/nelbren/desplegar_321">Repositorio en GitHub</a> <i class="fas fa-external-link-square-alt"></i></p>
      </li>
      <li>
        <p><i class="fab fa-windows"></i> <strong>Windows</strong> | <i class="fab fa-apple"></i> <strong>Mac</strong> | <i class="fab fa-linux"></i> <strong>Linux</strong>
<img src="/assets/images/posts/github_result.png" alt="" /></p>
      </li>
    </ul>
  </li>
</ul>

<h2 id="-referencias"><i class="fas fa-link" aria-hidden="true"></i> Referencias</h2>
<ul>
  <li><i class="fab fa-git-square" aria-hiddden="true"></i> <a href="https://git-scm.com/book/es/v2">Pro Git book</a> <i class="fas fa-external-link-square-alt"></i></li>
  <li><i class="fab fa-java" aria-hiddden="true"></i> <a href="http://mmc.geofisica.unam.mx/cursos/mcst-2007-II/Java/Java%20desde%20Cero.pdf">Java desde Cero</a> <i class="fas fa-external-link-square-alt"></i></li>
  <li><i class="fab fa-git-square" aria-hiddden="true"></i> <a href="http://rogerdudler.github.io/git-guide/index.es.html">git - la guía sencilla</a> <i class="fas fa-external-link-square-alt"></i></li>
  <li><i class="fab fa-java" aria-hiddden="true"></i> <a href="https://introcs.cs.princeton.edu/java/11cheatsheet/">Java Programming Cheatsheet</a> <i class="fas fa-external-link-square-alt"></i></li>
  <li><i class="fab fa-java" aria-hiddden="true"></i> <a href="ftp://soporte.uson.mx/PUBLICO/02_ING.SISTEMAS.DE.INFORMACION/PPI2/Java%20Manual%20de%20Referencia,%207ma%20Edici%F3n%20-%20Herbert%20Schildt-FREELIBROS.ORG.pdf">Java: manual de referencia, 7ma Edición</a> <i class="fas fa-external-link-square-alt"></i></li>
</ul>

<hr class="small" />

<p><img src="/assets/images/posts/origin_and_master_merge.jpg" alt="" /></p>

<hr class="small" />

<p class="text-center notice--success">HECHO CON <i class="fas fa-heart"></i> POR <strong><a href="/es/about/">NELBREN</a></strong></p>]]></content><author><name>Martin Nelbren Cuellar</name></author><category term="es" /><category term="develop" /><category term="git" /><category term="github" /><category term="bash" /><category term="cmd" /><category term="java" /><summary type="html"><![CDATA[Una guía rapida de cómo utilizar Java y Git en la Linea de Comando en Windows, Mac o Linux]]></summary></entry></feed>